
Mitsubishi
Outlander Headlight Bulbs Replacement Guide
How to change a burnt out low or high
beam, turn signal or side marker light bulb in a 2014 to 2021 Outlander.

By Paul B. Michaels Author & Photographer Auto Mechanic Since 1989 |
||
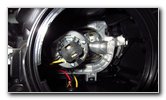
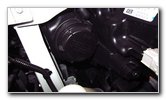
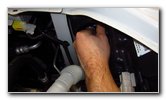
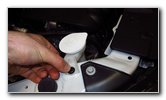
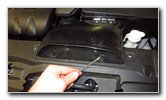
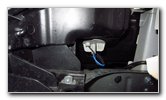
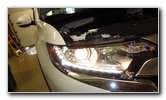
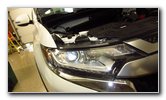 2020 Outlander Headlight |
 Low Beam Dust Cover |
 Twist Counterclockwise |
| This automotive
maintenance tutorial was specifically written to assist owners of the third
generation (2014, 2015, 2016, 2017, 2018, 2019, 2020 & 2021) Mitsubishi
Outlander SUV in changing a burnt out low beam, high beam, front turn signal
or front side marker light bulb in the headlight assemblies. Owners of other Mitsubishi vehicles such as the Outlander Sport, Eclipse Cross, Mirage, Mirage G4, Lancer, ASX, Montero Sport, Pajero, Xpander, Strada and RVR may also find these DIY instructions to be helpful. The compatible replacement light bulb part numbers for this 2020 Outlander SEL are as follows: Low Beam # H7, High Beam # 9005, Front Turn Signal PY21W (amber / orange) and Front Side Marker # W5W (or 2825). If you'd like to have brighter headlights that will also last much longer before burning out like the traditional halogen and incandescent bulbs, install some H7 LED, 9005 LED, PY21W LED and W5W LED units. Attention: Please double check the part numbers in your owner's manual or on the old bulbs before you purchase new ones. The correct part numbers may vary depending on the model year, trim level and your region of the world. The tools that may be needed to access the bulbs (depending on which bulb you need to replace) include a flat head screwdriver and a pop rivet removal tool. The first two steps are to open the hood and then move to the side of the vehicle with the burnt out light bulb. The low beam light is located near the center of the housing and the lens looks similar to an eye. Reach in behind the headlight housing and remove the round black plastic dust cover by rotating it 1/4 turn in the counterclockwise direction. Set the dust cap aside in a safe place. |
||
|
|
||
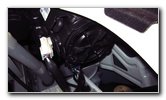
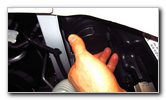
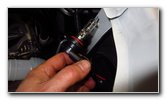
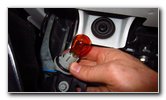
 Base of Old Low Beam |
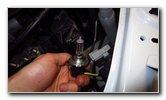 1/4 Turn Counterclockwise |
 Pull Bulb Out of Socket |
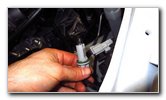
| Rotate the base of
the low beam light bulb socket 1/4 turn in the counterclockwise direction
before pulling it straight out of the housing. Carefully pull the old halogen light bulb straight out of the black plastic electrical connector. If you have trouble separating the old bulb from the socket, try gently wiggling the bulb back and forth while pulling on it. |
||
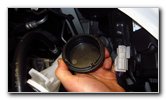
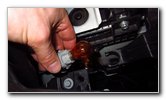
 Push New Bulb In Socket |
 1/4 Turn Clockwise - Lock |
 New Low Beam Installed |
| Try to avoid
touching the glass part of the new halogen bulb with your fingers or
anything greasy in the engine bay. If you do get the new bulb dirty, wipe it clean with a paper towel and some rubbing alcohol. Any oil or grease left on the glass could cause a hot spot which may result in the bulb failing prematurely. Push a new number H7 into the socket. Make sure the new bulb is fully seated in the socket. If you'd like to have brighter low beam lights, install some H7 LED units. Reinsert the socket into the housing and rotate it 1/4 turn in the clockwise direction. Replace the dust cap by twisting it 1/4 turn in the clockwise direction. |
||
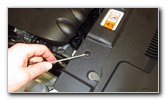
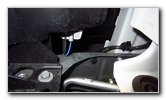
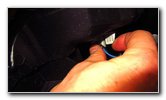
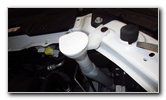 Windshield Washer Fluid |
 Release Pop Rivet |
 Pull Back Fill Tube |
| For easier access
to the high beam light bulb on the passenger side of the vehicle, I
recommend detaching the windshield washer fluid fill tube. Pry up the center of the single black plastic pop rivet with a flat head screwdriver. Then pry out the base of the pop rivet and set it aside in a safe place. Move the washer fluid fill tube out of the way towards the rear of the engine bay. |
||
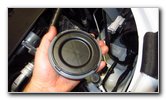
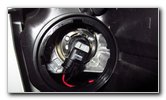
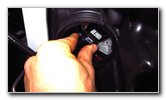
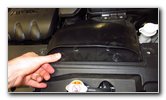
 High Beam Dust Cap |
 Turn Counterclockwise |
 High Beam Bulb Cover |
| Locate the round
black plastic dust cap for the high beam light bulb. Twist off the cover 1/4 turn in the counterclockwise direction. Set the cover aside in a safe place. |
||
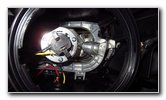
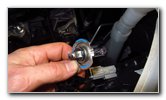
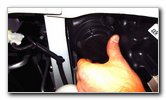
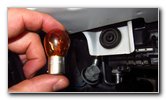
 Old High Beam Bulb |
 1/4 Turn Counterclockwise |
 High Beam Removed |
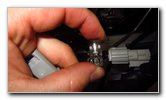
| Rotate the base of
the old high beam light bulb 1/4 turn in the counterclockwise direction
before pulling it straight out of the housing. Push down the release tab on the electrical connector before disconnecting it from the old high beam bulb. Push a new number 9005 bulb straight on to the power plug. You should hear the connector "click" securely into place. Avoid touching the glass part of the new bulb. If you do get it dirty, clean it with an alcohol wipe. If you would like to have brighter high beam lights, install some compatible replacement 9005 LED units. |
||
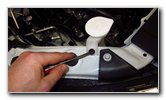
 1/4 Turn Clockwise |
 Replace Dust Cover |
 Replace Pop Rivet |
| Reinsert the bulb
into the housing and rotate it 1/4 turn in the clockwise direction. Replace the dust cap by rotating it 1/4 turn in the clockwise direction. Push the washer fluid fill tube back into position and secure it with the pop rivet. |
||
 Turn Signal - Inner Corner |
 Pry Out Center of Rivet |
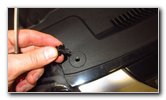 Remove Pop Rivet |
| The front turn
signal light bulb is located near the inner corner of the headlight housing.
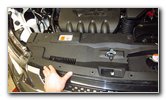
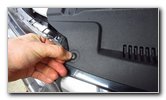
In order to access the turn signal bulb socket, you will have to remove 2 pop rivets on the air intake assembly and another 10 pop rivets on the plastic radiator cover. That is a total of 12 pop rivets that need to be removed for easy access to the front turn signal bulb socket. To unlock the pop rivets, raise the center button or "pin" in the middle of each fastener with a flat head screwdriver. Then pry out the base of the fastener with the screwdriver or a pop rivet removal tool. |
||
 Air Intake Assembly |
 12 Pop Rivets Removed |
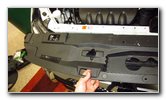 Remove Radiator Cover |
| The two pop rivets
that hold down the front edge of air intake assembly are slightly larger
than the other 10 on the radiator cover. Set the 12 pop rivets aside in a safe place. Carefully lift off the radiator cover and set it aside. |
||
 Turn Signal Bulb Socket |
 1/4 Turn Counterclockwise |
 Remove Old Light Bulb |
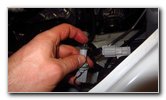
| Once the radiator
cover is out of the way, you'll be able to see the bottom edge of the gray
plastic front turn signal bulb socket. Rotate the bulb socket 1/4 turn in the counterclockwise direction before pulling it straight out. To remove the old bayonet style light bulb, push it down into the socket and rotate it 1/4 turn in the counterclockwise direction before pulling it straight out. |
||
 Install New Light Bulb |
 1/4 Turn Clockwise - Lock |
 Bulb Socket Secured |
| Push a new number
PY21W light bulb straight into
the socket and rotate it 1/4 turn in the clockwise direction to lock it into
place. If you'd like to have brighter front turn signal lights, install some compatible replacement PY21W LED (amber / orange colored) bulbs. Reinsert the bulb socket into the housing and rotate it 1/4 turn in the clockwise direction. Since you already have the radiator cover removed, I recommend replacing the other front turn signal light bulb at the same time to avoid having to do this again in the near future. |
||
 Replace Plastic Cover |
 Air Intake Assembly |
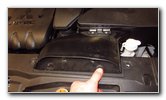 Push In Pop Rivets |
| Lower the plastic
radiator cover back into place. Make sure the pins or buttons in the center of each pop rivet is in the raised and unlocked position. Replace the 10 smaller pop rivets into the radiator cover. Replace the two slightly larger pop rivets into the front edge of the engine air intake assembly. |
||
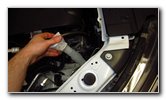
 Replace Other Fasteners |
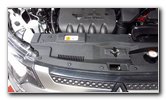 Radiator Cover Secured |
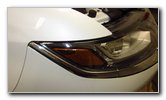 Front Side Marker Light |
| Double check that
all twelve of the pop rivets have been replaced. The front side marker light is located at the outer corner of the headlight assembly. |
||
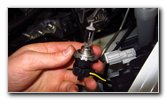
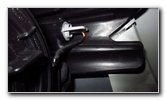 Side Marker Bulb Socket |
 1/4 Turn Counterclockwise |
 Pull Out Old Light Bulb |
| Reach in behind the
headlight housing and rotate the small grey plastic bulb socket 1/4 turn in
the counterclockwise direction before pulling it straight out. Carefully pull the old light bulb straight out of the socket. If you have trouble removing a stuck or stubborn old light bulb due to corrosion (rust) or debris such as sand, put on some protective gloves and try gently wiggling the bulb back and forth while pulling it straight out. |
||
 Push In New Light Bulb |
 1/4 Turn Clockwise |
 Test New Headlight Bulbs |
| Push a new number
W5W miniature wedge base light
bulb straight into the socket. Clean off the new bulb with a microfiber towel or an alcohol wipe. If you'd like to have brighter front side marker lights, install some compatible replacement W5W LED units. Reinsert the bulb socket into the opening in the housing and rotate it 1/4 turn in the clockwise direction. To test the new light bulbs, turn on the headlights, activate the hazard lights and flash the high beams. Be sure to write down the bulb change in your SUV's service records. Please check out all of the
2014-2021 Mitsubishi Outlander DIY Repair & Maintenance Guides. |
||
| If you found this guide to be helpful,
please consider making a small donation by clicking on the PayPal.com
"Donate" button located to the right of this paragraph. Thank you!
(Note: I am not a registered charity. Donations are not tax deductible.) |