
Kia Soul
Spark Plugs Replacement Guide
How to check or change the spark plugs in
the Nu 2.0L GDI I4 engine in a 2nd generation 2014 to 2019 Kia Soul.

By Paul B. Michaels Author & Photographer Auto Mechanic Since 1989 |
||
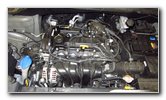
 2019 Soul Nu 2.0L GDI |
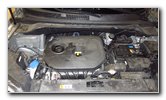
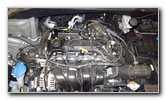
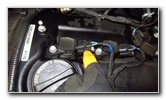
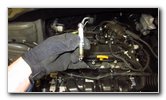
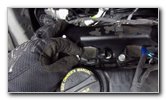
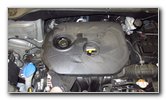 Pull Off Engine Cover |
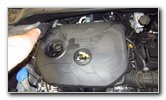 Lift Off Rear of Cover |
| This automotive
maintenance tutorial was specifically written to assist owners of the 2nd
generation (2014, 2015, 2016, 2017, 2018 & 2019 model years) Kia Soul in
checking or changing the spark plugs in the Nu 2.0 liter GDI inline four
cylinder engine. The procedure should also be the same or very similar for
the Gamma 1.6L GDI I4 engine or the Gamma 1.6L T-GDI turbocharged I4 engine. Owners of other Kia, Hyundai or Genesis vehicles such as the Niro, Sportage, Sedona, Telluride, Sorento, Rio, Forte, Optima, K900, Cadenza, Stinger, Tucson, Santa Fe, Kona, Palisade, Elantra, Sonata, Accent, Veloster, Ioniq, Nexo, Venue, G70, G80 and G90 may also find these DIY instructions to be helpful. The OEM spark plugs in this 2019 Kia Soul with the Nu 2.0L GDI I4 engine were the NGK SILZKR7B-11 Laser Iridium (also known as part number SILZKR7B11). A few other compatible replacement spark plugs with their part numbers include the following: Champion RER8ZWYCB4 (9407), NGK LKR7DIX-11S and Autolite APP5702. The tools and other items needed to complete this procedure include a 10mm socket, a 1/4" drive ratchet, a 5/8" spark plug socket, an extension bar, a 3/8" drive ratchet and a tube of dielectric grease. If the car has been driven recently, allow the engine to cool off for at least an hour. The first two steps are to open the hood and then pull off the black plastic engine cover. |
||
|
|
||
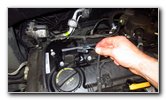
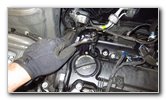
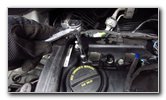
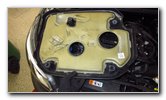 Four Rubber Fasteners |
 Top of Engine Exposed |
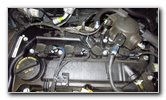 Spark Plug Ignition Coils |
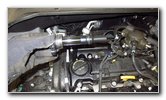
| There are four
rubber friction fasteners on the underside of the engine cover. Set the cover aside in a safe place. Once the cover is out of the way, you'll be able to see the four spark plug ignition coils. If you have access to compressed air or a wet/dry shop vacuum, clean off the top of the engine to help reduce the risk of having sand, dust, debris or any other foreign object drop down into the spark plug well. |
||
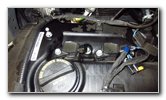
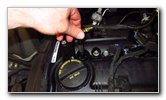
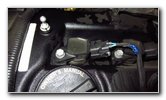 Coil & Power Plug |
 Slide Back Locking Tab |
 Push In Release Tab |
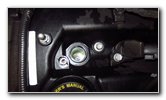
| I recommend only
checking or changing one spark plug at a time to help reduce the risk of
having a foreign object fall down into the spark plug well or the cylinder. Gently slide back the grey plastic locking tab on the ignition coil's electrical connector. Then push in the black plastic release tab on the electrical connector before sliding it straight off the base of the ignition coil. If you have trouble pushing in the release tab, use a plastic pry bar tool or a flat head screwdriver. |
||
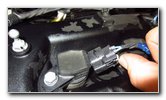
 Pull Off Power Plug |
 Power Plug Removed |
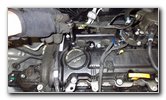 Loosen Counterclockwise |
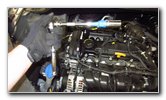
| Remove the single bolt that secures the ignition coil housing to the top of the engine by turning it in the counterclockwise direction with a 10mm socket and a 1/4" drive ratchet. | ||
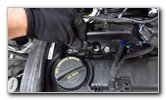
 Remove Silver Metal Bolt |
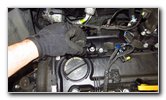 Pull Out Ignition Coil |
 Ignition Coil Removed |
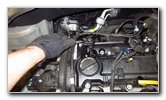
| Set the bolt aside
in a safe place. Gently rotate the top of the ignition coil back and forth a few times to make sure that the rubber dust boot at the bottom of the ignition coil isn't stuck or "frozen" to the top of the old spark plug. Pull the ignition coil straight out of the spark plug well. If you have a CEL (check engine light) or SES (service engine soon) warning on your gauge cluster, use an OBDII scanner (also known as an "OBD2 scan tool") to check for an ignition coil related DTC (diagnostic trouble code) such as P0350, P0351, P0352, P0353 and P0354. The OEM (original equipment manufacturer) Hyundai / Kia ignition coil part number is 27300-2E000. Set the ignition coil aside in a safe place. |
||
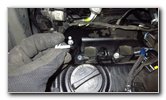
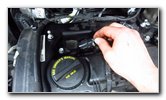
 Spark Plug Well |
 Attach Spark Plug Socket |
 Loosen Counterclockwise |
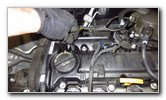
| Attach the
5/8" spark plug socket to the
extension bar and the 3/8" drive ratchet. I like to use a piece of painter's tape to keep the socket from popping off the end of the extension bar and becoming stuck down in the spark plug well. Push the socket down over the top of the old spark plug. Carefully loosen the old spark plug by turning it in the counterclockwise direction. If you have trouble loosening the old spark plug, spray a small amount of penetrating oil down into the spark plug well. Allow the penetrating oil to seep into the threads for at least 10 to 15 minutes before attempting to loosen the old spark plug again. |
||
|
|
||
 Detach Ratchet - Spin Out |
 Lift Out Old Spark Plug |
 Inspect Old Spark Plug |
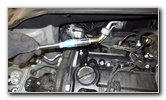
| Once the old spark
plug is loose, detach the ratchet from the extension bar. Spin out the old spark plug the rest of the way by hand. Carefully lift the old spark plug out of the well and detach it from the socket. Inspect the old spark plug for any signs of damage. If the old plug appears to be burnt or covered in soot or oily sludge, the engine may be burning oil and should be inspected by a professional mechanic. If the electrode tip on the old plug appears to be burnt or covered in white powder, the engine may have been subjected to overheating. You may need to choose a spark plug with a different heat range for your climate. The OEM parts in this 2019 Kia Soul with the Nu 2.0L GDI I4 engine were the NGK SILZKR7B-11 laser iridium spark plugs. |
||
 Lower In New Spark Plug |
 Tighten Clockwise |
 Apply Dielectric Grease |
| If you have a
spark plug gap gauge tool, check
the gap on the new spark plugs to make sure they match the specification
listed on the manufacturer's box. The OEM NGK SILZKR7B11 plugs should be gapped to 0.044". (Most spark plug manufacturers do not recommend using anti-seize lubricant grease on the threads of the new spark plugs since it can easily lead to over tightening.) Push the new spark plug into the socket. Your socket should have a rubber insert or a strong magnet to hold the spark plug securely in place. Lower the new spark plug down into the well and spin it in a few turns by hand in the clockwise direction to help prevent it from becoming cross threaded. Continue tightening the new spark plug in the clockwise direction with the 3/8" drive ratchet to a small fraction of a turn past finger tight. If you are installing new spark plugs, you may feel the new crush washer collapse as you are tightening the plugs. If you are re-installing the old spark plugs after inspecting them, just tighten the old plugs to a small fraction of a turn past finger tight. If you would like to use a torque wrench to tighten the spark plugs, the service manual specification is 10.8 to 18.0 lb-ft of torque (14.7 to 24.5 Nm). Double check that the new spark plugs are tight before moving on to the next steps. To help ensure a reliable electrical connection apply a small amount of dielectric grease to the opening in the rubber dust boot at the bottom of the ignition coil. The dielectric grease will also help keep out any dust, debris or moisture. |
||
 Lower In Ignition Coil |
 Line Up Bolt Holes |
 Tighten Bolt Clockwise |
| Lower the ignition
coil straight down into the well. Push on the ignition coil to secure the rubber dust boot to the top of the new spark plug. Rotate the ignition coil back and forth a few times to help spread the dielectric grease. Line up the bolt hole in the ignition coil with the corresponding bolt hole in the top of the engine. Spin in the ignition coil bolt a few turns by hand in the clockwise direction to help prevent it from becoming cross threaded. Tighten the bolt by turning it in the clockwise direction with the 10mm socket and the 1/4" drive ratchet until it is snug. Try to avoid over tightening the bolt to prevent from cracking the plastic ignition coil housing. |
||
 Push On Power Plug |
 Slide In Grey Lock Tab |
 Spark Plugs Replaced |
| Push the electrical
connector straight on to the base of the ignition coil. You should feel or hear the power plug "click" securely into place. Slide the grey plastic locking tab in towards the ignition coil to secure the electrical connector in place. Double check that the ignition coil bolts are tight and the electrical connectors are securely attached. Start the engine and listen closely for any strange sounds that might indicate a problem. Lower the plastic cover down into place over the top of the engine. Push on the cover to secure the four rubber friction fasteners to the metal pegs on the top of the engine. Be sure to write down the spark plug change in your vehicle's service records. (The service interval specification in the owner's manual and service manual for replacing the spark plugs is every 105,000 miles or every 84 months / 7 years.) For more, please check out all of my
2014-2019 Kia Soul DIY Repair & Maintenance Guides. |
||
| If you found this guide to be helpful,
please consider making a small donation by clicking on the PayPal.com
"Donate" button located to the right of this paragraph. Thank you!
(Note: I am not a registered charity. Donations are not tax deductible.) |