
Chevrolet
Impala 12V Automotive Battery Replacement Guide
How to change a dead 12 volt car battery
in the engine bay of a 10th generation 2014 to 2018 GM Chevy Impala.

By Paul B. Michaels Author & Photographer Auto Mechanic Since 1989 |
||
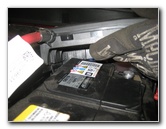
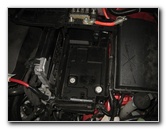
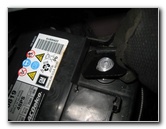
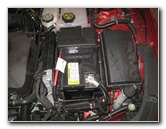
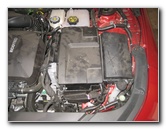 2014 Impala 12V Battery |
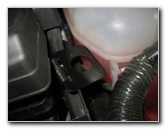
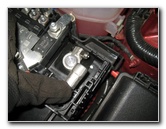
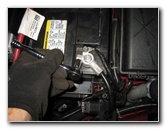
 Push In To Release Clip |
 Right Rear Retaining Clip |
| This
automotive maintenance tutorial was specifically written to assist
owners of the tenth generation (2014, 2015, 2016, 2017 and 2018) GM
Chevy Impala in changing a dead 12 volt car battery in the engine
bay. Owners of other General Motors vehicles such as the Malibu, Cruze, Camaro, Sonic, Spark, Volt, Corvette, Trax, Equinox, Traverse, Tahoe, Suburban, SS Sedan, Bolt, Colorado, Silverado, Buick Verano, Regal, LaCrosse, Cascada, Encore, Envision, Enclave, Canyon, Sierra 1500, Terrain, Acadia, Yukon, Savana, ATS, CTS, XTS, CT6, XT5, SRX and Escalade may also find these DIY instructions to be helpful. The OEM battery in this 2014 Impala was an ACDelco 48PS. A few other compatible "Group Size" 48 or H6 batteries with their part numbers are as follows: Bosch S6585B, EverStart MAXX-H6 and ACDelco 48AGM. The tools required to complete this procedure include a 10mm socket, a 1/4" drive ratchet, a 13mm socket, a 6" or 9" extension bar and a 3/8" drive ratchet. |
||
|
|
||
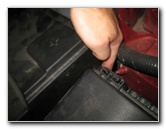
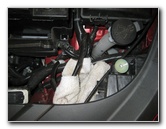
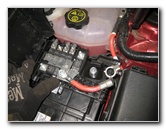
 Release Left Rear Clip |
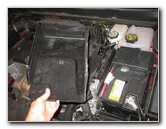 Lift Off Plastic Cover |
 Old Battery Exposed |
| The first two steps
are to open the hood and then move to the right (driver) side of the engine
bay. The 12 volt car battery is located to the left of the electrical fuse box and just behind the driver side headlight housing. There are two retaining clips holding the black plastic battery cover in place. Push in the release tab on the right rear clip to release it. Then push in the release tab on the left rear clip. Pull the plastic cover straight off the top of the battery and set it aside in a safe place. |
||
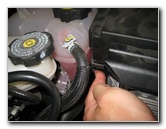
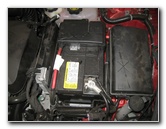
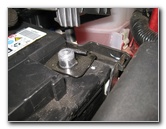
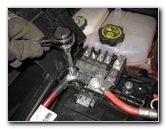
 Loosen Negative Terminal |
 Pull Off Negative Terminal |
 Cover & Tuck Away |
| If you would like
to avoid losing all your favorite radio station presets and having to reset
the time on the clock, consider buying an
OBD II Memory Saver device. Loosen the negative "-" terminal nut by turning it counterclockwise with a 10mm socket and a 1/4" drive ratchet. Pull the negative terminal straight off the "-" battery post. Wrap the terminal in a small towel and tuck it away on the side of the battery to help prevent accidental contact. |
||
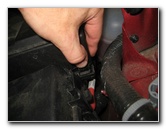
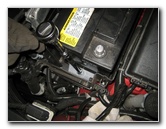
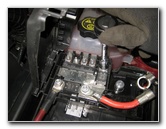
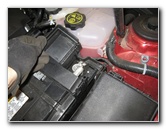 Flip Open Plastic Cover |
 Gently Pry Up Clip |
 Power Distribution Board |
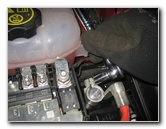
| Flip open the small
plastic door to view the positive terminal located near the back of the
engine bay. Gently pry up the retaining clip near the front of the plastic cover. Swing open the larger plastic cover on the power distribution board. |
||
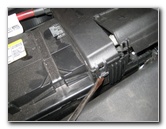
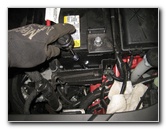
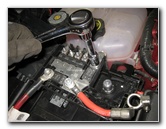
 Loosen Positive Terminal |
 Pull Off Power Board |
 13mm & Extension Bar |
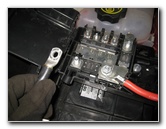
| Loosen the nut on
the positive terminal by turning it counterclockwise with the 10mm socket
and a 1/4" drive ratchet. Pull the power distribution board off the top of the old battery. (I later discovered that two of the wires attached to the power distribution board need to be removed in order to make enough room to lift out the old battery. See the pictures below.) |
||
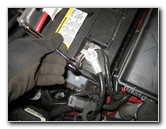
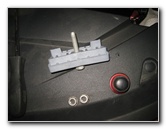
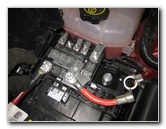
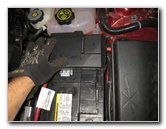
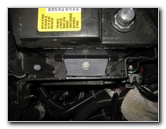 Battery Hold Down Clamp |
 Loosen Counterclockwise |
 Metal Ring & Strap |
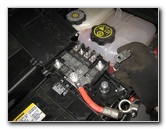
| There is a grey
plastic block at the front bottom edge of the battery that acts as a hold
down clamp. Attach your 9" extension bar to a 13mm socket and a 3/8" drive ratchet. Loosen the 13mm bolt by turning it counterclockwise. Lift the battery hold down clamp out of the engine bay and set it aside in a safe place. There is a metal ring and strap attached to the positive "+" battery post. |
||
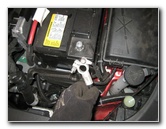
 Pull Ring Off "+" Post |
 Remove 10mm Nut |
 Remove 2nd 10mm Nut |
| Pull the metal ring
off the positive battery post and tuck it away on the side of the battery. As I mentioned earlier, I had to back track and remove two wires from the power distribution board in order to lift out the battery. Remove the wire at the rear of the power distribution board and near the coolant reservoir tank by turning the 10mm nut in the counterclockwise direction. Then remove the wire near the front left corner of the board by turning the 10mm nut counterclockwise. |
||
|
|
||
 Two 10mm Nuts Removed |
 Pull Off Black Wire |
 Remove 2nd Wire |
| Set the two 10mm
nuts aside in a safe place. Move the power distribution board out of the way. |
||
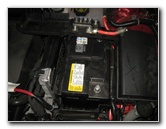
 Lift Out Old Battery |
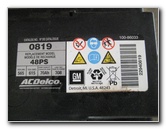 ACDelco 48PS - 0819 |
 Clean Off Battery Tray |
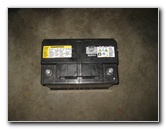
| Carefully lift the
old battery out of the engine bay. Gently set the old battery on the ground. Avoid dropping or tipping over the battery to prevent from having acid leak out. Be sure to bring the old battery with your to Walmart or the auto parts store to avoid having to pay a "core" or "disposal" charge. The retailer will also have the old battery properly recycled. If you can wait a few days, I recommend buying the Bosch S6585B since it has excellent reviews on Amazon. Clean off any debris from the battery tray so that the new battery will rest evenly on it. |
||
 Battery Hold Down Clamp |
 Lower In New 12V Battery |
 Tighten 13mm Clockwise |
| Carefully lower the
new battery in to the engine bay with the "+" positive post near the rear
(closest to the windshield) and the negative "-" terminal closer to the
front of the car (by the headlight). Lower the grey plastic battery hold down clamp down on to the front edge of the battery tray. Tighten the 13mm bolt by turning it clockwise. Check to see if the new battery can be rocked, slid or moved around on the tray. If the new battery can be moved, tighten the 13mm bolt an extra turn or two. |
||
 Replace Metal Ring |
 Lower Power Board |
 Replace Front Cable |
| Lower the metal
ring attached to the strap over the positive post which will further secure
the new battery in place. Swing the power distribution board down in to place over the top of the positive battery post. |
||
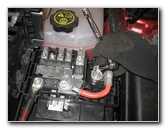
 Tighten Rear Cable |
 Push On Positive Terminal |
 Replace Positive Terminal |
| Push the two cables
back on to the power distribution board and tighten the 10mm nuts in the
clockwise direction. If you've had a problem with corrosion (white or blue powder) building up on the battery terminals, consider installing some felt anti-corrosion washers on to the battery posts. Push the positive terminal on to the "+" battery post and tighten the 10mm nut in the clockwise direction. Try to avoid over tightening the terminal nut to prevent from cracking or damaging the battery post which could lead to an acid leak. |
||
 Close Plastic Cover |
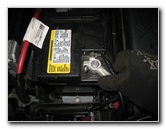 Push On Negative Terminal |
 Tighten 10mm Clockwise |
| Flip closed the
black plastic cover over the positive terminal and the distribution board. Push the negative terminal on to the "-" battery post. Tighten the 10mm terminal nut in the clockwise direction until it is snug. |
||
 New Battery Installed |
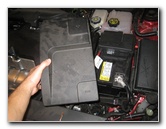 Plastic Battery Cover |
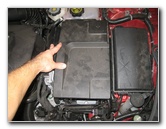 Push Down - Secure Clips |
| Lower the plastic
cover over the top of the new battery and the battery box. Firmly push on it to secure the two retaining clips. Test the new battery by starting the engine and turning on the headlights. Please remember to adjust the time on the clock and program your favorite radio station presets before driving. For more, check out all of my
2014-2018 Chevrolet Impala DIY Repair & Maintenance Guides. |
||
| If you found this guide to be helpful,
please consider making a small donation by clicking on the PayPal.com
"Donate" button located to the right of this paragraph. Thank you!
(Note: I am not a registered charity. Donations are not tax deductible.) |