
Nissan Versa
Camshaft Position Sensors Replacement Guide
How to change a failing or faulty
camshaft position sensor in a 2nd generation 2012 to 2019 Nissan Versa sedan.

By Paul B. Michaels Author & Photographer Auto Mechanic Since 1989 |
||
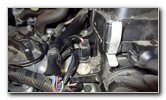
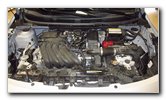
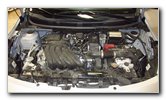 2019 Versa 1.6L I4 |
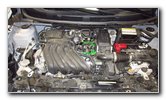 Front & Rear Sensors |
 Front Camshaft Sensor |
| This automotive
maintenance tutorial was specifically written to assist owners of the second
generation 2012, 2013, 2014, 2015, 2016, 2017, 2018 and 2019 Nissan Versa
sedan in changing a failing or faulty camshaft position sensor on the HR16DE
1.6 liter inline four cylinder engine. Owners of other Nissan vehicle such as the Sentra, Altima, Maxima, Murano, Rogue, Note, Leaf, Juke, Kicks, Latio, Almera, Sunny, Qashqai, NV200, Pathfinder, Frontier and X-Trail may also find these DIY instructions to be helpful. Some of the symptoms of a bad camshaft position sensor include the following: rough idling, lowered fuel economy (reduced MPG), stalling, slow acceleration, stumbling, reduced power, vibrations, rough starting, an erratic idle and a CEL / SES (check engine light, service engine soon) indicator warning on the gauge cluster. If you have an OBD2 scan tool (also known as an OBDII scanner), you might see a camshaft position sensor related DTC (diagnostic trouble code) such as P0340, P0341, P0342, P0343 and P0344. The OEM (original equipment manufacturer) camshaft position sensor was marked as part number 08719 03168 (8119701). A few compatible replacement sensors with their part numbers are as follows: Standard Motor Products PC856, NGK NTK EC0004, Holstein 2CAM0190, Dorman 917-739 and Walker Products 235-1444. The tools needed to remove and replace the sensor include a 10mm socket with a 1/4" drive ratchet. There are two camshaft position sensors on the top right (driver) side of the engine. Take a look at Picture # 2 in the row above to see the green dots that mark the location of the two sensors. Both sensors are situated just to the left of the engine air filter housing on the valve cover. |
||
|
|
||
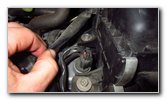
 Rear Camshaft Sensor |
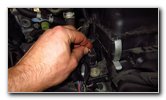
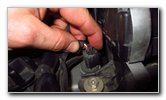 Push In Release Tab |
 Power Plug Detached |
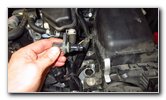
| To help reduce the
risk of having debris fall down into the engine, clean off the area around
the sensor with a wet/dry shop vacuum or use compressed air. Push in the release button on the black plastic electrical connector before sliding it off the top of the old sensor. The power plug should slide off relatively easily. Try to avoid using excessive force. |
||
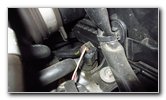
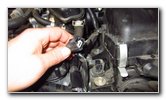
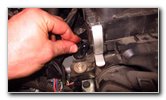
 Single Silver Metal Bolt |
 Loosen Counterclockwise |
 Remove Bolt |
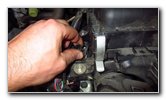
| Loosen the single
silver metal bolt that secures the sensor to the top of the engine by
turning it in the counterclockwise direction with the 10mm socket and a 1/4"
drive ratchet. Spin out the bolt the last few turns with your fingers to prevent it from falling down and becoming lost in the engine bay. Set the bolt aside in a safe place. |
||
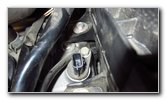
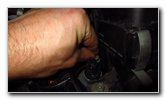
 Rotate Back & Forth |
 Remove Old Sensor |
 Old Sensor Removed |
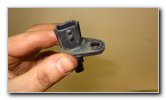
| Gently rotate the
sensor back and forth a few times to loosen the rubber gasket. Carefully pull the old sensor out of the valve cover. Make sure the rubber o-ring gasket or any part of it is not still stuck inside the engine. The OEM sensor in the HR16DE engine in this 2019 Versa SV was marked as part number 08719 03168 (8119701). |
||
 Empty Sensor Port |
 Lower In New Sensor |
 Replace Bolt |
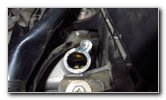
| An optional step is
to apply a small amount of new oil to the rubber o-ring gasket on the new
sensor to make it easier to install and possibly help it form a better seal
to prevent oil leaks. Lower the new sensor into the opening in the valve cover. Line up the bolt hole in the sensor with the corresponding bolt hole in the valve cover. Spin in the bolt a few turns by hand in the clockwise direction to help prevent it from becoming cross threaded. |
||
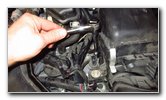
 Push On Power Plug |
 New Sensor Installed |
 Start Engine - Test Sensor |
| Tighten the bolt by
turning it in the clockwise direction with the 10mm socket and a 1/4" drive
ratchet until it is snug. Try to avoid over tightening the bolt to prevent from cracking the plastic sensor housing. Push the electrical connector straight on to the top of the new sensor. You should feel or hear the power plug "click" securely into place. If you have an OBDII scan tool, clear any camshaft position sensor related DTC codes. To test the new sensor, start the engine and listen closely for any strange sounds. If do you hear an unusual noise, turn off the ignition and double check your work. Take the car for a short and very careful test drive to see if any of the symptoms re-occur. Be sure to write down the sensor change in your car's service records. Please
check out all of my
2012-2019 Nissan Versa DIY Repair & Maintenance Guides. |
||
| If you found this guide to be helpful,
please consider making a small donation by clicking on the PayPal.com
"Donate" button located to the right of this paragraph. Thank you!
(Note: I am not a registered charity. Donations are not tax deductible.) |