
Nissan Versa
12V Automotive Battery Replacement Guide
How to change a weak or dead 12 volt car
battery in a 2nd generation 2012 to 2019 Nissan Versa sedan.

By Paul B. Michaels Author & Photographer Auto Mechanic Since 1989 |
||
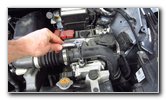
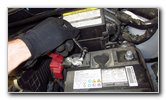
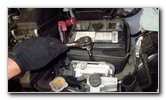
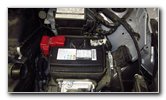
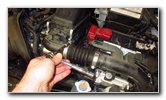
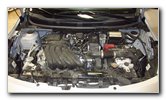 2019 Versa 1.6L I4 Engine |
 Driver Side - 12V Battery |
 Air Intake Pipe & Hose |
| This automotive
maintenance tutorial was specifically written to assist owners of the second
generation 2012, 2013, 2014, 2015, 2016, 2017, 2018 and 2019 Nissan Versa
sedan equipped with the HR16DE 1.6L I4 engine in changing a weak or dead 12
volt car battery. Owners of other Nissan vehicle such as the Sentra, Altima, Maxima, Murano, Rogue, Note, Leaf, Juke, Kicks, Latio, Almera, Sunny, Qashqai, NV200, Pathfinder, Frontier and X-Trail may also find these DIY instructions to be helpful. The OEM (original equipment manufacturer) battery's "Group Size" is 51R. A few compatible replacement group size 51R batteries with their part numbers are as follows: Optima 8073-167 D51R YellowTop, EverStart MAXX-51R (Walmart) and Interstate 51R (Costco). The tools needed to remove and replace the battery include an 8mm socket with a 1/4" drive ratchet (or a flat head screwdriver), a 10mm socket and a 13mm socket with a long extension bar and a 3/8" drive ratchet. The first two steps are to open the hood and then move to the right (driver) side of the engine bay. The 12V automotive battery is located under the air intake assembly and just in front of the electrical fuse and relay box. |
||
|
|
||
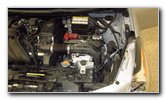
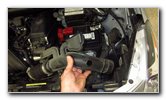
 Loosen Left Hose Clamp |
 Loosen Bolt - Middle |
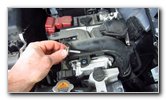 Single Bolt Removed |
| Locate the hose
clamp on the left side of the air intake assembly that attaches it to the
black plastic pipe on the engine air filter housing. To loosen the hose clamp's fastener, turn it in the counterclockwise direction with either an 8mm socket and a 1/4" drive ratchet or a flat head screwdriver. Then loosen the bolt situated near the center of the air intake assembly that attaches it to the ECU (electronic control unit or "car computer") by turning it in the counterclockwise direction with a 10mm socket and a 1/4" or a 3/8" drive ratchet. Spin out the bolt the rest of the way by hand and set it aside in a safe place. |
||
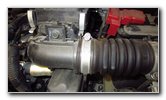
 Pull Hose Off Intake Tube |
 Lift Out Intake Assembly |
 Air Intake Removed |
| Gently pull the
rubber air intake hose off the black tube on the front of the filter
housing. Lift the right side of the air intake assembly out of the engine bay. Set the air intake aside in a safe place.
If you'd like to avoid losing your radio station presets and having to adjust the time on the clock after replacing the 12V battery, consider using an OBD2 Memory Saver device. |
||
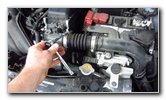
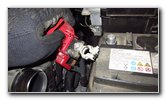
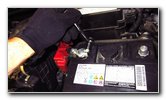
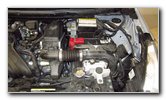
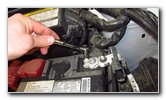 Loosen Negative Terminal |
 Pull Terminal Off "-" Post |
 Flip Open Plastic Cover |
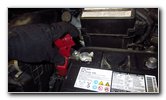
| Loosen the "-"
negative terminal by turning the nut in the counterclockwise direction with
a 10mm socket and a 1/4" drive ratchet. You don't need to fully remove the nut. Just loosen it a few turns until the terminal can be pulled off the battery post. Carefully pull the negative terminal off the "-" battery post. Wrap the negative terminal in a small towel and tuck it away on the side of the battery to help prevent accidental electrical contact. Flip open the red plastic cover to access the positive terminal. |
||
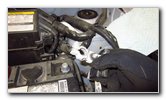
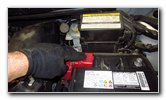
 Loosen Positive Terminal |
 Pull Off "+" Terminal |
 Hold Down Clamp Block |
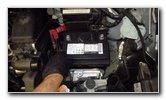
| Loosen the nut on
the positive terminal by turning it in the counterclockwise direction with
the 10mm socket and a 1/4" drive ratchet. Pull the positive terminal off the "+" battery post. Flip the red plastic cover closed and tuck the positive terminal away on the side of the battery. Look down in front of the old 12V battery and behind the ECU (car computer) to locate the hold down clamp and the single bolt that secures it in place. |
||
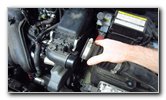
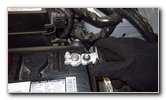
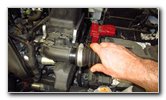
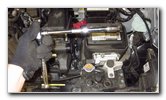 Socket & Extension Bars |
 Loosen Hold Down Bolt |
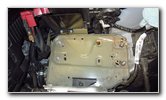
 Pull Off Heat Shield Box |
| Attach the 13mm
socket to a long extension bar or two shorter extension bars.
Loosen the bolt on the hold down bar by turning it in the counterclockwise direction. You don't need to fully remove the bolt and the hold down clamp. Just loosen it enough so that you can slide the old battery back and lift it off the tray. Pull the heat shield cover off the old battery and set it aside for re-installation later on. |
||
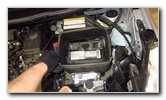
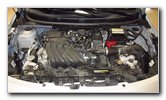
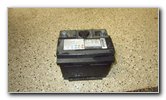 Old Battery Removed |
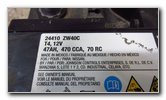 Part # 24410 ZW40C |
 Clean Off Battery Tray |
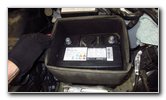
| Carefully lift the
old battery out of the engine bay. Gently set the old battery down on the ground. Try to avoid dropping or tipping over the old battery to prevent from having acid leak out. Be sure to take the old battery with you to the auto parts store or Walmart to prevent from having to pay a "disposal" fee, a "core charge" or a "recycling" fee. The OEM battery was marked as part number 24410 ZW40C T4. Clean off any debris on the tray so that the new battery will rest evenly on it. |
||
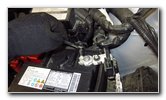
 Lower In New Battery |
 Tighten Hold Down Clamp |
 Replace Heat Shield Box |
|
Orientate the new battery with the positive post on the left (passenger) side and the negative post on the right (driver) side. Carefully lower the new battery down into the engine bay and onto the tray. If you've had a problem with corrosion (white, blue or green powder) building up on the terminals or the battery posts, I highly recommend placing some felt anti-corrosion washers over the posts. The felt washers are a very inexpensive way to prevent from having to replace corroded battery terminals or cables. Slide the new battery forward until the front bottom edge is under the hold down clamp. Tighten the bolt in the hold down clamp by turning it in the clockwise direction with the 13mm socket attached to a long extension bar and the 3/8" drive ratchet. Check to see if the new battery can be moved, slid or rocked on the tray. If the new battery can be moved, tighten the hold down clamp's bolt an extra turn or two. Lower the heat shield box over the new battery. |
||
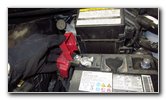
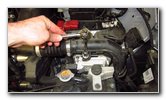
 Push On Positive Terminal |
 Tighten "+" Terminal Nut |
 Close Red Plastic Cover |
| Push the positive
terminal over the "+" battery post. Tighten the positive terminal nut by turning it in the clockwise direction with the 10mm socket and a 1/4" drive ratchet until it is snug. Try to avoid over tightening the terminal nut to prevent from cracking the battery post which could lead to an acid leak. Flip the red plastic cover closed over the positive terminal. |
||
 Push On Negative Terminal |
 Tighten Clockwise |
 New Battery Installed |
| Carefully push the
negative terminal on to the "-" battery post. Tighten the negative terminal by turning the nut in the clockwise direction until it is snug. Double check that the hold down clamp and the two terminals are secure. |
||
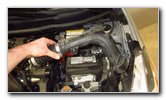
 Lower In Air Intake |
 Push On Rubber Hose |
 Tighten Bolt - Center |
| Lower the air
intake assembly down into the engine bay. Push the rubber hose on the left side over the plastic air intake tube on the filter housing. Lower the right side down into its corresponding opening just behind the driver headlight assembly. Replace the bolt in the middle of the air intake assembly by turning it in the clockwise direction with the 10mm socket and a 1/4" drive ratchet. |
||
 Tighten Hose Clamp |
 Air Intake Secured |
 Battery Change Done! |
| Tighten the hose
clamp on the left by turning the fastener in the clockwise direction with
the 8mm socket and a 1/4" drive ratchet or you can use a flat head
screwdriver. Double check that the air intake assembly is properly installed and the hose clamps are tight. To test the new battery, start the engine and turn on the headlights. Please be sure to adjust the time on the clock and re-program your favorite radio stations before you start driving. If you suspect that your alternator is failing, use a digital multimeter tool to check the voltage when the engine is running. If the alternator is working properly, the voltage on the battery terminals should be about 13V to just over 14V when the engine is running. When the engine is turned off, the new lead-acid battery should be at least 12 volts and about 12.60V when it is fully charged. Please
check out all of my
2012-2019 Nissan Versa DIY Repair & Maintenance Guides. |
||
| If you found this guide to be helpful,
please consider making a small donation by clicking on the PayPal.com
"Donate" button located to the right of this paragraph. Thank you!
(Note: I am not a registered charity. Donations are not tax deductible.) |