
Toyota
4Runner Vanity Mirror Light Bulb Replacement Guide
How to change a burnt out vanity mirror
light bulb above the sun visor of a 5th generation 2010-2016 Toyota 4Runner
SUV.

By Paul B. Michaels Author & Photographer Auto Mechanic Since 1989 |
||
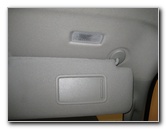
 2015 4Runner Sun Visor |
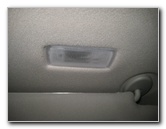 Vanity Mirror Light |
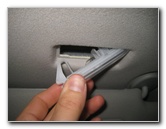
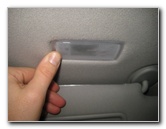
 Pry Out Inner Edge |
| This
automotive maintenance tutorial was specifically written to assist
owners of the fifth generation (2010, 2011, 2012, 2013, 2014, 2015 &
2016) Toyota 4Runner SUV in changing a burnt out vanity mirror light
bulb in the headliner above the sun visor. Owners of other Toyota, Lexus or Scion vehicles such as the Yaris, Corolla, Matrix, Prius, Camry, RAV4, Sienna, Tacoma, Tundra, FJ Cruiser, Venza, Highlander, Avalon, Sequoia, Land Cruiser, IS 250, ES 350, GS 350, tC, xB, xD, iQ and FR-S may also find these DIY instructions to be helpful. A replacement light bulb is part number 168 which is available from various manufacturers such as Sylvania, GE, PIAA and Eiko. (You can also use the 2825, W5W, 194 or an LED.) The only tool needed to access and replace the bulb is a small flat head screwdriver used to pry out the light housing. |
||
|
|
||
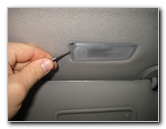
 Remove Light Housing |
 Old Bulb Exposed |
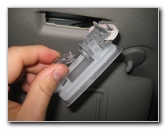 Pull Out Old Light Bulb |
| To prevent from
scratching the plastic surfaces, you may choose to cover the tip of your
screwdriver with a thin micro fiber cloth or instead use a plastic
pry bar tool. Insert the blade of the small flathead screwdriver in between inner edge of the light housing and the fabric headliner. Gently pry out the light housing and remove it from the headliner. If the old bulb was recently turned on, be careful when you remove it since it might still be hot enough to burn your fingers. Pull the old bulb straight out of the socket. |
||
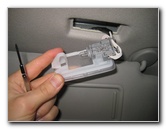
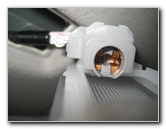 Empty Bulb Socket |
 Push In New 168 or 2825 |
 Re-Insert Wires First |
| The OEM bulb was a
Toshiba 12V8WAL:51.
But you can use any miniature wedge base bulbs such as the 168, 2825, W5W, 158, 194 or a compatible LED unit. Push a new 168 bulb straight in to the socket. Re-insert the wires back in to the headliner first. |
||
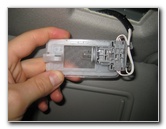
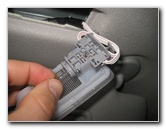
 Pop In Retaining Clip |
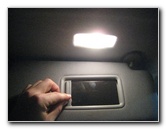 Slide Open Cover - Test Bulb |
 Vanity Bulb Replaced |
| Gently pop in the
retaining clip on the inner edge of the housing back in to place. Test the new light bulb by sliding open the vanity mirror cover. Close the vanity mirror cover to complete the job. Be sure to record the bulb change in your vehicle's service records. For more,
check out my other
2010-2016 Toyota 4Runner DIY Repair & Maintenance Guides. |
||
| If you found this guide to be helpful,
please consider making a small donation by clicking on the PayPal.com
"Donate" button located to the right of this paragraph. Thank you!
(Note: I am not a registered charity. Donations are not tax deductible.) |