
Chevrolet
Camaro Engine Air Filter Replacement Guide
How to clean or change the engine air
filter element for a sixth generation 2016 to 2021 GM Chevy Camaro 2.0L.

By Paul B. Michaels Author & Photographer Auto Mechanic Since 1989 |
||
 2020 Camaro 2.0L I4 |
 Engine Air Filter Box |
 Loosen Counterclockwise |
| This automotive
maintenance tutorial was specifically written to assist owners of the sixth
generation (2016, 2017, 2018, 2019, 2020 and 2021) GM Chevrolet Camaro in
checking, cleaning or changing the engine air filter element for the Ecotec
LTG 2.0 liter turbocharged inline four cylinder motor. (The steps should be
the same or similar for the LGX 3.6L V6, LT1 6.2L V8 and 6.2L LT4
supercharged V8.) The development and release of the 7th generation Camaro has been delayed, so the current sixth generation will probably continue into the 2022 and 2023 model years. Owners of other General Motors vehicles from Chevrolet, Buick, GMC and Cadillac such as the Malibu, Impala, Bolt, Corvette, Trailblazer, Trax, Equinox, Blazer, Traverse, Tahoe, Suburban, Colorado, Silverado, Express, Encore, Envision, Enclave, Regal, Sierra, Terrain, Acadia, Yukon, Canyon, Savana, XT4, XT5, XT6, Escalade, CT4, CT5, CTS and CT6 may also find these DIY instructions to be helpful. The OEM (original equipment manufacturer) air filter in this 2020 Camaro was part number ACDelco A3178C (also known as GM # 20857930). A few other compatible replacement aftermarket engine air filters with their part numbers are as follows: Fram CA11494, Premium Guard PA8153, Wix 49830, Purolator A58153 and Hastings AF1576. The only tool needed to access and replace the filter is a standard Phillips head screwdriver. The first two steps are to open the hood and then move to the right (driver) side of the engine bay. The black plastic triangular shaped engine air filter housing is situated behind the driver side headlight assembly. Locate the four Phillips head screws on the air box cover. There is one situated near each of the four corners. |
||
|
|
||
 Rear Left Screw |
 Rear Right Screw |
 Right Side Screw |
| Loosen the screws
by turning them in the counterclockwise direction with the Phillips head
screwdriver. The screws are "captured" and will remain attached to the air box cover. |
||
 Lift Off Air Box Cover |
 Old Filter Exposed |
 Pull Out Old Air Filter |
| Gently lift the
cover off the top of the air box to expose the old filter. Pull the old filter straight out of the bottom half of the air box. |
||
 Old Air Filter Removed |
 Inspect Both Sides |
 OEM Part # 20857930 |
| Inspect both sides
of the old filter. If the old filter is dark grey or black and clogged with dirt, dust, sand, insects, leaves, twigs, hair, soot, pollen and other debris, it should be replaced with a new element. I recommend buying the OEM engine air filter which is part number ACDelco A3178C. If the old filter is relatively clean, just tap out the large debris and remove any fine dust with a wet/dry shop vacuum cleaner. |
||
 Clean With Vacuum |
 Clean Out Bottom Half |
 Lower In New Air Filter |
| If your vacuum has
a crevice attachment, clean out any sand or debris in the lower half of the
air box. Orientate the new air filter with the pleats facing down and the black plastic grates facing up towards you. Make sure the new filter is fully seated in the lower half of the air box. |
||
 Lower Air Box Cover |
 Tighten Captured Screws |
 Tighten Clockwise |
| Lower the top half
of the air box down into place. Tighten the four screws by turning them in the clockwise direction with the Phillips head screwdriver. |
||
 Front Right Screw |
 Rear Left Screw |
 Engine Filter Change Done |
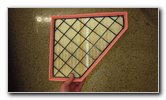
| Double check that
the two halves of the air box are flush together with no part of the orange
rubber gasket visible at the edges. Try to avoid over tightening the screws to prevent from cracking the plastic air box assembly. The service interval specification in the owner's manual for changing the engine air filter is every 45,000 miles. I also recommend checking and cleaning the filter during each oil change which is every 7,500 miles. (Please double check your owner's manual for the specific maintenance schedule for your vehicle.) Be sure to write down the filter change in your car's service records. Please
check out all of the
2016-2021 GM Chevrolet Camaro DIY Repair & Maintenance Guides. |
||
| If you found this guide to be helpful,
please consider making a small donation by clicking on the PayPal.com
"Donate" button located to the right of this paragraph. Thank you!
(Note: I am not a registered charity. Donations are not tax deductible.) |