
Toilet Water Supply Valve Leak Repair Guide
A pictures
illustrated step by step instruction guide for replacing or repairing a leaking
toilet water supply valve.

| This guide was specifically written to assist homeowners in replacing a leaking toilet water supply valve. It might also be useful for a leaky washer machine water supply valve, sink water supply valve, or dishwasher water supply valve. I am not a professional plumber. I take no responsibility for any damage to your pipes, fixtures, person, pets, home or property. If you have any doubts, please consult with a professional plumber or handyman. Good luck! | |
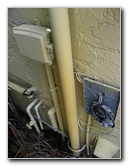 Outside Wall of Home |
 Main Water Supply Valve |
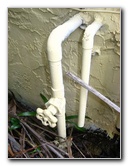
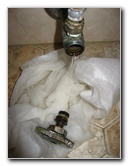
| A leak
originating from the toilet water supply valve is one of the most
common household leaks. To repair or replace the valve is a relatively simple procedure and should in most cases not require a professional plumber's assistance. The first step is to determine exactly where the water is coming from by closely examining the area. Flushing the toilet may help. It could be leaking from the valve's knob, from the metal threads that attach the knob to the valve, the hose that leads up to the toilet tank, or the ends of the hose where it attaches to the toilet tank or the water supply valve. In my case, the water was leaking out of the metal shaft that screws in as you turn the valve to turn on or off the water supply. |
|
|
|
|
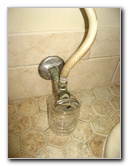 Plastic Bottle Catching Water |
 Toilet Water Supply Valve |
|
Since this toilet water supply valve dates back to the late 80's, I was fairly certain that the rubber washer and metal inside the valve had deteriorated so badly as to allow water to seep out. I went outside and located the main water supply valve for the entire home. I turned the main water supply valve counter clockwise until it was completely closed. Once inside, I verified that the water had been turned off by turning on a sink faucet. Don't skip this step since it also helps relieve the water pressure inside your pipes so that less water comes rushing out when you remove the knob on the toilet's water supply valve. |
|
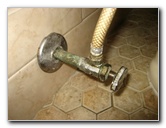
 Water Running Out of Pipe |
 Old Valve Stem Removed |
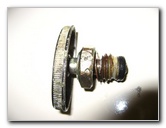
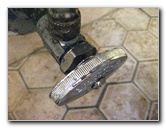
| Now that the home's
main water supply is shut off and the water pressure in the pipes has been
released, you can use a wrench to gently unscrew the knob from the water
supply knob assembly.
As you can see in the picture above, the metal threads and rubber washer on the old valve were worn, rusted and practically falling apart. |
|
 Corroded Metal & Rubber Washer |
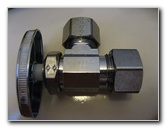
 New BrassCraft Valve |
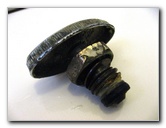
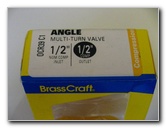
| I took the old
valve stem to Home Depot to find a replacement part.
The person working in the plumbing department told me to purchase a 1/2" inch BrassCraft Multi-Turn Valve assembly for about $5.00. He said that I could just remove the new valve stem from the new valve assembly and attach it to the old valve housing. |
|
|
|
|
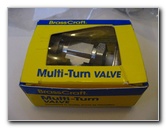
 New Valve Assembly |
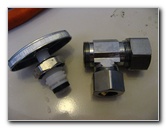 Remove Knob With Rubber Washer |
| The new valve stem was equipped with plastic threads and a neoprene rubber washer that should keep water from seeping out for at least another decade or two. | |
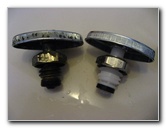 Old Knob & New Knob |
 Old Water Supply Valve Housing |
| Before installing
the new valve stem, I cleaned up the metal threads on the toilet water
supply valve assembly with a wire brush and a rag.
As an optional step, you can use Teflon tape or Silicone tape (A.K.A. plumber's tape) to ensure that water won't leak from the threads where the valve stem's packing nut attaches to the valve stem assembly. Then you can insert the new valve stem and tighten the valve stem's packing nut to securely attach the valve stem to the water supply valve assembly. |
|
 New Knob With Washer Installed |
 1/2" Inch Multi-Turn Valve |
| I went outside and
opened the main water supply valve to pressurize the home's water pipes.
I opened the new valve stem all the way and I heard the toilet tank filling up. After a few flushes, I was certain that the leak had been successfully
stopped.
Be sure to not over tighten the valve in either direction (closed or open) because this can damage the compression fitting inside the valve assembly and cause it to leak. If you still see water leaking, you may need to replace the entire toilet water supply valve assembly or replace the hose that connects the supply pipe to the toilet tank. For more of my helpful guides, check out the
following pages:
Air Conditioner Dual Motor Start Capacitor Replacement Guide, and the
Leaking Refrigerator Repair Guide. |
|
| If you found this guide to be helpful,
please consider making a small donation by clicking on the PayPal.com
"Donate" button located to the right of this paragraph. Thank you!
(Note: I am not a registered charity. Donations are not tax deductible.) |