
GM Pontiac
Grand Prix Alternator Replacement Guide
A pictures illustrated instruction manual
for replacing the alternator on a General Motors 3800 Series II 3.8L engine.

|
|
||
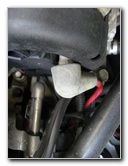
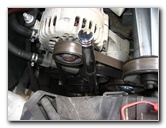
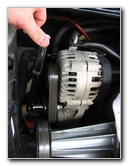
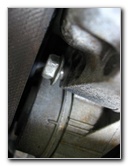
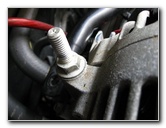
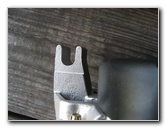
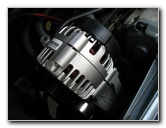
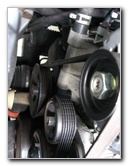
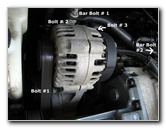 GM Alternator Bolt Locations |
 Alternator Side View |
 Bolt # 3 Under Black Bar |
| This guide was
specifically written to help owners of the 6th generation (1997, 1998,
1999, 2000, 2001, 2002 & 2003) GM Pontiac Grand Prix GTP to
replace a faulty alternator. Owners of other General Motors Buick, Oldsmobile, Chevrolet or Holden vehicles equipped with the GM 3800 Series II V6 engine from 1995 to 2005 may also find these alternator replacement instructions useful. My alternator gave up on me on the way back from Home Depot with a utility trailer attached. I guess that the stereo system, trailer lights, headlights and hazard lights on all at once was too much for the old OEM part to handle. To be sure, I hooked up the battery to a "Battery Tender Jr." 12V trickle charger over night. The next day I was able to complete a couple of errands before the battery light illuminated on the dash. Once back home, the car wouldn't start again without a jump. I also knew that my battery was less than 6 months old so all signs pointed to the alternator needing to be replaced. Check out all of the replacement alternator options at Amazon. |
||
|
|
||
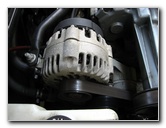
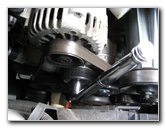
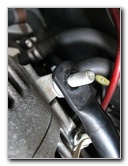
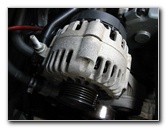
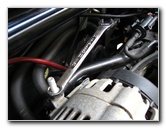
 Bolt # 1 Below Belt |
 Bolt # 2 Under Bar End |
 13mm Power Lead Bolt |
| The GM 3800 Series
II engine, which was on the Ward's list of 10 Best Engines of the 20th
Century, has powered General Motors vehicles from Saab, Cadillac, Chevrolet
(Chevy), Buick, Pontiac, Holden, Oldsmobile, and Saturn.
Some of the vehicle models that have the L37 N/A (naturally aspirated) or L67 S/C (Eaton M90 supercharged) versions of this popular engine include the Bonneville, Grand Prix, Grand Am, Park Avenue, Regal, Century, LeSabre, Riviera, Cobalt, Malibu, Intrigue, Ion, Firebird, Lumina LTZ, Commodore, Monaro, Eldorado, Seville STS, Deville, Cadillac DTS and Chevy Monte Carlo SS. I'd imagine that the newer 2004+ cars with the GM 3800 Series III L26 N/A and L32 S/C engines might also have a similar alternator replacement procedure. A few compatible replacement alternators with their part numbers are as follows: ACDelco 335-1078, ACDelco 334-2487A, DB Electrical ADR0138, TYC 2-08437, Remy 91531 and Quality-Built 8243605N. |
||
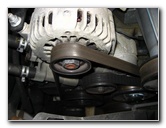
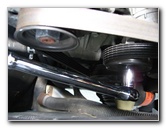
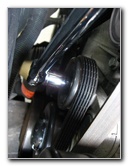
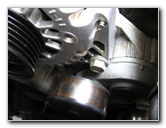
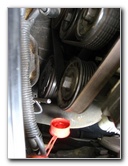
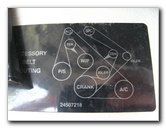 Accessory Belt Routing Diagram |
 Supercharger Belt Tensioner |
 Not Alternator Tensioner |
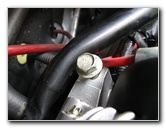
| The first picture
on this page has been labeled in Photoshop with the 3 alternator bolt
locations and the two nuts that must be loosened to move the black brace bar
out of the way.
If you can't read the accessory serpentine belt routing guide on your car, I have provided a copy above. At first I mistakenly loosened the supercharger belt by attaching the 15mm socket & wrench to the tensioner near the front of the engine. The correct tensioner for the alternator is just below the ALT pulley. |
||
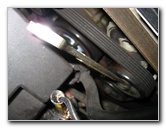
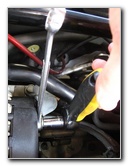
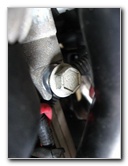
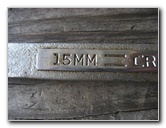 15 mm Wrench For Tensioner |
 Remanufactured ProStart |
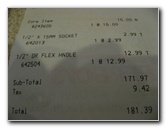 15mm Socket & Flex Handle |
|
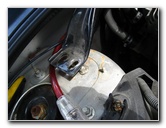
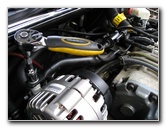
In order to get the wrench and 15mm socket onto the tensioner pulley below the alternator I had to remove the coolant overflow / filler tank and also my aftermarket Buick GM STB (strut tower brace). At this point, go ahead and remove the black negative (-) battery terminal for safety. My battery required an 8mm socket to remove the terminal. |
||
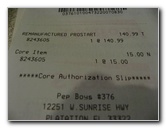
 PowerBuilt Socket & Wrench |
 $140.99 Bosch Alternator |
 $15.00 Core Return Charge |
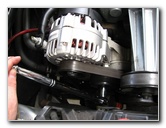
| After removing the
serpentine drive belt, I loosened the two accessible alternator bolts (# 1 &
# 3) as illustrated in the first picture on this page.
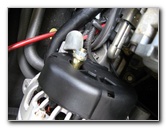
Then I had to remove the nut on top of the black bar end which covers "Bolt # 2". To move the black brace bar off of the alternator, locate the other bolt on it that secures it to the engine (Picture # 31) and loosen it a bit. Then you can lift the black brace bar off alternator bolt # 2 and remove it. |
||
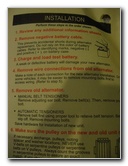 Installation Instructions |
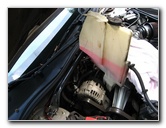 Coolant Overflow Tank Removed |
 Buick STB Removed |
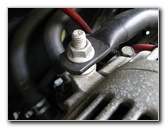
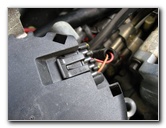
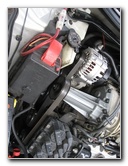
| With all of the
three mounting bolts out, I took off the power lead using a 13mm socket.
Then I popped off the electrical connector on the bottom right hand side of the alternator. After calling AutoZone, Discount Auto Parts, and Pep Boys, I found a remanufactured Bosch alternator at PepBoys for $140.99 with a $15.00 core return charge. |
||
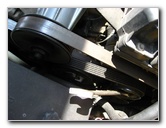
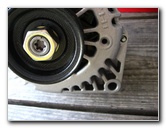
 Old Pontiac Alternator |
 Correct 15mm Tensioner Pulley |
 Wrench on Tensioner |
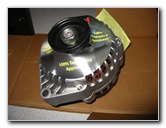
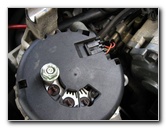
| To install the new
alternator I just reversed the entire process.
Don't forget to connect both the electrical connector and the power lead cable. The documentation that came with the new alternator warned that a weak or dead battery could damage the alternator, so I attached my battery again to the Battery Tender Jr. 12 volt trickle charger over night till the little light went from red to fully charged green. |
||
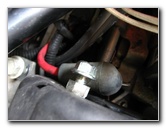
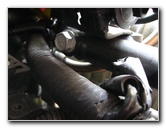
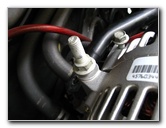
 Push Wrench Towards Car |
 13mm Alternator Power Lead |
 |
| If you're not sure
if the alternator is the problem with your charging system, be sure to have
the auto parts store bench test the alternator.
They'll usually do this for free. You could also test the alternator and battery yourself with a voltmeter. With the car running, the voltage across the battery terminals should be anywhere from 13.8 to 14.8 volts. |
||
 Remove Top Bolt Black Bar |
 Bolt # 3 Under Bar |
 13mm Power Back of Alt. |
 Bolt # 1 Under Belt |
 Remove Belt From Pulley |
 |
 Loosen Black Bar Bolt # 2 |
 Bolt # 2 Under Bar End |
 |
 Bolt # 1 New Alternator |
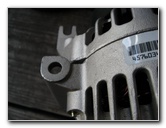 New Alt. Location of Bolt # 2 |
 Bolt # 3 Location |
 Remove Old Alternator |
 Unplug Alternator Sensor Connector |
 Plug In New Alternator |
 Mount New Alternator |
 Attach 13mm Power Lead |
 Insert 15mm Bolt # 1 |
 Thread Bolt # 2 |
 Attach Bolt # 3 |
 Reattach Black Bar Brace |
 Release Tensioner & Reattach Belt |
 Verify Belt Routing |
 Check Belt Path |
 Re-attach Coolant Tank |
 Fully Charge Car Battery |
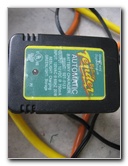 Battery Tender Jr. 12V |
| For more of my car
maintenance updates check out the following links:
Grand Prix Power Window Motor Replacement Guide,
Buffing Faded Headlights
K&N Air Filter Cleaning,
Eaton M90 Supercharger Oil Change,
GM Wheel Bearing Hub Repair, and the
GM 3800 Series II Engine Oil Change Guide.
For more, check out all of my Pontiac
Grand Prix DIY Repair & Maintenance Guides. |
||
| If you found this guide to be helpful,
please consider making a small donation by clicking on the PayPal.com
"Donate" button located to the right of this paragraph. Thank you!
(Note: I am not a registered charity. Donations are not tax deductible.) |