
How To Fix A
Leaking Refrigerator
A pictures illustrated guide to fixing a
water leak from the freezer into a refrigerator due to an ice clogged defrost drain
hole.

| This guide was
specifically written to assist owners of the
Kenmore Coldspot refrigerator
model # (number) 105. 79172990 in fixing a clogged defrost drain pipe,
located behind the freezer false wall under the evaporator coil, which
causes water to leak down from the cold air vents into the fresh food
section.
Owners of other top brand with similar designs may also find these instructions useful. Some of the other manufacturers include Amana, Maytag, Whirlpool, Frigidaire, Electrolux, GE (General Electric), Hotpoint, LG, Kitchenaid, Samsung, Jenn-Air, Thermador & Viking. I am not a professional appliance repair technician. I take no responsibility for any damage to your refrigerator, home, belongings or person. Please disconnect the power and exercise caution when working on your refrigerator. Please seek qualified assistance if you have any doubts. |
|
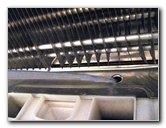
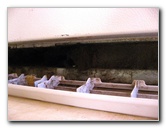
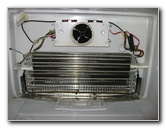 Evaporator Coil Cover Removed |
 Ice Clogging Defrost Drain Pipe |
| The first
two steps are to unplug the refrigerator from the electrical outlet
and remove all of the frozen food from the freezer. I put all of the
food into a cooler (portable ice chest) with some ice to keep
everything from melting while I resolved the problem. Next I removed the ice maker tray, the ice maker unit, and the freezer's plastic false wall. There were only a few 8mm bolts that had to be unscrewed to access the evaporator coil, automatic defrost element, freezer drip pan and drain hole behind the panel. I immediately saw that the metal defrost drip pan below the evaporator coil was covered in a sheet of ice. The opening in the pan for the drain hose was completely blocked by an ice plug. You don't want to use any sharp objects to remove the ice because you risk damaging the evaporator coils or drip pan. |
|
|
|
|
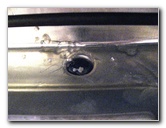
 Water On Bottom of Refrigerator |
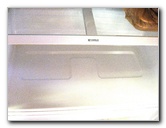
Water Leaking Down From Freezer 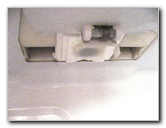 Cold Air Vents From Freezer |
| In the two pictures
above, you can see the water that accumulated on the bottom of the
refrigerator and also the source of the leak which was the cold air vents
from the freezer which are located on the roof of the fresh food section.
To stop the leak I had to melt the ice on the freezer defrost drip pan and the ice plug in the entrance to the drain hose. I repeatedly used a measuring cup full of hot water from the microwave to thaw all of the ice. (You could also use a hair dryer or heat gun but I didn't want to be using electrically powered tools in a wet environment.) Then I used the straw to verify that the drain tube was clear of any obstructions. Once the defrost drain hose was unclogged, I poured some more warm water into the drip pan to make sure that I could hear the water hitting the lower condensing tray underneath the refrigerator. |
|
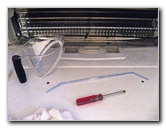 Hot Water, Screwdriver & Straw |
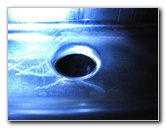 Melting Ice Plug In Drain Hole |
| If you find that
the drain hole in your defrost drip pan becomes clogged with ice often, then
try attaching a piece of aluminum wire to the defrost heater element and
insert it about 1-2 inches down into the drain pipe.
This will help prevent the ice plug from forming when the freezer goes into defrost mode by transmitting some of the heat from the defrost heating element down directly into the drain hole. I chose to omit this step and so far the refrigerator has been working normally with no leaks. |
|
 Straw Forcing Out Obstructions |
 Ice Maker Water Fill Hose |
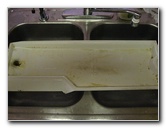
| To finish up the
job, remove the condensing tray's front cover at the bottom of the
refrigerator, carefully pull out the pan, drain the dirty water into the
sink and wash the tray with warm water.
Then I re-installed the condensing tray, the freezer's false wall, the ice maker, the ice bucket and put all of the frozen food back into the freezer. Finally, I checked the height and leveling of the adjustment feet or legs located at the front underside of the refrigerator. It's best to make sure that the refrigerator is level and to tip the fridge slightly up and back towards the wall. This keeps the water in the defrost drip pan moving smoothly into the freezer defrost drain hole and also to ensure that the doors close securely with the help of gravity. |
|
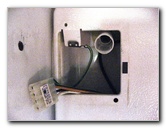
 Freezer False Wall Cover |
 Refrigerator Drip Pan Front Cover |
| If you took apart
your freezer and found that a clogged defrost drain hole was not the
problem, then check all of these other possible causes of a refrigerator
leak.
1. Check the condensing tray or "lower drip pan" for cracks, holes or other damage. A broken condensing tray will allow water flowing from the freezer's defrost cycle to accumulate on the floor under your refrigerator. You could either try to repair the pan or just replace it with a new part. 2. Inspect the rubber door seals and the sides of the refrigerator around the doors. If you see any beads of water or moisture, then the door seals may be failing to create an air tight seal which causes the cold air from the refrigerator to escape and form condensation around the doors. Sometimes you can solve this problem by applying a light film of gasket lubricant to the existing seals or just cleaning them of any debris with a warm soapy rag. If they still don't seal well after you apply lubricant, or clean them, you may need to replace the entire seal assembly. 3. If the water is coming from the freezer but you think that the defrost drain pipe is clear, then it may be coming from the ice maker. Check the ice maker for cracks in the unit's body or a misalignment of the water supply line. Make sure that the water supply spout in the freezer lines up with the ice maker's water supply cup. 4. Check the ice maker copper water supply line, your ice maker water filter, and the plastic ice maker water supply tube for any cracks, splits or connection leaks. If you find any leaks, remove the leaking part and obtain a replacement at the hardware store. |
|
 Cleaning Refrigerator Condensing Tray |
I hope
that you have found this refrigerator leak troubleshooting guide useful and
that you have saved yourself from having to pay for a service call from a
professional appliance technician.
For more of my appliance repair instructions,
such as the
Air Conditioner Start Capacitor Replacement Guide, visit the
miscellaneous image galleries, product reviews, and how-to's section of
Paul's Travel Pictures. |
If you found this guide to be helpful, please consider making a small donation by clicking on the PayPal.com "Donate" button located to the right of this paragraph. Thank you! (Note: I am not a registered charity. Donations are not tax deductible.) |