
Toyota Corolla MAF Sensor
Replacement Guide
How to clean or change the mass air flow
sensor in a 12th generation 2020, 2021 and 2022 Toyota Corolla sedan.

By Paul B. Michaels Author & Photographer Auto Mechanic Since 1989 |
||
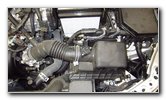
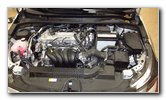 2020 Corolla 2ZR-FAE |
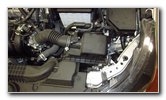 1.8L I4 Air Filter Box |
 MAF Sensor On Top |
| This automotive maintenance
tutorial was specifically written to assist owners of the twelfth generation
2019 (hatchback), 2020, 2021, 2022 (and probably also the 2023, 2024 & 2025)
Toyota Corolla sedan in removing, cleaning and replacing the mass air flow
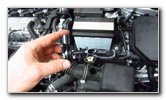
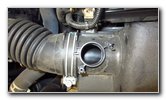
sensor (also known as the MAF meter). Owners of other Toyota and Lexus vehicles such as the Camry, C-HR, Venza, Avalon, 86, Sienna, Tacoma, RAV4, Highlander, 4Runner, Sequoia, IS 350, RX 350, UX 200, GS 350, IS 300 and ES 350 may also find these DIY instructions to be helpful. The OEM (original equipment manufacturer) mass air flow sensor part number is Toyota 22204-75040 (also known as part # 2220475040). A few of the most common symptoms of a dirty, failing or faulty MAF sensor include hard starting, rough idling, hesitating, surging, poor acceleration, hiccups, low fuel economy (reduced MPG), stalling, loss of power and misfiring. You might also see a CEL / SES (check engine light / service engine soon warning) displayed on the gauge cluster. If you have an OBD2 scan tool it should reveal a MAF sensor related DTC (diagnostic trouble code) such as P0100, P0101, P0102, P0103 or P0104. It's also a good idea to check for other issues that may produce similar symptoms such as a vacuum leak from a split rubber hose, a clogged engine air filter, a cracked plastic intake tube, a leaking intake manifold gasket and a faulty PCV valve. The first two steps are to open the hood and move to the right (driver) side of the engine bay. The MAF sensor is located on the top of the engine air filter housing's plastic air intake tube connected to the rubber air intake hose. If you'd like to try cleaning the old sensor before you buy a new one, use some CRC Mass Air Flow Sensor Cleaner spray. The only tool needed to remove and replace the sensor is a standard Phillips head screwdriver. |
||
|
|
||
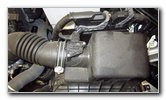
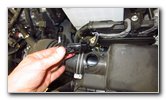
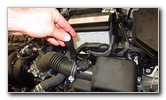
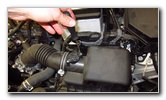
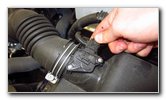 Push In Release Tab |
 Slide Off Connector |
 Power Plug Removed |
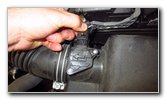
| Push in the release
button on the electrical connector before sliding it straight off the old
sensor. Tuck the wire harness aside. |
||
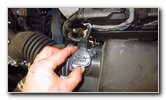
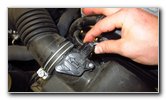
 Loosen Counterclockwise |
 Remove Second Screw |
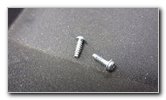 Two Screws Removed |
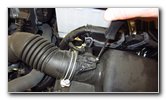
| Remove the two
screws by turning them in the counterclockwise direction with the Phillips
head screwdriver. Spin out the two screws the last few turns by hand to help prevent them from falling down into the engine bay and becoming lost. Set the two screws aside in a safe place. |
||
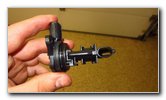
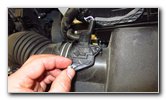
 Rotate Old MAF Sensor |
 Pull Out Old Sensor |
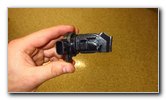 Inspect Old Sensor |
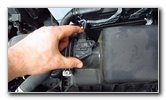
| Gently rotate the
old sensor back and forth a few times to make sure the rubber gasket is not
stuck (or "frozen") in the port (opening). Pull the old sensor straight out of the plastic intake pipe. |
||
 |
 Try Cleaning Old Sensor |
 |
| If you would like
to try cleaning the old MAF sensor before buying a new one, gently spray
some CRC Mass Air Flow Sensor Cleaner
into the openings and exterior.
Avoid spraying the cleaner into the socket for the electrical connector. Allow the sensor to air dry for at least 15 to 30 minutes. Do not use compressed air, heat or shake the sensor to dry it to avoid damaging the sensor wire. |
||
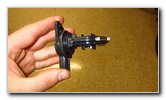
 Inspect Sensor Port |
 Line Up New Sensor |
 Line Up Screw Holes |
| Inspect the opening
in the air intake assembly for any soot, oil or large debris. Carefully lower the new sensor down into the port and rotate it to line up the two screw holes. |
||
 Spin In Two Screws |
 Tighten Clockwise |
 Do Not Over Tighten |
| Spin in the two
screws a few turns by hand to help prevent them from falling down into the
engine bay and becoming lost. Tighten the screws in the clockwise direction with the Phillips head screwdriver until they are snug. Try to avoid over tightening the screws to prevent from cracking the plastic sensor housing or the air intake tube. |
||
 Push On Power Plug |
 New Sensor Installed |
 Test New MAF Sensor |
| Push the electrical
connector straight on to the new sensor. You should feel or hear the power plug "click" securely into place. If you have an OBD2 scanner, clear any MAF sensor related DTC codes. Start the engine and listen closely for any strange sounds. If you do hear any weird noises, immediately turn off the ignition and double check your work. If everything sounds normal, take the car for a short test drive to see if any of the symptoms of a faulty MAF sensor happen again. Don't forget to write down the procedure in your car's service records. Please check out all of my
2020 Toyota Corolla DIY Repair & Maintenance Guides. |
||
| If you found this guide to be helpful,
please consider making a small donation by clicking on the PayPal.com
"Donate" button located to the right of this paragraph. Thank you!
(Note: I am not a registered charity. Donations are not tax deductible.) |