
Toyota
Corolla Map Light Bulbs Replacement Guide
How to change a burnt out map light bulb in the
overhead console of a 12th generation 2020 Toyota Corolla.

By Paul B. Michaels Author & Photographer Auto Mechanic Since 1989 |
||
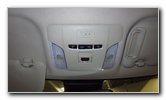 2020 Corolla Map Lights |
 Plastic Pry Bar Tool |
 Loosen Pop Rivets |
| This automotive maintenance
tutorial was specifically written to assist owners of the twelfth generation
2019 (hatchback), 2020, 2021, 2022 (and probably also the 2023, 2024 & 2025)
Toyota Corolla sedan in changing a burnt out map light bulb located in the
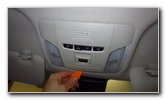
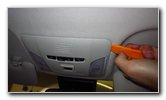
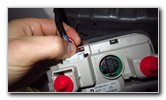
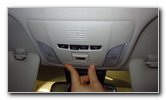
overhead console or upgrading both bulbs to LED units. Owners of other Toyota and Lexus vehicles such as the Camry, C-HR, Venza, Avalon, 86, Sienna, Tacoma, RAV4, Highlander, 4Runner, Sequoia, IS 350, RX 350, UX 200, GS 350, IS 300 and ES 350 may also find these DIY instructions to be helpful. The compatible replacement miniature wedge base light bulb part number is 2825 (also known as W5W). If you'd like to have brighter map lights that will also last much longer before burning out, install some 2825 LED units. The only tool needed to access and replace the bulbs is a plastic pry bar tool. I found it easiest to use several plastic trim panel removal tools to help gently loosen the four stubborn pop rivets that secure the overhead console in place to the ceiling of the passenger compartment without causing any damage. Attention: Please proceed with caution and at your own risk! Gently insert the blade of a plastic pry bar tool in between the outer edge of the overhead console and the fabric headliner. |
||
|
|
||
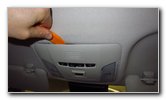
 Left Rear Edge |
 Right Rear Edge |
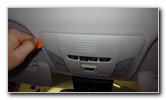
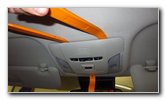 Very Gently Loosen |
| Very carefully and
slowly apply some downward pressure to begin loosening the four plastic pop
rivets that secure the entire assembly in place. If you only have one plastic trim panel removal tool, remove it and re-insert it in many locations at every edge of the overhead console. Continue gently and carefully loosening the pop rivets. Do NOT use excessive force. The pop rivets should eventually release with minimal effort. If you have an entire set of plastic tools, insert the blade of a tool at each side of the overhead console and leave them there to loosen the pop rivets. |
||
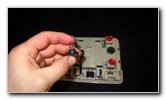
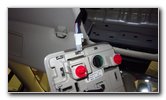
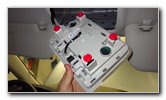 Remove Light Housing |
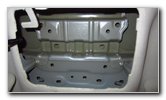 Roof Above Headliner |
 Push In Release Tab |
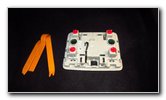
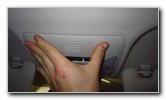
| Once all four pop
rivets have been released, pull the overhead console out of the headliner.
You'll be able to see the metal roof of the car with the mounting holes for the red plastic pop rivets. Push in the release tab on the white plastic electrical connector before sliding it straight out of its socket. |
||
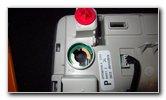
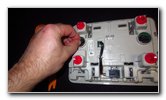
 Four Red Pop Rivets |
 1/4 Turn CCW |
 Bulb Socket Removed |
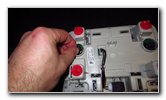
| Set the overhead
console down on a soft surface such as the floor mat or a towel to help
prevent from scratching the lens covers. Locate the two round black plastic bulb sockets. Rotate the bulb socket 1/4 turn in the counterclockwise direction before pulling it straight out of the housing. |
||
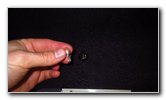 Pull Out Old Light Bulb |
 Old Light Bulb Removed |
 Empty Light Housing |
| If the old light
bulb was recently turned on, be careful when you remove it. The bulb might
still be hot enough to burn your fingers. Pull the old light bulb straight out of the socket. If you have trouble removing the bulb from the socket, try gently wiggling it back and forth while pulling it straight out. |
||
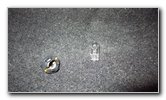
 Push In New Light Bulb |
 1/4 Turn Clockwise |
 Raise Console To Plug |
| Push the new number
2825 light bulb straight into
the socket. If you'd like to have brighter map lights, install some compatible replacement 2825 LED bulbs. The 2825 light bulb is also known as part number "W5W". Re-insert the bulb socket into the housing and rotate it 1/4 turn in the clockwise direction to secure it into place. Raise the overhead console up towards the opening in the headliner. |
||
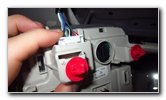 Push In Connector |
 Line Up Pop Rivets |
 Push To Secure |
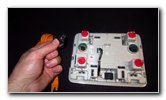
| Push the electrical
connector straight into its socket. You should feel or hear the power plug "click" securely into place. I recommend testing your new light bulbs before re-installing the overhead console. Push the "ON" or "DOOR" button to test the new light bulbs. Tip - If you installed an LED bulb and it doesn't work, try removing it from the socket, rotate it 180 degrees and then push it back into the socket. Some LED bulbs are "polarized" and will only work when the "+" positive and "-" negative electrical contacts are in the correct orientation. Line up the four red plastic pop rivets with their corresponding holes in the metal mounting bracket. |
||
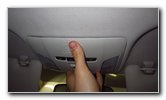
 Fasteners Secured |
 Overhead Console |
 Test New Light Bulbs |
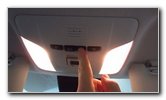
| Carefully push on
the overhead console to secure the four pop rivet friction fasteners into
place. Double check that every edge of the assembly is flush with the fabric headliner. To test the new light bulbs again, press the "ON" button. I recommend leaving the "Door" button pushed in so that the map lights will turn on any time the driver door or a passenger door is opened. Be sure to write down the bulb change in your car's service records. Please check out all of my
2020 Toyota Corolla DIY Repair & Maintenance Guides. |
||
| If you found this guide to be helpful,
please consider making a small donation by clicking on the PayPal.com
"Donate" button located to the right of this paragraph. Thank you!
(Note: I am not a registered charity. Donations are not tax deductible.) |