
Mitsubishi
Outlander PCV Valve Replacement Guide
How to check or change the PCV (positive
crankcase ventilation) valve in a 2014 to 2021 Mitsubishi Outlander.

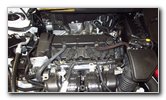
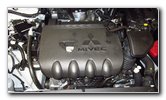
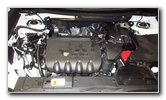
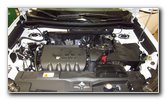 2020 Outlander 2.4L I4 |
 Plastic Engine Cover |
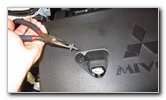
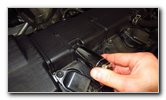
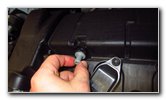
 Loosen Counterclockwise |
| This automotive
maintenance tutorial was specifically written to assist owners of the third
generation (2014, 2015, 2016, 2017, 2018, 2019, 2020 & 2021) Mitsubishi
Outlander SUV in checking, cleaning or changing the PCV (positive crankcase
ventilation) valve located in the valve cover of the MIVEC 2.4 liter
naturally aspirated inline four cylinder engine. (The procedure should be
the same or very similar for models equipped with the 2.0L I4 engine or the
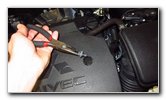
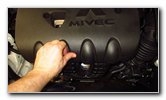
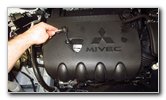
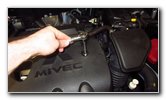
3.0L V6 engine.) Owners of other Mitsubishi vehicles such as the Outlander Sport, Eclipse Cross, Mirage, Mirage G4, Lancer, ASX, Montero Sport, Pajero, Xpander, Strada and RVR may also find these DIY instructions to be helpful. The OEM (original equipment manufacturer) PCV valve part number is Mitsubishi 1035A422. The tools needed to complete this procedure include a 10mm socket with a 1/4" drive ratchet, a pair of needle nose pliers and a 23mm deep well socket (or a 24mm socket would also work). If you'd like to clean the old PCV valve and reinstall it, use carb cleaner or something similar such as throttle body cleaner, brake parts cleaner spray or engine degreaser. Just a few of the possible symptoms of a clogged or failing PCV valve include misfires, rough acceleration, surging, a rough idle, a CEL / SES (check engine light or service engine soon light), oil leaks, oil consumption (burning oil) and blue, white or black smoke coming from the exhaust system. If you have an OBDII scanner, a few related DTC (diagnostic trouble codes) include P053A, P0300, P0171, P0174 and P052E. The first steps are to open the hood and locate the two black metal bolts on the top of the plastic engine cover. Loosen the bolts by turning them in the counterclockwise direction with a 10mm socket and a 1/4" drive ratchet. (You could also use a Phillips head screwdriver). |
||
|
|
||
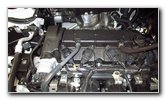
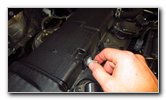
 Remove Right Side Bolt |
 Left Side Black Bolt |
 Pull Out Right Side Bolt |
| You may need to use
needle nose pliers to lift the black metal bolts out of the plastic engine
cover. Set the two bolts aside in a safe place. |
||
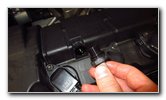
 Lift Up Front of Cover |
 Plastic Cover Removed |
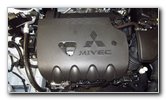
 Engine Valve Cover |
| The plastic engine
cover is still held in place by a plastic peg attached to a rubber socket. Gently lift up the front edge of the engine cover to release the friction fastener. Set the engine cover aside in a safe place. |
||
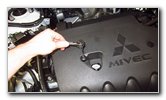
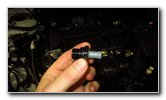
 Locate Rubber Hose |
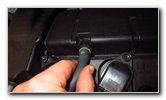 Pull Hose Off PCV Valve |
 Rubber Hose Detached |
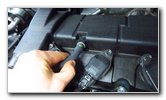
| Locate the black
rubber hose in between the first and second spark plug ignition coils. Carefully pull the rubber hose straight off the old PCV valve. A few drops of oil might leak out of the hose or weep out of the old valve. |
||
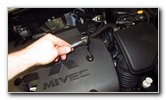
 Loosen Counterclockwise |
 Spin Out Old Valve |
 Old Valve Removed |
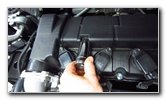
| Loosen the old
valve by turning it in the counterclockwise direction with a deep well 23mm
socket. A 24mm deep well socket is close enough in size that it would also work. You could also use an adjustable crescent wrench or some pliers. Once the old valve is loose, spin it out the rest of the way by hand. |
||
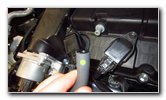
 Empty Port In Engine |
 Shake - Rattle Sound |
 Spin In New PCV Valve |
| To check the
condition of the old valve, shake it vigorously. If you hear a "healthy" sounding rattling noise, the old valve is most likely still in good working condition. If you'd like to try cleaning and reusing the old valve, thoroughly spray it inside and out with carburetor cleaner. You could also use brake parts cleaning spray, throttle body cleaner or engine degreaser. Allow the PCV valve to fully dry before reinstalling it. If the old valve seems damaged or clogged, replace it with a new OEM Mitsubishi 1035A422 PCV valve. (The old valve also had the part number CMFS 9Y07 printed on it.) This is especially important if your vehicle has over 60,000 miles. PCV valves can sometimes last over 100,000 miles, but they are inexpensive enough that they should be replaced early as preventative maintenance. Spin in the new PCV valve in the clockwise direction by hand with just your fingers. Do NOT use a ratchet or a wrench to tighten the plastic PCV valve since it can easily be over tightened and cracked. |
||
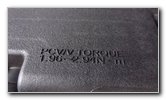 Torque Specification |
 Gently Tighten New Valve |
 Push On Rubber Hose |
| The torque
specification for tightening the PCV valve is printed on the plastic valve
cover and it is a range of just 1.96~2.94 N*m (or 1.44 lb-ft to 2.16
lb-ft). Use the 23mm socket by itself to slightly tighten the new PCV valve until it is just barely snug. Try to avoid over tightening the new valve! Push the rubber hose over the nipple on the new PCV valve until it is fully seated in place. |
||
 Push On Engine Cover |
 Secure Friction Fastener |
 Replace Left Bolt |
| Lower the engine
cover back down into place. Push on the front edge of the the cover to secure the plastic peg to the rubber socket. Spin in the two bolts a few turns by hand in the clockwise direction to help prevent them from becoming cross threaded. |
||
 Tighten Right Side Bolt |
 Plastic Cover Secured |
 PCV Valve Change Done |
| Tighten the two
bolts in the clockwise direction with the 10mm socket and a 1/4" drive
ratchet until they are snug. Try to avoid over tightening the bolts to prevent from cracking the plastic engine cover. Be sure to write down the PCV valve change in your vehicle's service records. Please check out all of the
2014-2021 Mitsubishi Outlander DIY Repair & Maintenance Guides. |
||
| If you found this guide to be helpful,
please consider making a small donation by clicking on the PayPal.com
"Donate" button located to the right of this paragraph. Thank you!
(Note: I am not a registered charity. Donations are not tax deductible.) |