
Chevrolet
Malibu Tail Light Bulbs Replacement Guide
How to change a burnt out brake, rear
turn signal or reverse light bulb in a 6th generation 2004 to 2008 Malibu.

By Paul B. Michaels Author & Photographer Auto Mechanic Since 1989 |
||
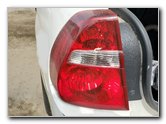 2005 Malibu Tail Lights |
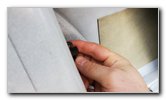
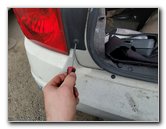
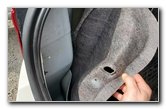 Remove Carpet Fastener |
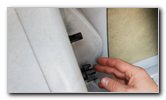 Two Thumb Nuts |
| This automotive
maintenance tutorial was specifically written to assist owners of the sixth
generation (2004, 2005, 2006, 2007 and 2008) GM Chevrolet Malibu sedan in
changing a burnt out brake, rear turn signal or reverse light bulb in the
tail light housings. Owners of other General Motors vehicles from Chevrolet, Buick, Cadillac and GMC such as the Impala, Sonic, Spark, Trax, Equinox, Cavalier, Lumina, Venture, Cobalt, Cruze, LaCrosse, Regal, Verano, LeSabre, Lucerne, Cascada, DeVille, CTS, STS, Savana, Acadia and Terrain may also find these DIY instructions to be helpful. The compatible replacement light bulb part numbers are as follows: Brake # 3057, Rear Turn Signal # 3057 and Reverse # 921. If you would like to have brighter lights that will also last much longer before burning out, install some 3057 LED and 921 LED bulbs. The first two steps are to open the trunk and then move to the side of the vehicle with the burnt out bulb. The only tool needed to remove the tail light housing and access the bulb sockets is a standard Phillips head screwdriver. Remove the cargo net anchor that secures the carpet liner in place by turning it in the counterclockwise direction. Set the cargo net anchor aside in a safe place. If your Malibu is not equipped with cargo net anchors, you may instead need to pry out the plastic pop rivet friction fasteners that secure the cargo area liner in place. Gently pull back the liner to access the two thumb nuts that secure the tail light assembly to the rear corner of the car. |
||
|
|
||
 Loosen Counterclockwise |
 Lower Thumb Nut |
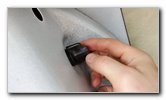 Loosen Counterclockwise |
| Loosen the two
thumb nuts by turning them in the counterclockwise direction. Spin the thumb nuts of the threaded rods and set them aside in a safe place. |
||
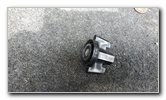 2 Thumb Nuts Removed |
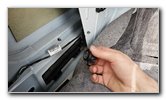
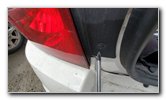 Phillips Head Screw |
 Loosen Screw |
| Locate the single
screw on the bottom inner edge of the tail light housing in between the
brake light and the rubber weatherstripping for the trunk lid. Remove the screw by turning it in the counterclockwise direction with the Phillips head screwdriver. |
||
 Fasteners Removed |
 One Screw Removed |
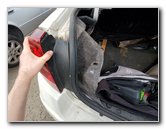
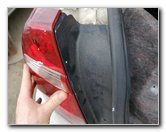
 Pull Assembly Off Car |
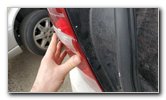
| Set the screw aside
with the two plastic thumb nut fasteners. Gently pull the tail light housing straight off the rear corner of the car. If you have trouble removing the housing, you may need to carefully and gently wiggle it back and forth while pulling it straight back. Try to avoid using excessive force. The light housing should slide off the rear corner of the vehicle relatively easily. |
||
 Gently Wiggle To Loosen |
 Rear Turn Signal Bulb |
 Reverse Bulb Socket |
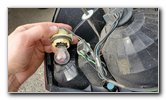
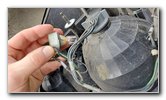
| Turn over the tail
light housing to access the three bulb sockets. Place a towel in between the tail light housing and the rear bumper cover to prevent the plastic lens or the paint from being scratched. The brake light bulb is located at the bottom of the housing. The reverse light is in the center of the housing and the rear turn signal bulb is situated at the top of the housing. Rotate the bulb socket 1/4 turn in the counterclockwise direction before pulling it straight out of the socket. Carefully pull the old wedge base light bulb straight out of the socket. If you have trouble removing the old bulb due to corrosion (rust) or debris, put on some gloves to protect your hands and try gently wiggling the bulb back and forth in the socket while pulling it straight out. Try to avoid using excessive pressure on the bulb to prevent from having it break between your fingers and cut your skin. |
||
 Brake Light Bulb Socket |
 Push On Housing |
 Replacing Fasteners |
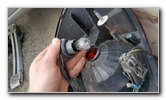
| Push the new light
bulb into the socket. Both the brake and rear turn signal light bulbs are white/clear number 3057 bulbs. If you would like to have brighter lights that will last much longer than the incandescent bulbs, install some compatible replacement 3057 LED bulbs. Re-insert the socket into the housing and rotate it 1/4 turn in the clockwise direction to secure it into place. If you would like to have brighter reverse (back-up) lights for extra safety, install some compatible miniature wedge base number 921 LED light bulbs. Once you are done replacing the bulbs, slide the tail light housing back into place on the rear corner of the vehicle. Replace the Phillips head screw by turning it in the clockwise direction until it is snug. Try to avoid over tightening the screw to prevent from cracking the plastic inner edge of the housing. Spin on the two thumb nuts in the clockwise direction and tighten them until they are snug. Push the carpet trunk liner panel back into place. Replace the cargo net anchor or the pop rivet fasteners. To test the new light bulbs, have an assistant step on the brake pedal, turn on the hazard signals and shift the transmission into reverse by moving the gear selector from "P" to "R". Be sure to write down the bulb change in your vehicle's service records. Please
take a look at all of the
Chevrolet Malibu DIY Repair & Maintenance Guides. |
||
| If you found this guide to be helpful,
please consider making a small donation by clicking on the PayPal.com
"Donate" button located to the right of this paragraph. Thank you!
(Note: I am not a registered charity. Donations are not tax deductible.) |