
Jenn-Air
Refrigerator Condenser Coils Cleaning Guide
How to clean the condenser coils on the
back of a Jenn-Air refrigerator and freezer with photo illustrated DIY steps.
 Jenn-Air Refrigerator |
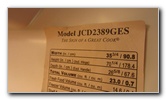 Model # JCD2389GES |
|
This appliance maintenance tutorial was specifically written to
assist owners of the Jenn-Air model number JCD2389GES side-by-side
refrigerator and freezer in cleaning the condenser coils located on
the back side of the unit behind an access cover. Owners of other appliances made by the Whirlpool corporation including KitchenAid, Amana, Kenmore and Maytag may also find these DIY instructions to be helpful. The tools needed to remove the lower rear panel and access the condenser coils include a 1/4" socket and a 1/4" drive ratchet or a 1/4" wrench. To clean the condenser coils, I highly recommend buying a long Condenser Coil Brush, also known as an "auger lint remover", which can also be used to clean out dryer vents or radiator heaters). You will also need a vacuum cleaner with a detachable accessory hose and a brush or crevice attachment. |
|
|
|
|
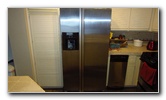
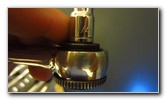
 Water & Ice Dispenser |
 Carefully Pull Out Fridge |
| The first step is
to very carefully roll the refrigerator about three feet away from the wall
and out from between your kitchen cabinets. Avoid pulling from the middle or the top of the refrigerator to prevent from having tip over and fall on top of you. The refrigerator has four wheels, so it should roll out relatively easily. You may need to remove the debris in front of the refrigerator with your vacuum cleaner in order for it to roll smoothly and reduce the risk of scratching your tile or laminate wood flooring. |
|
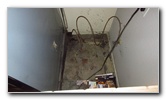
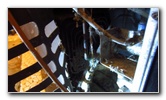
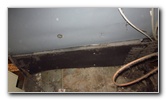 Cardboard Access Cover |
 Two Small Screws - Left |
| I wasn't surprised
to see a large amount of dust and debris behind our refrigerator.
It probably hadn't been cleaned in at least five to ten years. There are four small screws on the black cardboard access panel located at the bottom edge of the back side of the refrigerator. |
|
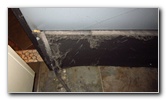
 Air Intake - Right |
 Two Small Screws - Right |
| Two screws are on
the left edge and the other two are located on the right edge. Use the crevice attachment on your vacuum cleaner or wet/dry shop vac to clean the accumulated dust, pet hair and lint on the ventilation slats on the right side of the access panel. |
|
|
|
|
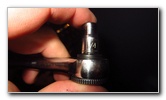 1/4" Drive Ratchet |
 1/4" Socket |
| Attach the 1/4" socket to a 1/4" drive ratchet. | |
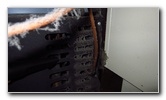
 Remove Screws |
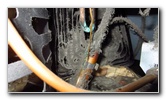 Pull Back Access Panel |
| Remove the two
screws located on the right side of the black cardboard paper access cover. Gently bend back the panel to access the refrigerator coils. After seeing how dirty our coils looked, I highly recommend buying a 24" or 26" long Condenser Coil Brush to thoroughly remove all of the lint, dust, hair and dirt from your condenser coils. (A coil brush can also be useful for dusting a radiator heater or cleaning out lint from your laundry dryer's lint trap, exhaust hose and outside air vent.) I ordered a brush immediately after I finished cleaning the coils with just my vacuum. |
|
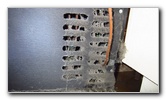
 Dirty & Dusty Coils |
 Clean With Vacuum Hose |
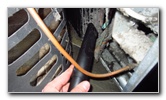
| Use a brush or
crevice attachment on your vacuum cleaner's accessory hose to suction off
the lint attached to the coils. If you have a wet/dry shop vacuum, you may choose to plug the hose into the "blower" opening on the opposite side. Then carefully blow out the rest of the dust from in between the coils. I recommend wearing a mask to avoid breathing in the dust. This would also be a good time to double check that the water supply line's compression nut fitting is tight to prevent water leaks and make sure the copper pipe or plastic tubing is in good condition. For more, please take a look at my list of
DIY Home Repair & Maintenance Guides. |
|
| If you found this guide to be helpful,
please consider making a small donation by clicking on the PayPal.com
"Donate" button located to the right of this paragraph. Thank you!
(Note: I am not a registered charity. Donations are not tax deductible.) |

|