
Infiniti QX60 Rear Turn
Signal Light Bulb Replacement Guide
How to change a burnt out rear turn
signal tail light bulb in a first generation 2013 to 2020 Infiniti QX60 SUV.

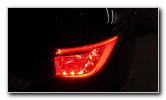
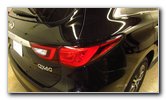 2020 QX60 Tail Lights |
 Open Tailgate |
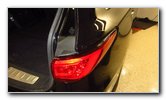
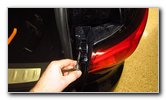
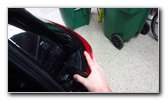
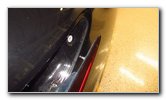
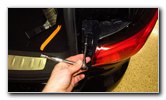
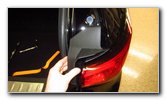
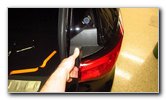
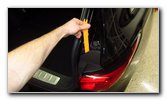 Pry Off Plastic Trim Cover |
| This automotive
maintenance tutorial was specifically written to assist owners of the first
generation (2013, 2014, 2015, 2016, 2017, 2018, 2019 & 2020) Infiniti QX60
luxury SUV in changing a burnt out rear turn signal light bulb in the tail
light housing. Owners of other Infiniti and Nissan vehicles such as the JX35, Q50, Q60, QX50, QX80, Pathfinder, Murano, Rogue, Armada, Kicks, Frontier, Titan, NV, NV200, 370Z, GT-R, Leaf, Maxima, Altima, Sentra and Versa might also find these DIY instructions to be helpful. The compatible replacement wedge base light bulb part number is 7440 (also known as W21W). If you would like to have brighter rear turn signal lights, install some 7440 LED bulbs. The tools needed to complete this procedure include a plastic pry bar tool, a 10mm socket and a 1/4" drive ratchet. The first two steps are to open the tailgate door for the cargo area and move to the side of the SUV with the burnt out light bulb. Use the plastic pry bar tool to gently remove the black plastic trim cover at the top inner corner of the tail light housing. |
||
|
|
||
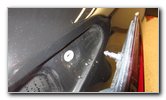
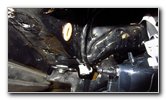
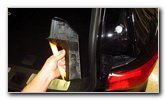 Trim Cover Removed |
 Two Housing Bolts |
 Loosen Counterclockwise |
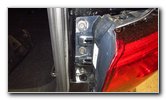
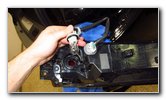
| Set the plastic
trim panel aside in a safe place. Once the cover is out of the way, you'll be able to see three black metal bolts. The two top bolts secure the tail light assembly in place. You do not need to remove the third bolt at the bottom, which is one of the fasteners for the rear bumper cover. Loosen the top bolt by turning it in the counterclockwise direction with the 10mm socket and a 1/4" drive ratchet. |
||
 Loosen Middle Bolt |
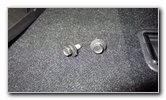 Two Bolts Removed |
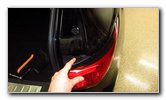 Push To Outside ---> |
| Loosen the second
bolt (in the middle) by turning it in the counterclockwise direction with
the 10mm socket and a 1/4" drive ratchet. Set the two bolts aside in a safe place. The tail light housing is still held in place by two metal pegs or "spikes" on the back side of the assembly that are inserted into two plastic grommets on the rear corner of the SUV. Do NOT pull the tail light housing straight back like you would for most vehicles. To remove the tail light housing on the QX60, you have to gently push it towards the outside of the vehicle away from the cargo area. For the passenger side housing, you would push it to the right as shown in the picture above. |
||
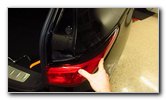
 Gently Pull Off Side |
 Metal Peg & Grommet |
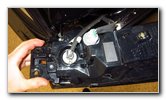 Turn Over Light Housing |
| If you have trouble
removing the housing, try gently wiggling it and pulling it off towards the
outside of the vehicle. You could also use the small plastic pry bar tool to very gently pry in between the plastic lens and the metal body panel. Avoid using excessive force to prevent from cracking the plastic tail light lens. There is one metal peg and grommet at the front narrow corner of the housing and another set at the rear edge near the two bolt holes. Turn over the housing to access the bulb socket. (The brake and rear side marker lights are LED bulbs that should last the life time of the vehicle.) |
||
 1/4 Turn Counterclockwise |
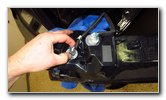
 Pull Out Bulb Socket |
 Pull Out Old Light Bulb |
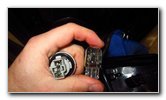
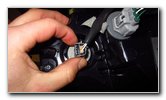
| Rotate the gray
plastic rear turn signal light bulb socket 1/4 turn in the counterclockwise
direction before pulling it straight out of the housing. If the old light bulb was recently turned on, be careful when you remove it. The old bulb might still be hot enough to burn your fingers. Carefully pull the old light bulb straight out of the socket. If you have trouble removing an old stubborn or stuck bulb due to corrosion (rust) or debris, try gently wiggling it back and forth while pulling it straight out. Try to avoid using excessive force. For extra stubborn old bulbs, I highly recommend putting on thick gloves just in case the old bulb shatters between your fingers. |
||
 Push In New Light Bulb |
 1/4 Turn Clockwise - Lock |
 Line Up Peg & Grommet |
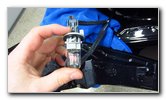
| Push a new number
7440 light bulb straight into
the socket. Clean off the new bulb with a paper towel and some rubbing alcohol. If there is any oil or grease on the new bulb, it may cause hot spots which could reduce the life of the bulb. Re-insert the bulb socket into the housing and rotate it 1/4 turn in the clockwise direction to secure it into place. To re-attach the tail light housing, line up the two metal pegs on the back side of the assembly with their corresponding white plastic grommets on the rear corner of the SUV. |
||
 Second Peg & Grommet |
 Line Up Two Metal Pegs |
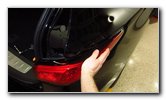 Push On Tail Light Housing |
| Push the tail light
housing on to the vehicle. Make sure the lens is flush with the metal body panel at every edge. |
||
 Tighten Clockwise |
 Replace Second Bolt |
 Line Up Trim Piece |
| Spin in the two
bolts a few turns by hand in the clockwise direction to prevent them from
becoming cross threaded. Tighten the bolts in the clockwise direction with the 10mm socket and a 1/4" drive ratchet until they are snug. Try to avoid over tightening the bolts to prevent from cracking the plastic inner edge of the tail light housing. Line up the black plastic trim cover. |
||
 Pop On Plastic Cover |
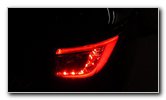 LED Brake Light |
 Test Turn Signal Bulb |
| Push on the trim
cover to secure the retaining clips. Double check that the trim cover is securely attached. To test the new rear turn signal light bulb, activate the hazard signals. Tip - If you installed LED bulbs and they don't work, try removing them from their sockets, rotating them 180 degrees and pushing them back into their sockets. Some LED bulbs are polarized and will only work when the "+" positive and "-" negative electrical contacts are in the correct orientation. Be sure to write down the bulb change in your SUV's service records. Please
take a look at all of the
2013-2020 Infiniti QX60 DIY Repair & Maintenance Guides. |
||
| If you found this guide to be helpful,
please consider making a small donation by clicking on the PayPal.com
"Donate" button located to the right of this paragraph. Thank you!
(Note: I am not a registered charity. Donations are not tax deductible.) |