
Dodge Charger
Engine Oil Change Guide
How to change the motor oil and filter in
a 2006 to 2010 Dodge Charger sedan equipped with the 3.5 liter V6 engine.

By Paul B. Michaels Author & Photographer Auto Mechanic Since 1989 |
||
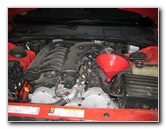
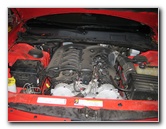 Dodge Charger 3.5L V6 |
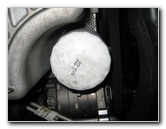
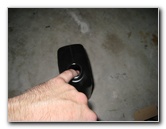
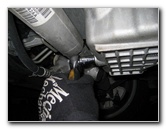
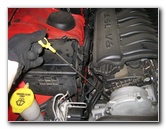
 Remove Oil Filler Cap |
 Oil Fill Cap Removed |
| This
automotive "how-to" guide was specifically written to assist owners
of the 2006, 2007, 2008, 2009 and 2010 Dodge Charger sedan with the 3.5L V6 engine in
replacing the motor oil and oil filter. Owners of other Dodge or Chrysler vehicles such as the Magnum, Challenger, 300, Caliber, Journey, Avenger, Nitro, Durango, Grand Caravan, 200 and Town & Country minivan may also find this guide to be useful. To complete this oil change procedure, you'll need the following items: 6 quarts (5.7 liters) of new SAE 10W-30 oil, a new oil filter, a floor jack, jack stands, a used oil catch container, a 13mm socket with a 3/8" drive ratchet or a 13mm wrench and an automotive funnel. Some oil filters compatible with the Dodge Charger's 3.5L V6 engine include the following with their respective part numbers: Fram XG16, Royal Purple 20-253, Wix 51085, Bosch 3402, Purolator PL14670, ACDelco PF13 and Mobil 1 M1-204. Please verify the correct replacement oil filter for your car by using the Amazon Part Finder website. The part number varies depending on the model year, engine and/or trim level. |
||
|
|
||
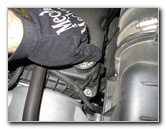
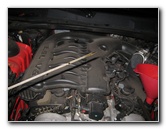
 Engine Oil Pan |
 Oil Drain Bolt |
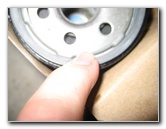
 Engine Oil Filter |
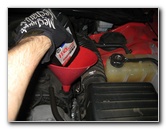
| The first step is
to warm up the engine for a few minutes.
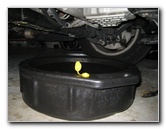
This will help suspend any contaminants inside the motor within the old oil and allow it to drain out more quickly. Then turn off the engine, pop the hood, and remove the oil filler cap by twisting it counter clockwise. Raise the passenger side of the car with the floor jack and securely support it with a jack stand (or two jack stands for extra safety). Slide the used oil catch container below the passenger side of the engine and position it underneath the silver metal oil pan. Use a 13 mm socket with a ratcheting wrench to carefully loosen the oil drain bolt located at the rear edge of the oil pan by turning it counter clockwise until it can be removed. |
||
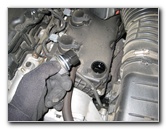
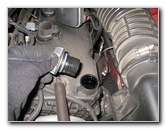
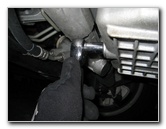 Remove 13 MM Drain Bolt |
 Drain Out Old Motor Oil |
 Twist Off Old Oil Filter |
| Allow the old oil
to drain out of the engine for at least a few minutes before replacing the
oil drain bolt by turning it clockwise.
The service manual states that the oil drain bolt should be tightened with a torque wrench to about 20ft lbs. If you don't have a torque wrench, tighten the bolt a 1/4 to 1/3 turn past hand tight. Don't over tighten the bolt which may damage the threads or the oil pan and cause an oil leak. Move the oil catch container forward to just below the old oil filter. Twist off the old oil filter by hand or use an oil filter wrench to turn it counter clockwise until it can be removed from the engine. If you need an oil filter wrench, I love the Lisle 63600 since it works really well on a wide variety of filter sizes and you can use the leverage of a 3/8" drive ratchet. |
||
|
|
||
 Dip Finger In New Oil |
 Lubricate Oil Filter O-Ring |
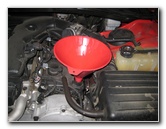
 Insert Funnel |
| Put some new oil on
your finger and run it along the rubber o-ring on the new oil filter until
it is adequately lubricated.
This will help the o-ring to form a better seal which prevents leaks and also make it easier to remove during the next oil change. Install the new oil filter by turning it clockwise and tighten it to just past hand tight. Don't use the oil filter wrench to tighten the new oil filter since it can damage the filter and cause it to leak. |
||
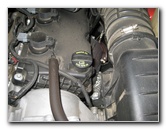
 |
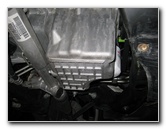
 Tighten Oil Drain Bolt |
 Twist On New Oil Filter |
| Double check that
both the 13 MM oil drain bolt and the new oil filter are adequately
tightened before lowering the car from the jack stands.
Insert the automotive funnel into the oil filler hole and pour in about 5 quarts of new oil. Run the engine for a minute, turn it off, and let it rest for a few minutes before checking the oil level on the dipstick. |
||
 Pour In New Oil |
 Oil Level Dipstick |
 Check Oil Level |
| Slowly add the 6th
and final quart of new oil and repeatedly check the oil level on the
dipstick until it just reaches the "MAX" line.
The engine may not need the entire 6 quarts of new oil depending on how long you allowed the old oil to drain out or the brand of new oil filter. |
||
 Add Oil - Check Again |
 Replace Oil Filler Cap |
 Oil Change Complete |
| Once the oil is at the correct level, remove
the funnel and replace the oil filler cap by turning it clockwise.
I'd recommend checking the oil level on the dipstick a few times during the next week and watch your driveway or garage for any drops of oil that may indicate a leak from the oil drain bolt or oil filter. Be sure to record the vehicle's mileage in your maintenance records book. To reset the oil change indicator light, turn the key in the ignition switch to the "ON" position but don't start the engine. Then fully depress the accelerator pedal three times quickly within 10 seconds. Finally, turn the ignition key to the "OFF" position. For more, check out my
Dodge
Charger Maintenance & Repair Guides page. |
||
| If you found this guide to be helpful,
please consider making a small donation by clicking on the PayPal.com
"Donate" button located to the right of this paragraph. Thank you!
(Note: I am not a registered charity. Donations are not tax deductible.) |