
Acura MDX
Throttle Body Cleaning Guide
How to check or clean the throttle body
on the VTEC 3.5L V6 engine in a 1st generation 2001 to 2006 Acura MDX.

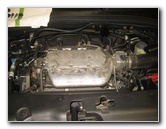
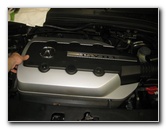
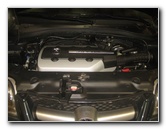 2006 MDX 3.5L V6 Engine |
 Pry Off Bolt Covers |
 Left Rear Cover |
| This
automotive maintenance tutorial was specifically created to assist
owners of the first generation (2001, 2002, 2003, 2004, 2005 & 2006)
Acura MDX in checking or cleaning the "DBW" (drive-by-wire)
electronic throttle body and valve for the J35A3 or J35A5 VTEC 3.5L
V6 engine. Owners of other Acura or Honda vehicles such as the RDX, ILX, TLX, RLX, TL, CL, RSX, RL, TSX, ZDX, NSX, Integra, Pilot, Accord, Civic, Fit, Clarity, CR-V, CR-Z, HR-V, Odyssey, Element and Ridgeline may also find these DIY instructions to be helpful. The tools and other items needed to complete this procedure include a small plastic pry bar tool, a 10mm socket with a 1/4" drive ratchet, a Phillips head screwdriver or an 8mm socket with an extension bar, a can of throttle body cleaner spray and a micro fiber towel or paper towels. |
||
|
|
||
If you would like to fully remove the throttle body to clean both sides, you'll need a 12mm socket with a 1/4" or 3/8" drive ratchet and possibly also a new gasket. The compatible replacement gaskets for the 2003-2006 MDX with their part numbers are as follows: Fel-Pro 61331 and the MAHLE Original G32319. The 2001 and 2002 model years use a slightly different gasket which is part number Fel-Pro 61319 or MAHLE G31899. |
||
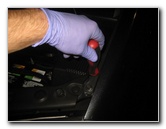
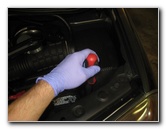
 Rear Right Bolt Cap |
 Front Right Bolt Cap |
 Loosen Counterclockwise |
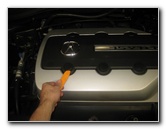
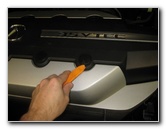
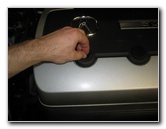
| For easier access
to the throttle body, you'll need to remove the plastic engine manifold
cover. There are six round plastic caps on the engine cover. The two in the middle are decorative only and do not need to be removed. Remove the four caps at the corners of the cover (front left, rear left, front right, rear right) by gently lifting them out with a plastic pry bar tool or a flathead screwdriver. Set the bolt caps aside in a safe place. |
||
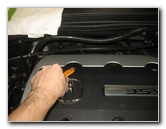
 Remove Four Bolts |
 Four Caps & Four Bolts |
 Lift Off Engine Cover |
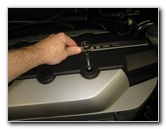
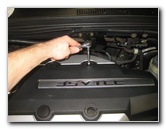
| Loosen the four
bolts by turning them counterclockwise with a 10mm socket and a ratchet. Set the four bolts aside in a safe place. Carefully lift the plastic cover off the top of the engine and set it aside in a safe place. |
||
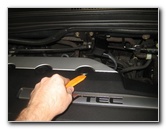
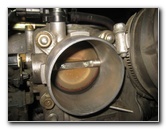
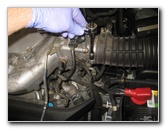
 Manifold Exposed |
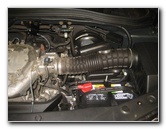 Air Intake Hose |
 DBW Throttle Body |
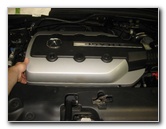
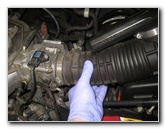
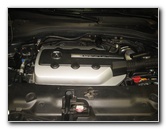
| Locate the black
rubber air intake hose and the silver metal throttle body on the right
(driver) side of the engine bay. The MAP sensor is located on the top of the throttle body and the IAT sensor is on the front. |
||
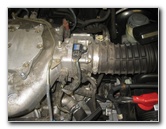
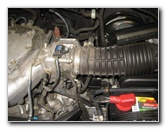
 Loosen Hose Clamp |
 Loosen Air Box Screws |
 Move Aside Air Intake |
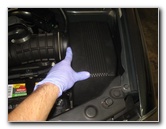
| In order to access
the air intake (right) side of the throttle body, you'll need to remove the
air box cover and loosen the hose clamp. Loosen the metal hose clamp on the rubber air intake tube by turning the fastener in the counterclockwise direction with a 10mm socket and a 1/4" drive ratchet. Then loosen the four screws on the air box cover by turning them counterclockwise with an 8mm socket, a long extension bar and a ratchet. You could also use a Phillips head screwdriver if your air box screws aren't partially stripped like mine. Carefully lift the cover off the air box and slide the air intake hose off the throttle body. I chose to just temporarily move aside the air intake hose rather than entirely disconnect it.
The Acura MDX (as well as the Honda Pilot, Odyssey and Ridgeline) has a D.B.W. (drive-by-wire) electronic throttle body. If you force open the throttle valve with your fingers, you may damage the electronic valve's gears and motor. At the very least, you may need to complete the idle speed learn procedure and clear an engine error code after moving the throttle plate with your fingers. There is also the risk of the electronic valve motor activating and causing severe injury to your fingers. Some of the DTC (diagnostic trouble codes) you may see with an OBD2 (OBDII) scanner include P2119 (control range), P0120 (throttle position sensor), P2111 (throttle actuator stuck open), P2112 (stuck closed), P2118 (current range) and P2108 (throttle actuator control module performance). |
||
|
|
||
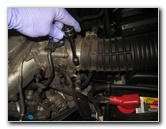
 Throttle Body Exposed |
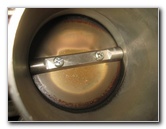 Relatively Clean After 160K |
 Wipe Out Throttle Body |
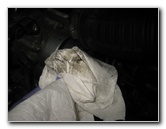
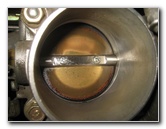
| I was very
surprised to see how clean the throttle body looked in this 2006 MDX after
160,000 miles.
I believe this is due to the previous owner having the engine air filter replaced every 30,000 miles, his 75 mile round trip drive on the highway to work and almost always filling up with high quality Costco premium 91 octane gasoline. Spray some throttle body cleaner spray on to a micro fiber towel or a paper towel. Very gently and carefully wipe out the area inside the throttle body and on the valve.
If the intake (right) side of your throttle body looks very dirty with a thick layer of soot and oily sludge, you should consider removing the assembly to clean the manifold (left) side of the throttle body. To separate the throttle body from the manifold, first disconnect the power plug for the MAP sensor and remove its screw before pulling it straight out. Then remove the two 12mm bolts on the bottom of the throttle body and the two 12mm nuts on the top of the throttle body. Carefully pull the throttle body off the manifold. You may also choose to disconnect the electrical connector for the D.B.W. throttle valve. If you do remove the throttle body, there is a good change the gasket will be damaged and have to be replaced. The compatible replacement gaskets for the 2003, 2004, 2005 and 2006 MDX model years with their part numbers are as follows: Fel-Pro 61331 and the MAHLE Original G32319. The earlier 2001 and 2002 MDX model years use a slightly different gasket which is part number Fel-Pro 61319 or the MAHLE G31899. If you re-install the throttle body with a damaged old gasket, you may encounter vacuum leak problems in the future. |
||
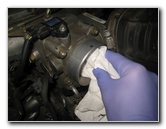
 Throttle Body Cleaner |
 Throttle Body Cleaned |
 Push On Air Intake Tube |
| Lightly spray both
sides of the exposed throttle body with the cleaner spray.
Gently wipe away any carbon deposits and soot. Don't worry about wiping the rounded top and bottom of the throttle plate. The spray will flush away the carbon deposits. Avoid spraying the cleaner on the plastic housing for the electric motor and the reduction gear set. If you are replacing the gasket, pull off the old one, clean the area and attach the new gasket. Push the throttle body back into place, spin on the two 12mm nuts at the top and re-insert the two 12mm bolts into the bottom edge. The service manual specifies that the throttle body nuts and bolts should be tightened to 12 lb-ft with a torque wrench. If you removed the MAP sensor, push it back into its port and tighten the screw in the clockwise direction. Push the power plug back into place on the sensor. Push the air intake hose back into place over the throttle body. |
||
 Replace Air Box Cover |
 Tighten 4 Air Box Screws |
 Tighten Hose Clamp |
| Lower the cover
over the engine air filter and lower half of the air box. Tighten the four air box cover screws by turning them in the clockwise direction with the 8mm socket, a long extension bar and the 1/4" drive ratchet or you can use a Phillips head screwdriver. Tighten the hose clamp on the air intake hose to secure it to the throttle body by turning it in the clockwise direction with the 10mm socket and a 1/4" drive ratchet until it is snug. |
||
 Air Intake Hose Secured |
 Replace Engine Cover |
 Spin In 10mm Bolts |
| Double check that
all of the electrical connectors, bolts, nuts and any vacuum hoses you may
have removed are securely in place. Lower the plastic cover back into place over the top of the engine. Line up the bolt holes in the cover with their corresponding holes in the engine. Spin in the four 10mm bolts a few turns by hand in the clockwise direction to prevent them from becoming cross threaded. |
||
 Tighten Clockwise |
 Snap In Bolt Caps |
 Engine Cover Replaced |
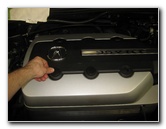
| Tighten the four
bolts in the clockwise direction with the 10mm socket and a 1/4" drive
ratchet until they are snug. Pop the four bolt caps back into place. Be sure to record the throttle body cleaning in your SUV's service records. For more,
please check out all of my
2001-2006 Acura MDX DIY Repair & Maintenance Guides. |
||
| If you found this guide to be helpful,
please consider making a small donation by clicking on the PayPal.com
"Donate" button located to the right of this paragraph. Thank you!
(Note: I am not a registered charity. Donations are not tax deductible.) |