
Subaru
Forester Spark Plugs Replacement Guide
How to check or change the FB25 2.5L
boxer engine's spark plugs in a 4th generation 2014-2018 Subaru Forester.

By Paul B. Michaels Author & Photographer Auto Mechanic Since 1989 |
||
 2017 Forester FB25 Engine |
 Driver Side - 12V Battery |
 Loosen Negative Terminal |
| This automotive maintenance tutorial
was specifically written to assist owners of the fourth generation
(2014, 2015, 2016, 2017 and 2018) Subaru Forester SUV in checking or
changing the spark plugs in the FB25 2.5 liter four cylinder boxer
engine. Owners of other Subaru vehicles such as the Outback, Impreza, Legacy, XV Crosstrek, WRX, BRZ, SVX, Tribeca, Exiga, Trezia, Levorg and Baja may also find these DIY instructions to be helpful. The OEM spark plugs are the NGK SILZKAR7B11 laser iridium. A few other compatible replacement spark plugs with their part numbers are as follows: Autolite XP5683, Denso (4712) IXEH22TT, Pulstar gg1h10 and Champion 9412. The tools and other items needed to complete this procedure include an 8mm socket or a flathead screwdriver, a 10mm socket, a 1/4" drive ratchet, a 14mm spark plug socket (or a 9/16" spark plug socket), a short 2" or 3" extension bar, a pair of needle nose pliers and a tube of dielectric grease. Tip - Another Subaru owner let me know that using a piece of rubber hose or fuel line can make it much easier to get the new spark plug started. Just push the flexible rubber tube over the terminal (top of the spark plug) and use that to spin it in by hand. Then you can use the spark plug socket and ratchet to tighten the plug the rest of the way. |
||
|
|
||
 Pull Off Negative Terminal |
 Pull Off Wire Fastener |
 Cover & Tuck Away |
| If this is your
first time checking or changing the spark plugs in your Forester, I highly
recommend removing the 12 volt car battery on the driver side and the engine
air filter box on the passenger side. Taking the extra time to remove those items from the engine bay will make the job much easier to complete. It will also be much safer on the driver side since you will eliminate the possibility of being electrocuted by the 12V battery. When I repeat this process in the future, I believe that it can be done with out removing the battery or air box assembly since there seems to be just enough room to access the ignition coils and spark plugs on both the driver and passenger sides. If you don't remove the 12V battery, please at least place a thick towel or rubber mat over the battery and avoid making contact with the terminals. The service manual specifies that the "-" negative (ground) cable should be disconnected. The first two steps are to open the hood and then move to the right (driver) side of the engine bay. Loosen the negative "-" terminal nut by turning it counterclockwise with a 10mm socket and a 1/4" drive ratchet. Pull the negative terminal off the "-" battery post, wrap it in a towel and tuck it away on the side of the battery to help prevent accidental electrical contact. |
||
 Pull Off Red Plastic Cover |
 Loosen Positive Terminal |
 Pull Off Positive Terminal |
| Pull the red
plastic cover off the top of the positive "+" terminal. Set the red plastic cover aside in a safe place. Loosen the 10mm positive terminal nut by turning it counterclockwise. Pull the positive terminal off the "+" battery post and tuck it away on the side of the battery. |
||
 Loosen Front 10mm Nut |
 Remove "J" Hook Bar |
 |
| Loosen the two nuts on the top of the battery hold down bar or "clamp" by turning them counterclockwise with a 10mm wrench or a deep well 10mm socket with a 1/4" drive ratchet. | ||
 Remove Rear "J" Bar |
 Lift Off Battery Clamp |
 Battery Hold Down Bar |
| Pull the "J" hooks
at the bottom of the two bars out of their mounting slots on the battery
tray. Avoid making contact with the battery posts. Lift the battery hold down clamp off the top of the old battery and set it aside in a safe place. |
||
 Battery Heat Shield Box |
 12V Battery Removed |
 Plastic Battery Tray |
| Lift the heat
shield cover off the old battery. Carefully lift the old battery out of the engine bay and gently rest it on the ground. |
||
 FB25 Boxer Engine |
 Driver Side of Engine |
 Lower Driver Side |
| The FB25 2.5L is a "boxer" or "flat four" engine with four cylinders arranged in a horizontal layout with two cylinders on the left (passenger) side and two cylinders on the right (driver) side. | ||
 Spark Plug Ignition Coils |
 Remove Plastic Battery Tray |
 2 Driver Side Spark Plugs |
| Lift the black
plastic battery tray out of the way and set it aside in a safe place. Once the 12V battery is out of the engine bay, you'll be able to easily access the two black plastic ignition coil housings on the driver side. |
||
 Passenger Side of Engine |
 Engine Air Filter Box |
 Flip Up Air Box Latches |
| For easier access
to the two spark plugs on the left (passenger) side of the engine, remove
the entire air filter box assembly. Flip up the two metal latches on the top of the air filter housing. |
||
 Loosen Hose Clamp Screw |
 Pull Off Air Intake Hose |
 Remove Engine Air Filter |
| Loosen the hose
clamp by turning the silver metal screw in the counterclockwise direction
with either a flathead screwdriver or an 8mm socket with a 1/4" drive
ratchet. Pull the air intake hose off the air box housing. Remove the engine air filter and set it aside. |
||
 Disconnect MAF Sensor |
 Squeeze Together Prongs |
 Pull Out Wire Fastener |
| Push in the release
tab on the MAF (mass air flow sensor) electrical connector and pull it
straight out of its socket. Use a pair of needle nose pliers to squeeze together the two prongs on the plastic pop rivet fastener for the MAF sensor's wire loom. Separate the MAF sensor wire harness from the air box. |
||
 Rear of Air Box Removed |
 Lower Bolt - Front Air Box |
 Loosen Counterclockwise |
| Set the rear half
of the air box aside in a safe place. Removing the front half of the air box is optional if you want even more working room on the passenger side of the engine. Remove the bolt at the bottom right (driver) side of the front air box. Attach the 10mm socket to a long extension bar and loosen the bolt by turning it counterclockwise. |
||
 10mm Bolt Removed |
 Nut - Top Left of Air Box |
 Loosen Counterclockwise |
| Set the 10mm bolt
aside in a safe place. Remove the 10mm nut on the front left (passenger) side of the front air box housing by turning it counterclockwise. |
||
 10mm Nut Removed |
 Air Box & Resonator Tank |
 Resonator / Silencer |
| Set the 10mm nut
aside in a safe place. Lift out the front half of the air box which is attached to the white plastic resonator tank which acts as an intake silencer. Set the front part of the air box aside in a safe place. |
||
 Passenger Side of Engine |
 Two Ignition Coils Exposed |
 Loosen 10mm Bolt |
| Once the air box
assembly is out of the way, you'll have easy access to the two spark plugs
on the passenger side of the engine. The steps for checking or replacing any of the four spark plugs is the same. I recommend only checking or changing one spark plug at a time to reduce the risk of having debris enter the spark plug well. Loosen the single bolt that secures the ignition coil housing to the cylinder block by turning it counterclockwise with a 10mm socket and a 1/4" drive ratchet. |
||
 Spin Out Counterclockwise |
 10mm Bolt Removed |
 Pull Out Ignition Coil |
| Spin out the 10mm
bolt and set it aside in a safe place. Gently pull the ignition coil straight out of the spark plug well. If you'd like to disconnect the electrical connector in order to replace the ignition coil. Take a look at the picture below. You can click on the small thumbnail to view the full size picture. |
||
 Ignition Coil Removed |
 Spark Plug In Well |
 14mm Spark Plug Socket |
| Rest the ignition
coil on the side of the engine.
Try to avoid stressing or pulling on the electrical wires. In order to remove the old spark plug, you'll need either a 14mm spark plug socket or a 9/16" spark plug socket. My 9/16" spark plug socket was too long to fit into the small space on the side of the engine, so I pulled out the rubber insert from inside of it and pushed it into a standard 14mm socket. Attach your spark plug socket to a short 2 or 3 inch extension bar and insert them into the spark plug well. |
||
 Loosen Counterclockwise |
 Spin Out Old Spark Plug |
 Old Spark Plug Removed |
| Attach the 3/8"
drive ratchet to the extension bar and loosen the old spark plug in the
counterclockwise direction. Try to avoid using excessive force to prevent from cracking the ceramic portion of the old spark plug. If necessary, you can spray a small amount of penetrating oil into the spark plug well and try again a few minutes later. Once the old spark plug is loose, detach the ratchet from the extension bar. Spin the old spark plug out the rest of the way by hand. |
||
|
|
||
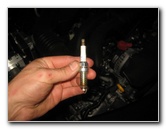 Inspect Old Spark Plug |
 Spin In New Spark Plug |
 Tighten Clockwise |
| Pull the old spark
plug out of the engine and separate it from the socket. Inspect both sides of the old spark plug. If the electrode end of the old spark plug appears to be ashy white, the plugs might have been exposed to high temperatures such as overheating or they might be the incorrect heat range for your driving conditions or environment. If the electrode tip of the old spark plug looks grey or is covered in dark black soot, the engine might be burning oil and should be inspected by a professional mechanic. I recommend buying the genuine OEM NGK SILZKAR7B11 iridium spark plugs that are installed in the Forester at the factory. If you have a spark plug gap gauge tool, verify that the gap on the new spark plugs match the specification on the product box. The service manual specifies that the standard plug gap is 0.039 to .0043" (inch) or 1.0mm to 1.1mm. Push the new spark plug into the socket and insert it into the well. Carefully spin the new spark plug in the clockwise direction by hand to prevent it from becoming cross threaded. |
||
 Tape - Secure Socket |
 To Just Past Hand Tight |
 Dielectric Grease |
| To prevent from
having the socket pop off the extension bar and possibly become stuck inside
the spark plug well, I like to use some painter's tape to secure it in
place. Attach the ratchet to the extension bar and the spark plug socket. Tighten the spark plug in the clockwise direction. If you are replacing the old spark plug after checking it, just tighten it to a small fraction of a turn past hand tight. If you are installing a new spark plug, tighten it to just past the point when you feel the new crush washer collapse. If you have a very sensitive and reliable torque wrench, the service manual specification for tightening the spark plugs is 13.3 lb-ft (or 18 N-m). (Please verify this torque specification for your vehicle.) Most spark plug manufacturers recommend that you do NOT use anti-seize lubricant grease on the threads of the new plugs since it can easily lead to over tightening of the spark plugs. If you do use anti-seize, be very careful to not over tighten the new plugs. |
||
 Line Up Ignition Coil |
 Push In Ignition Coil Housing |
 Re-Insert 10mm Bolt |
| Apply a small
amount of dielectric grease to
the opening at the bottom of the rubber dust boot on the ignition coil
housing. The dielectric grease will help keep out moisture and debris to ensure a reliable electrical connection. Push the ignition coil straight back into the spark plug well. Re-insert the 10mm bolt and spin it a few turns by hand in the clockwise direction to prevent it from becoming cross threaded. |
||
 Tighten Clockwise |
 Ignition Coil Secured |
 Lower In Front Air Box |
| Tighten the
ignition coil bolt in the clockwise direction with the 10mm socket and a
1/4" drive ratchet until it is snug. The service manual specification for tightening the ignition coil bolt is 5.9 lb-ft (or 8.0 N-m). Try to avoid over tightening the bolt to prevent from cracking the plastic ignition coil housing. If you removed the air box assembly, follow the next steps to replace it. Lower the front half of the air box with the resonator / silencer bottle down into the engine bay. |
||
 Front Half Air Box In Place |
 Spin In Lower 10mm Bolt |
 Tighten Bolt Clockwise |
| Spin in the 10mm
bolt at the bottom right (driver) side of the front half of the air box. Tighten the 10mm bolt in the clockwise direction until it is snug. |
||
 |
 Spin On 10mm Nut - Top |
 Tighten Nut Clockwise |
| Spin on the 10mm
nut at the front left (passenger) side of the front half of the air box. Tighten the nut in the clockwise direction with the 10mm wrench. |
||
 Re-Insert Air Filter |
 Replace Rear of Air Box |
 Push On Air Intake Tube |
| Re-install the
engine air filter into the front half of the air box. Lower the rear half of the air box down into the engine bay. Push the tabs on the bottom edge of the rear half of the air box into their corresponding slots on the front half of the air box. Push the air intake hose back on to the air box. |
||
 Snap Two Latches Closed |
 Push In Wire Fastener |
 Re-Connect MAF Sensor |
| Swing the two metal
latches closed over the top of the air box.
Snap the two latches in place to secure the two halves of the air box together. Push the wire harness fastener back into the hole on the inner edge of the air box. Push the MAF sensor electrical connector back into its socket on the top of the air intake tube. |
||
 Air Box Re-Assembled |
 Replace Plastic Battery Tray |
 Battery Tray - Driver Side |
| Lower the black plastic battery tray down into the engine bay with the arrow pointing towards the front of the vehicle. | ||
 Replace Battery & Shield |
 Lower In Battery Clamp |
 Re-Insert Rear "J" Hook |
| Lower the 12V
battery down into the engine bay and replace the heat shield cover. Lower the two "J" bars and the hold down clamp over the top of the battery. Avoid making contact with the battery posts. |
||
 Spin 10mm Nut Clockwise |
 Replace Front "J" Hook |
 Tighten 10mm Clockwise |
| Re-insert the "J"
hooks at the bottom of the bars into their mounting slots on the battery
tray. Tighten the two 10mm nuts in the clockwise direction until they are snug. Make sure that the battery can't be rocked, slid or moved around in the engine bay. If you can move the battery, tighten the two 10mm nuts an extra turn or two. |
||
 12V Battery Secured |
 Push On Positive Terminal |
 Tighten 10mm Clockwise |
| Push the positive
terminal on to the "+" battery post. Tighten the terminal nut in the clockwise direction with the 10mm socket and a 1/4" drive ratchet until it is snug. |
||
 Replace Red Plastic Cover |
 Push Wire Fastener On Bar |
 Push On Negative Terminal |
| Push the red
plastic cover back into place over the positive terminal. Push the black plastic fastener for the negative terminal cable over the top of the threaded rear "J" bar. Push the negative terminal on to the "-" battery post. |
||
 Tighten Nut Clockwise |
 12V Battery Replaced |
 Spark Plugs Replaced |
| Tighten the 10mm
negative terminal nut in the clockwise direction until it is snug. Start the engine and listen closely for any strange sounds that might indicate a loose spark plug or a disconnected electrical connector. Be sure to record the spark plug change in your vehicle's service records. If you removed the 12V battery, please remember to adjust the time on the clock and program your favorite radio station presets before you start driving. For more,
please check out all of my
2014-2018 Subaru Forester DIY Repair & Maintenance Guides. |
||

| If you found this guide to be helpful,
please consider making a small donation by clicking on the PayPal.com
"Donate" button located to the right of this paragraph. Thank you!
(Note: I am not a registered charity. Donations are not tax deductible.) |