
Honda CR-V
License Plate Light Bulb Replacement Guide
How to change a burnt out license plate
light bulb in the tail gate door of a 3rd generation 2007-2011 Honda CR-V SUV.

By Paul B. Michaels Author & Photographer Auto Mechanic Since 1989 |
||
 2011 CR-V License Light |
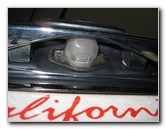
 Push Bulb Housing To Right |
 Bulb Housing Released |
| This
automotive maintenance tutorial was specifically written to assist owners of the
third generation (2007, 2008, 2009, 2010 & 2011) Honda CR-V in
changing a burnt out license plate light bulb in the cargo tail gate
door. Owners of other Honda or Acura vehicles such as the Pilot, Insight, CR-Z, Accord, Civic, Fit, Crosstour, Odyssey, Ridgeline, TSX, ILX, TLX, TL, RLX, RDX and MDX may also find these DIY instructions to be helpful. A replacement bulb is part number 2825 which is available from various manufacturers such as Sylvania, GE, PIAA, and Eiko. If necessary, you may also use any other miniature wedge base bulbs such as the # 168, 158, 194, W5W or a compatible LED unit. No tools are needed to change the bulb. |
||
|
|
||
 Pull Down Bulb Housing |
 Squeeze Release Tabs |
 Pull Off Lens Cover |
| To release the
license plate light bulb housing, gently push the housing towards the right
side of the vehicle to release the plastic retaining clip. Pull the housing down out of the tail gate. Squeeze together the two light tan plastic tabs on the rear of the housing to release the plastic lens cover. Pull the lens cover straight off the front of the light housing. |
||
 Pull Out Old Bulb |
 Old Light Bulb Removed |
 Old # 2825 Bulb |
| Pull the old light bulb straight out of the socket. | ||
 Empty Bulb Socket |
 Push In New # 2825 |
 Line Up Lens Cover |
|
|
||
| Push a new #
2825 bulb straight in to the socket. You may also use any other miniature wedge base bulbs such as the # 168, 175, 194, W5W or a brighter LED unit. (Tip: If you are installing an LED bulb and it doesn't work at first, try flipping the bulb around in the socket.) |
||
 Snap Lens Cover In Place |
 Re-Insert Light Housing |
 Insert Tab On Left Side |
| Line up the plastic
lens cover and gently pop it back in place over the light housing. Raise the light housing towards the mounting hole in the tail gate with the tab on the left and the retaining clip on the right side. |
||
 Pop In Clip On Right Side |
 Light Housing Replaced |
 Test New License Bulb |
| Re-insert the tab
on the left side in to the tail gate first and then gently snap in the
retaining clip on the right side. Test the new license plate light bulb by turning on the headlights. For more,
check out my other
Honda CR-V Repair & Maintenance Guides. |
||
| If you found this guide to be helpful,
please consider making a small donation by clicking on the PayPal.com
"Donate" button located to the right of this paragraph. Thank you!
(Note: I am not a registered charity. Donations are not tax deductible.) |