
Chevrolet
Aveo Headlight Bulbs Replacement Guide
How to change a burnt out low / high beam
or front turn signal light bulb in a 1st generation 2007-2011 GM Chevy Aveo.

By Paul B. Michaels Author & Photographer Auto Mechanic Since 1989 |
||
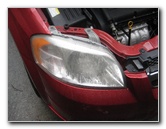 Chevy Aveo Headlight |
 Two Top Bolts |
 One Lower Inner Bolt |
| This
automotive maintenance tutorial was specifically written to assist
owners of the revised first generation (2007, 2008, 2009, 2010 &
2011) GM Chevrolet Aveo sedan in changing a burnt out combination
low and high beam headlight bulb or the front turn signal light
bulb. Owners of other General Motors vehicles such as the Buick Verano, Regal, LaCrosse, Cascada, Encore, Enclave, Envision, GMC Canyon, Sierra 1500, Terrain, Yukon, Denali, Savana, Spark, Sonic, Cruze, Malibu, Impala, Volt, Camaro, Corvette, SS, Trax, Equinox, Traverse, Tahoe, Suburban, Colorado, Silverado and Express may also find these DIY instructions to be helpful. The replacement bulb part numbers are as follows: Dual Filament Low & High Beam Headlight Bulb # 9003 and Front Turn Signal Light Bulb 2357A (or PY21W). To access and replace the bulbs, you'll need a 10mm socket, an extension bar and a 1/4" drive ratcheting wrench. |
||
|
|
||
 Loosen Outer Bolt |
 Loosen 2nd Top Screw |
 3rd Screw - Inner Corner |
| The first two steps
are to open the hood and then move to the side of the car with the burnt out
headlight bulb. You may be able to reach the low/high beam headlight bulb on the passenger side of the vehicle with out the use of tools, but it is much easier to access the bulbs by just removing the headlight assembly from the front of the car. The 12V battery blocks access to the bulbs on the driver's side of the car. The headlight housing is held in place by three bolts. There are two bolts on the top of the housing and the third is located near the inner corner of the assembly. Loosen the three bolts by turning them counterclockwise with the 10mm socket and 1/4" drive ratcheting wrench. You will need an extension bar to reach the third screw which is recessed in between the inner edge of the housing and the front bumper cover. |
||
 3 Bolts Removed |
 Pull Off Headlight Housing |
 Headlight Assembly Removed |
| Set the three bolts
aside in a safe place. Gently pull the headlight housing straight off the front of the car. |
||
 Back of Headlight |
 Pull Off Power Plug |
 Remove Rubber Gasket |
| Turn over the
headlight housing to access the bulb sockets. Pull the tan plastic electrical connector for the low/high beam headlight bulb straight off the electrical contacts. Then gently pull the black rubber gasket or dust cover off the back of the headlight housing. |
||
 Rubber Dust Cover |
 Headlight Bulb Socket |
 Squeeze Metal Tabs |
| Set the black
rubber dust cap aside in a safe place. The old headlight bulb is held in place by two metal arms that act as retaining clips. |
||
 Metal Arms Released |
 Swing Open Metal Arms |
 Pull Out Old Light Bulb |
| Gently squeeze
together the two metal loops at the end of the retaining arms to release
them. Swing open the two metal retaining arms until they are out of the way. Pull the old light bulb straight out of the socket. |
||
 Osram 9003 Bulb |
 Empty Bulb Socket |
 Insert New # 9003 Halogen |
| Try to avoid
touching the glass part of the new halogen bulb with your fingers or
anything greasy in the engine bay. If you do get the new bulb dirty, wipe it clean with a paper towel moistened with rubbing alcohol. Insert the new # 9003 dual filament combination low & high beam headlight bulb straight in to the housing. |
||
 Swing Down Retaining Arms |
 Squeeze Together Tabs |
 Retaining Clips Secured |
| Swing the metal
retaining arms down over the new bulb. Squeeze together the two metal tabs at the end of the retaining arms and re-insert them back in to place. Double check that the new headlight bulb is securely installed. |
||
|
|
||
 Rubber Dust Cap |
 Push On Rubber Gasket |
 Turn Signal Bulb Socket |
| Push the rubber
dust cover back in to place over the base of the new headlight bulb. Since I was also replacing the turn signal light bulb, I didn't immediately replace the electrical connector for the headlight bulb to give myself more working room. If you are only replacing the low/high beam bulb, push on the tan plastic power plug to complete the job. |
||
 1/4 Turn Counterclockwise |
 Bulb Socket Removed |
 Push Down & 1/4 Turn CC |
| Rotate the front
turn signal light bulb socket 1/4 turn counterclockwise before pulling it
straight out of the housing. Push the old bulb down in to the socket and rotate it 1/4 turn counterclockwise before pulling it straight out. |
||
 Part # PY21W (Amber) |
 Push In & 1/4 Turn Clockwise |
 1/4 Turn Clockwise - Lock |
| Push a new amber
colored # PY21W or
2357A bulb down in to the socket and rotate it 1/4 turn
clockwise to secure it in place. Re-insert the socket in to the housing and rotate it 1/4 turn clockwise to secure it in place. |
||
 Turn Signal Bulb Replaced |
 Push On Electrical Connector |
 Power Plug Replaced |
| If you haven't already, push the tan plastic electrical connector for the headlight bulb on to the base of the new low / high beam bulb. | ||
 Push On Headlight Housing |
 Headlight Assembly Replaced |
 Spin In 10mm Bolts |
| Slide the headlight
assembly back in to place on the front corner of the car. Spin in the three 10mm bolts a few turns by hand to prevent them from becoming cross threaded. |
||
 Replace 2nd 10mm Bolt |
 3rd Bolt - Inner Edge |
 Tighten 10mm Clockwise |
| Tighten the three bolts by turning them clockwise with the 10mm socket and 1/4" drive ratcheting wrench. | ||
 Tighten 2nd Bolt |
 3rd Bolt Tightened |
 Test New Headlight Bulb |
| Try to avoid over
tightening the three bolts to prevent from cracking the plastic mounting
tabs. Test the new light bulbs by turning on the headlights, activating the hazard signals and flashing the high beams. For more,
check out my other
2007-2011 GM Chevrolet Aveo DIY Repair & Maintenance Guides. |
||
| If you found this guide to be helpful,
please consider making a small donation by clicking on the PayPal.com
"Donate" button located to the right of this paragraph. Thank you!
(Note: I am not a registered charity. Donations are not tax deductible.) |