
Ford Crown
Victoria Headlight Bulbs Replacement Guide
How to replace the low/high beam, turn
signal & sidemarker bulbs in the headlights of a 1998-2011 Ford Crown Victoria.

By Paul B. Michaels Author & Photographer Auto Mechanic Since 1989 |
||
 Crown Victoria Headlight |
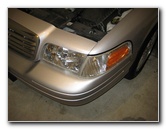
 Unscrew Fasteners |
 Black Plastic Fastener |
| This
automotive "how-to" guide was specifically written to assist owners
of the 2nd generation 1998-2011 Ford Crown Victoria in replacing the
low/high beam, turn signal, or front side marker bulbs in the
headlight assemblies. Owner's of other related "Panther" platform Ford, Lincoln or Mercury vehicles such as the Grand Marquis, Marauder, and Town Car, may also find these DIY instructions to be helpful. Replacement bulbs include the following with their part numbers: Low/High Beam # 9007, Front Turn Signal # 3357A or 3457A, and Front Sidemarker # 194NA.No tools are needed to replace the combination low/high beam bulb or the front turn signal bulb. To access the front side marker bulb, you'll need a Phillips head screwdriver and an 11mm socket with a 1/4" drive ratchet. |
||
|
|
||
 Radiator Cover Fastener |
 3 Plastic Screws Removed |
 Remove Radiator Cover |
| The primary
headlight housing at the front of the vehicle contains the dual filament low
beam and high beam bulb along with the turn signal light bulb. To access the headlight assembly, you'll first need to remove the radiator cover by twisting out the three round black plastic fasteners that hold it in place counter clockwise. Set the three fasteners aside in a safe place and lift off the black plastic radiator cover. |
||
 Headlight Assembly Clips |
 Pull Up On Black Metal Tab |
 Remove Black Fastener |
| Each headlight
assembly is held in place by two rectangular black metal clips. Pull upwards firmly on each rectangular metal piece to unlock it. Then move them towards the rear of the vehicle to remove them from the silver metal screw ends. |
||
 Remove 2nd Black Metal Clip |
 2nd Fastener Removed |
 Pull Out Headlight Housing |
| Once both of the metal clips have been removed, you can carefully pull the headlight assembly out of the bumper. | ||
 Pry Up Power Plug Clip |
 Power Connector Removed |
 Twist Off Black Collar Nut |
| Turn the headlight assembly down on the bumper. To avoid scratching the paint or the plastic headlight, place a towel in between the bumper and headlight. | ||
 Remove Collar Nut |
 Pull Out Low/High Beam Bulb |
 Sylvania HB5 9007 |
| The combo low/high
beam bulb has a large black collar nut around the base of the bulb.
Pry off the power connector with a small flathead screwdriver and spin off the collar nut in the counter clockwise direction |
||
 Insert New Headlight Bulb |
 Replace Collar Nut & Plug |
 Turn Signal - 1/4 Turn CC |
| Pull the old
headlight bulb straight out of the housing. Insert a new #
9007 combination
low/high beam dual filament bulb into the headlight assembly.
Try to avoid touching the glass part of the new headlight bulb with your fingers or anything greasy in the engine bay. If you get the glass part of the bulb dirty, wipe it off with a paper towel moistened with rubbing alcohol. Twist the collar nut on 1/4 turn clockwise to secure the new bulb in place and push on the power connector. |
||
|
|
||
 Pull Out Turn Signal Socket |
 Pull Out Turn Signal Bulb |
 Push In New # 3457A |
| The turn signal
light bulb socket is a light orange color. Rotate the turn signal socket 1/4 turn counter clockwise and pull it straight out of the headlight assembly. Pull the old turn signal bulb straight out of the socket and push in a new # 3457A or 3357A bulb. Insert the turn signal bulb and socket back into the headlight and rotate it 1/4 turn clockwise to secure it in place. |
||
 1/4 Turn Clockwise |
 Side Marker Light Housing |
 Unscrew Phillips Head |
| To access the front side marker light bulb, you'll need to remove a single Phillips head screw on the out side of the vehicle and a single 11mm nut in the engine bay. | ||
 Loosen 11mm Nut |
 11mm Nut Removed |
 Pull Off Sidemarker Housing |
| Attach an extension bar to an 11mm socket and ratcheting wrench to remove the nut at the back side of the side marker housing. | ||
 Sidemarker Bulb Socket |
 1/4 Turn Counter Clockwise |
 Pull Out Socket |
| Turn the side marker bulb housing over and rotate the light tan colored socket 1/4 turn counter clockwise to remove it. | ||
 Pull Out Sidemarker Bulb |
 Push In New 194NA Bulb |
 1/4 Turn Clockwise |
| Pull the old side
marker bulb straight out of the socket and push in a new #
194NA bulb. Insert the socket back into the housing and rotate it 1/4 turn clockwise to lock it in place. |
||
 Side Marker Bulb Secure |
 Line Up Side Marker Housing |
 Tape 11mm Nut To Socket |
| Line up the side
marker housing and push it in place against the side of the vehicle. To prevent from losing the 11mm nut, loosely tape the nut to the socket and tighten it to the rear of the side marker housing. |
||
 Tighten 11mm Bolt |
 |
 Replace Phillips Head Screw |
| Then tighten the Phillips head screw to the outside of the side marker housing. | ||
 Low/High Beam Bulb |
 Twist On Collar Nut |
 Push On Power Plug |
| If you haven't already, replace the black plastic collar nut on the low/high beam headlight bulb and push on the power plug. | ||
 Re-Install Headlight Housing |
 Push Down Black Metal Clip |
 Replace 2nd Metal Clip |
| Line up the screw
ends on the headlight housing with the holes in the front bumper and gently
push it into place. Lower the two metal rectangular clips down over the screw ends on the rear of the headlight housing. Push the clips down firmly until they snap in place to secure the headlight assembly. |
||
 Test New Headlight Bulbs |
 Replace Radiator Shroud |
 Replace 3 Black Plastic Screws |
|
Test the new headlight bulb, turn signal bulb and front side marker bulb. Replace the radiator cover and twist the 3 black plastic fasteners in the clockwise direction to secure them in place. For more,
check out my other
Ford Crown Victoria Repair & Maintenance Guides. |
||
| If you found this guide to be helpful,
please consider making a small donation by clicking on the PayPal.com
"Donate" button located to the right of this paragraph. Thank you!
(Note: I am not a registered charity. Donations are not tax deductible.) |