
Mazda Mazda6
Dome Light Bulbs Replacement Guide
How to change a burnt out overhead dome
light bulb in a 3rd generation 2014 to 2018 Mazda Mazda 6 sedan.

By Paul B. Michaels Author & Photographer Auto Mechanic Since 1989 |
||
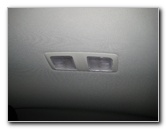 2016 Mazda6 Dome Lights |
 Insert Flathead Screwdriver |
|
| This
automotive maintenance tutorial was specifically written to assist
owners of the third generation (2014, 2015, 2016, 2017 and 2018)
Mazda Mazda6 sedan in changing a burnt out overhead dome light bulb
(also known as the rear passenger courtesy reading lights) or
upgrading them both to brighter LED units. Owners of other Mazda vehicles such as the Mazda2, Mazda3, Mazda5, CX-3, CX-5, CX-7, CX-9, and the MX-5 Miata may also find these DIY instructions to be helpful. The compatible replacement festoon or miniature "fuse" type light bulb is part number DE3175 which is available from various manufacturers such as Sylvania, GE, Philips and JDM. You can also use a brighter LED unit. The only tool needed to access and replace the light bulbs is a small flathead screwdriver or a plastic pry bar tool. |
||
|
|
||
 Remove Front Edge |
 Two Tabs - Rear Edge |
|
|
To prevent from scratching the plastic surfaces, you can either use a thin plastic pry bar tool or wrap the tip of your flathead screwdriver with a thin micro fiber cloth. Insert the blade of the screwdriver in between the translucent plastic lens cover and the overhead housing near the front edge (closer to the front of the car). Gently pry out the front edge of the lens cover and then remove the two plastic tabs on the rear edge. Set the lens cover aside in a safe place. |
||
 Old Light Bulb Exposed |
 Remove Old Light Bulb |
|
|
Pull the old DE3175 light bulb straight out of the socket. |
||
 Empty Bulb Socket |
 Old Light Bulb Removed |
|
|
(The OEM bulb was marked as part number KHA12V8W4 7E.) |
||
 Install New Light Bulb |
 New Light Bulb Installed |
|
| Push a new festoon DE3175 light bulb straight in to the socket. | ||
 Re-Insert Plastic Tabs |
 Gently Pop In Front Edge |
|
| Re-insert the two
plastic tabs on the rear edge of the lens cover back in to the housing. Gently snap in the front edge of the lens cover. |
||
 Lens Cover Replaced |
 Test New Dome Light Bulbs |
|
| To test the new
dome light (A.K.A. rear passenger courtesy reading lights), press on the
rear part of the lens cover to activate the "On/Off" switch. For more,
check out my other
2014-2018 Mazda Mazda6 DIY Repair & Maintenance Guides. |
||
| If you found this guide to be helpful,
please consider making a small donation by clicking on the PayPal.com
"Donate" button located to the right of this paragraph. Thank you!
(Note: I am not a registered charity. Donations are not tax deductible.) |