
Toyota
Corolla PCV Valve Replacement Guide
Pictures illustrated instructions for
replacing the PCV (positive crankcase ventilation) valve in a 2005 Toyota
Corolla S.

| This guide was specifically written to assist owners of the 2005 Toyota Corolla S sedan in removing the old PCV (positive crankcase ventilation) valve and replacing it with a new one. Owners of any "Ninth Generation" Corolla (2003, 2004, 2005, 2006, 2007, 2008) may also find this guide to be useful. I am not a professional mechanic. I assume no liability for any injuries or damage to your vehicle, persons, property or pets. Please proceed with caution and/or consult a professional. | |
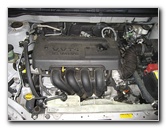 Toyota 1ZZ-FE I4 Engine |
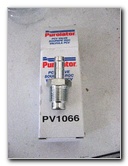 Purolator PCV PV1066 |
| The
scheduled maintenance guide for our 2005 Toyota Corolla S sedan does
not mention cleaning, inspecting or replacing the PCV valve. Since the PCV (positive crankcase ventilation) valve is such a cheap part to replace, it's a good idea to put in a new one every so often. The PCV valve is an important part of the vehicle's emissions system and can be hamper fuel economy if it becomes clogged. There are varying opinions about when a PCV valve should be replaced ranging from every calendar year, or at specific intervals such as every 15,000 to 60k miles. This Corolla's odometer has just rolled past 65,000 miles so I figured it would be a good idea to replace the old PCV valve with a new Purolator PV1066 or PV1074 PCV valve to keep the fuel economy (MPG) at the optimum level. Attention: If you have a 10th generation model, check out this 2009-2013 Toyota Corolla PCV Valve Change Guide. |
|
|
|
|
A few other compatible replacement PCV valves with their part numbers include the following: Toyota 12204-22041, ACDelco CV2523C, Fram FV407, Wells PCV234 and Airtex 6P1201. |
|
 10mm Socket |
 10mm Engine Cover Bolt |
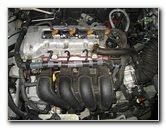
| To
access the PCV valve, I first had to remove the plastic cover on top of the
1.8L I4 four cylinder 1ZZ-FE engine.
There are two 10mm bolts towards the front of the cover and two plastic snap fasteners on the back of the cover (closest to the windshield). |
|
 2nd Engine Cover Bolt |
 Engine Cover Plastic Fasteners |
| The
10mm bolts can be removed with a 10mm socket and a ratcheting socket wrench.
The two plastic pop fasteners on the rear of the cover need to be pulled up and out with a pair of needle nose pliers. I found it easiest to remove them by wiggling the pliers around as I pulled up. Be careful not to smash your hand on the car's hood when the fasteners finally pop out. |
|
 2nd Plastic Clip |
 Engine Cover Removed |
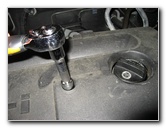
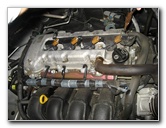
| With
the cover removed, I located the PCV valve at the top right corner of the
1ZZ-FE engine.
In other words, it's on the driver's side of the car and close to the windshield. Click on the 2nd picture in the row above and look for the red arrow labeling the "PCV Valve" location. The PCV valve location may vary on other model year Toyota Corolla vehicles or those equipped with the more powerful 2ZZ-GE engine. |
|
 Metal Spring Clip |
 Needle Nose Pliers On Clip |
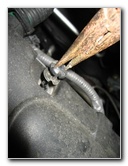
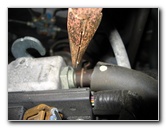
| The
rubber hose connected to the PCV valve is held in place by a metal spring
clip.
To remove the clip, hold the two circular ends of the clip together with a pair of pliers and move it further down the rubber hose away from the PCV valve. |
|
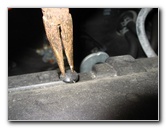
 Removing Metal Clip |
 Rubber PCV Hose Removed |
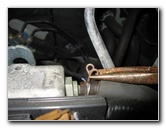
| Now
that the metal spring clip is no longer holding the hose on the PCV valve,
the hose can be pulled off.
Wiggling the hose can help if the hose won't budge. Again, be careful when pulling off the hose. It's really easy to cut, scrape or smash your hand against something else in the engine bay if the hose suddenly comes free while you're applying force to it. |
|
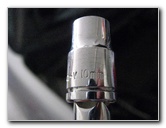
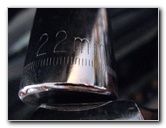 22mm Socket |
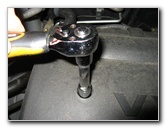
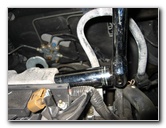 Removing PCV Valve |
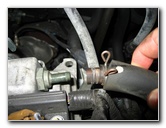
| The old
PCV valve can be removed by using a 22mm or 3/8 inch socket or a ratcheting
wrench.
I realized after removing the old PCV valve that the Pep Boys employee had given me the incorrect replacement valve. Some 2005 Toyota Corolla cars use the Purolator PV1066 (3/8 pipe thread) replacement valve, while others need the PV1074 (16mm thread) PCV valve. I went back, exchanged the PV1066 for the PV1074 PCV valve, installed it back into the engine, and replaced the hose. I didn't take pictures of these last few steps, which are just the reverse of the first few steps. If everything went well, your engine should be running smoothly and continue to do so for years to come. Update - The Fram FV406 PCV valve will work if you can't find a Purolator PV1074 since it also has metric # 16 threads. Try using a 24mm socket or a 7/8" deep socket wrench to remove the old PCV valve if the 22mm or 3/8" socket does not work. |
|
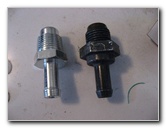 New Valve Left PV1066 |
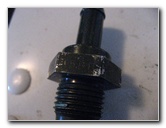 Old OEM PCV Valve |
|
For more, check out my other 2003-2008 Toyota Corolla Repair & Maintenance Guides. If you have a newer model check out my 2009-2013 Toyota Corolla Repair & Maintenance Guides.
For
more of my automotive maintenance instructions, check out the following
links:
Toyota Corolla Engine Oil Change,
Toyota Cabin Air Filter Replacement Guide,
K&N Air Filter Cleaning Guide,
WeatherTech FloorLiner Interior Mats Review,
Tail Light & Headlight Condensation Repair Guide,
Garmin Nuvi 260W GPS Review,
Buffing Old Faded Headlights, and
Interior Carpet Replacement Guide. |
|
| If you found this guide to be helpful,
please consider making a small donation by clicking on the PayPal.com
"Donate" button located to the right of this paragraph. Thank you!
(Note: I am not a registered charity. Donations are not tax deductible.) |