
Toyota
Corolla Front Wheel Bearings Replacement Guide
How to replace the "press out/in" front wheel
bearings on a 9th generation 2003 to 2008 Toyota Corolla with pictures.
 Home |
 Next |
Page 1 of 2
By Paul B. Michaels Author & Photographer Auto Mechanic Since 1989 |
||
 Corolla Front Wheel |
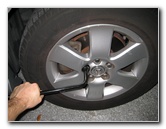 Loosen Five Lug Nuts |
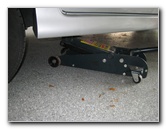 Raise With Floor Jack |
| This
automotive "how-to" guide was specifically written to assist owners
of the ninth generation (2003, 2004, 2005, 2006, 2007 & 2008) Toyota Corolla in replacing a
"press out/in" front wheel bearing.
Owners of other related Toyota, Scion or Pontiac vehicles with "press in" front wheel bearings such as the Matrix, Celica, MR2, Prius, tC, and Vibe should also find these DIY instructions to be helpful. Replacement front wheel bearings are part # 510070 from manufacturers such as Precision, National, Timken, and BCA. Amazon.com also lists the SKF # FW188 and Prime Choice Auto Parts # WB610072 as being compatible bearings. I had to pay a total of $46 for a technician at a machine shop to press out/in the bearing on each steering knuckle. |
||
|
|
||
The tools needed to remove the steering knuckle include the following: floor jack, jack stands, lug nut wrench, 17mm socket, 19mm socket, ratcheting wrench, flathead screwdriver, 30mm 12 point deep axle nut socket, breaker/cheater bar or an electric impact wrench, WD-40 spray, a hammer or mallet, needle nose pliers, white lithium grease, Loctite Red heavy duty threadlocker liquid and a torque wrench. |
||
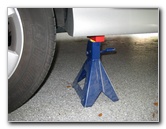 Support With Jack Stand |
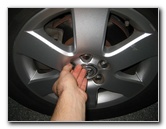 Spin Off Lug Nuts |
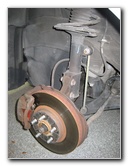
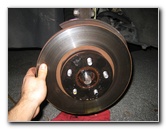
 Front Brake Rotor |
| Our 2005 Toyota
Corolla is about to pass 100,000 miles on the odometer and I've been hearing
a faint growling (groaning, roaring, whirring, moaning, humming, whining,
grinding) noise coming from the front driver's side wheel bearing.
Once the annoying sounds got louder, I decided it was a good time to just replace both of the front wheel bearings. The first few steps are to chock the rear wheels, engage the emergency parking brake so that the vehicle won't move, and slightly loosen the five lug nuts on the front wheels. Then raise the vehicle with the floor jack, securely support it with jack stands, spin off the lug nuts and remove the front wheel. Behind the front wheel, you'll see the front brake rotor, caliper, and the suspension strut. |
||
 Front Strut & Hub |
 Loosen Caliper Bracket Bolt |
 Remove 17mm Bolt |
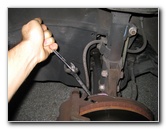
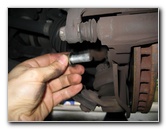
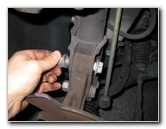
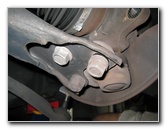
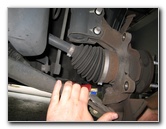
| Look on the back of the front brake caliper bracket and locate the two bolts that hold it to the steering knuckle. | ||
 Lower Caliper Bracket Bolt |
 Caliper Bracket 17mm Bolt |
 17mm Caliper Bracket Bolts |
| Use a 17mm socket
with a ratcheting wrench to remove the two brake caliper bracket bolts.
Set the two bolts aside in a safe place such as a Tupperware container or small cardboard box. |
||
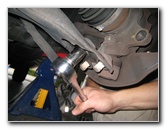
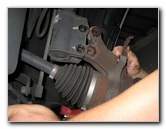
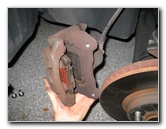 Remove Caliper & Bracket |
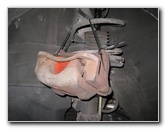 Suspend Caliper From Spring |
 30mm Drive Axle Nut |
|
Carefully pull off the brake caliper and bracket from the edge of the rotor.
Try to avoid putting any stress on the rubber brake fluid line. Suspend the brake caliper bracket out of the way by using several zip ties (cable ties) to secure it to the suspension spring. |
||
|
|
||
 Pry Up Axle Nut Indent |
 Impact Wrench On Axle Nut |
 30mm Axle Nut Removed |
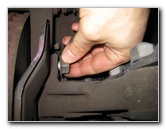
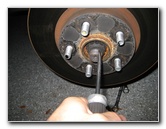
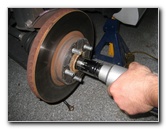
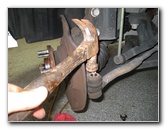
| To remove the axle
nut, you'll first need to pry out the indentation on the nut using a chisel
or strong flathead screwdriver.
Tap the indent out until it looks round like the rest of the axle nut. Then use a 30mm 12 point deep well socket to loosen the axle nut by turning it counter clockwise. We used an electric impact wrench to make removing the axle nut an easy job. If you don't have an impact wrench, you can use the spare tire along with a cheater pipe (breaker bar) to loosen the 30mm axle nut. Place the spare tire on the hub, thread on a few lug nuts, lower the vehicle down until the tire makes contact with the ground, insert the 30mm socket through the hole in the center of the spare tire, and turn the axle nut counter clockwise. |
||
 Hammer Rotor With Wood |
 Spray With WD-40 |
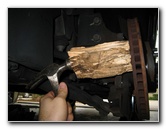 Hammer Back of Rotor |
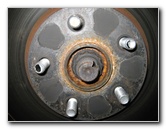
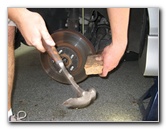
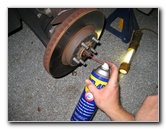
| The next step is to
remove the brake rotor from the wheel hub. These rotors have never been removed in almost 100,000 miles so I had to pound them off with a hammer and a piece of wood to break up the layer of rust keeping them frozen in place. It also helps to spray down the center hole of the rotor and the lug thread holes with WD-40 and allow it to work for a few minutes before continuing to hammer the rotor. I found that it was best to smack the rotor from behind with the piece of wood while rotating the rotor a 1/4 turn at a time. |
||
 Pull Off Brake Rotor |
 Brake Rotor Removed |
 Tie Rod End 17mm Nut |
| Once the brake
rotor is free, pull it off the hub and set it aside in a safe place.
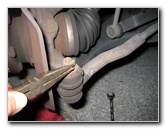
If you have never replaced the rotors and the vehicle has over 100,000 miles, it would be a good time to install new rotors. Then locate the tie rod end and straighten the cotter pin that passes through the nut before pulling it out with a pair of needle nose pliers. |
||
 Straighten Out Cotter Pin |
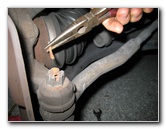 Cotter Pin Removed |
 Remove 17mm Tie Rod Nut |
| Remove the tie rod end nut using a 17mm wrench or socket and ratcheting wrench by turning it counter clockwise. | ||
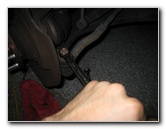
 |
 Tie Rod End 17mm Nut |
 Tap Out Tie Rod End |
| After the tie rod end nut has been removed, tap on the top of the tie rod end threads with a hammer or mallet to pop it out of the steering knuckle. | ||
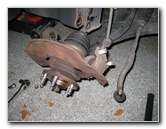
 Tie Rod Off Steering Knuckle |
 Strut To Steering Knuckle |
 Loosen Strut-Knuckle Bolts |
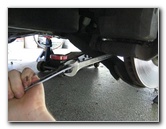
| Next use a 19mm
socket or wrench with a cheater pipe (breaker bar) to loosen the two strut
to steering knuckle nuts.
Remove the two strut to steering knuckle nuts but leave the bolts in place for now. |
||
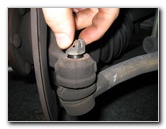
 Remove 19mm Nuts |
 Balljoint - Lower Control Arm |
 Loosen 17mm Nuts & Bolt |
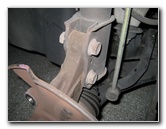
| Move down to the
area where the balljoint connects to the lower control arm.
Look underneath the control arm to locate the two nuts and one bolt that hold it to the steering knuckle. Loosen the two nuts and the one bolt with a 17mm socket and ratcheting wrench. |
||
 2 17mm Nuts & 1 Bolt |
 Pull Off Lower Control Arm |
 Pull Out Knuckle From Strut |
| Remove the 2 nuts
and 1 bolt before pulling off the lower control arm from the ball joint
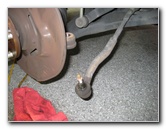
bracket on the bottom of the steering knuckle. Pull out the two bolts from the strut flange and remove the top of the steering knuckle from the strut. Try to avoid putting stress on the drive axle by not letting it drop down to the ground. Use a few plastic zip ties (cable ties) to support the drive axle by attaching it to the suspension spring. |
||
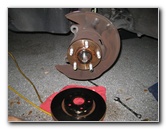
 Steering Knuckle On Axle |
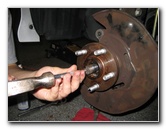 Tap Drive Axle With Punch |
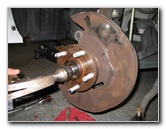 Put On Axle Nut - Tap Axle |
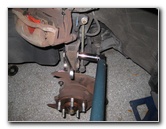
| Now the drive shaft
splines will need to be tapped out of the wheel hub to separate the drive
axle from the steering knuckle. Use a brass pin drive punch and a hammer to gently tap on the center of the drive axle threads. Another method is to twist on the axle nut backwards on to the drive axle threads and then tap it with a hammer. Do not use excessive force when tapping on the drive axle to avoid damaging the transmission. Spraying a bit of WD-40 on the rear of the steering knuckle can help make it easier to remove it from the drive axle. Please
click on the link below or the "Next"
button below to continue reading the second page of this guide -
Page 2. |
||
| If you found this guide to be helpful,
please consider making a small donation by clicking on the PayPal.com
"Donate" button located to the right of this paragraph. Thank you!
(Note: I am not a registered charity. Donations are not tax deductible.) |
|
Home |
Next |