
Subaru
Outback MAP Sensor Replacement Guide
How to clean or change the MAP (manifold
absolute pressure sensor) in a 2015, 2016, 2017, 2018 & 2019 Subaru Outback.

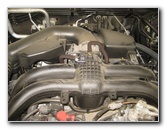
 2017 Outback FB25 Engine |
 MAP Sensor - Top of Engine |
| This automotive maintenance tutorial
was specifically written to assist owners of the fifth generation
(2015, 2016, 2017, 2018 and 2019
model years) Subaru Outback station wagon in cleaning or changing
the MAP (manifold absolute pressure) sensor on the FB25 2.5 liter
four cylinder Boxer engine. Owners of other Subaru vehicles such as the Forester, Impreza, Legacy, XV Crosstrek, WRX, BRZ, SVX, Tribeca, Exiga, Trezia, Levorg and Baja may also find these DIY instructions to be helpful. The original Subaru MAP sensor part number in this 2017 Outback was Denso 22627AA510 (also known as part number 079800-9430 3U16). To clean the OEM sensor, you will need a can of electronics cleaner spray such as CRC Electronic Cleaner. The tools needed to remove and replace the MAP sensor include an 8mm socket with a 1/4" drive ratchet. |
|
|
|
|
Some of the symptoms of a dirty or faulty MAP sensor that needs to be replaced include a rough idling engine, hesitating or jerking during acceleration, stalling, knocking, pinging and lower fuel economy (MPG) due to excessive fuel consumption. If you have an OBD2 Scanner (or OBD II Port Scan Tool), you may see the following MAP sensor related error codes: P0108 - MAP sensor high input, P0107 MAP sensor low voltage input or P0106 - MAP sensor range / performance problem. |
|
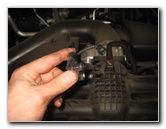
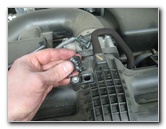
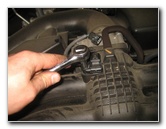
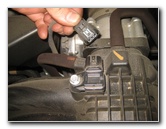 Disconnect Power Plug |
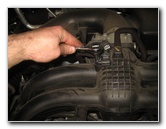 Loosen Counterclockwise |
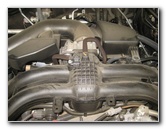
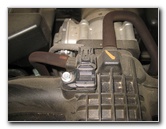
| The first two steps
are to open the hood and then move to the center of the engine bay. The MAP sensor is located at the top center of the FB25 engine. Gently push in the release tab on the electrical connector before sliding it straight off the base of the MAP sensor. Loosen the single bolt by turning it in the counterclockwise direction with an 8mm socket and a 1/4" drive ratchet. |
|
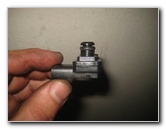
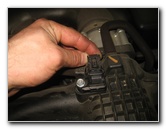
 Pull Out Old Sensor |
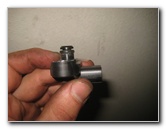
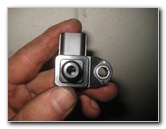 Old Sensor Removed |
| Gently pull the old
sensor straight out of the port. If you have trouble removing the old sensor, rotate it back and forth while pulling it straight out. Try to avoid using excessive force to prevent from damaging the plastic housing or breaking off the rubber o-ring gasket. |
|
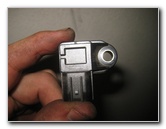 |
 Denso 079800-9430 |
| Inspect the old MAP
sensor for any signs of soot, carbon, oil or grease. If you would like to try cleaning the old sensor, use CRC Electronic Cleaner spray. (Do not use MAF mass airflow cleaner or brake cleaner spray to clean the MAP sensor.) |
|
|
|
|
 |
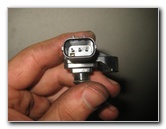
 3U16 |
| The OEM map sensor was marked as part number Denso 22627AA510 (also known as Denso 079800-9430 3U16). | |
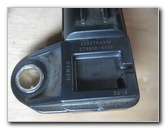 Denso 22627AA510 |
 Install MAP Sensor |
| Carefully spray
some electronics cleaner into the opening at the bottom of the MAP sensor
and on to the rubber o-ring gasket. Do not spray cleaner into the opening in the engine. Allow the MAP sensor to fully air dry. I would avoid using compressed air or the blower hose from a wet/dry shop vacuum. |
|
 Spin In 8mm Bolt |
 Tighten Clockwise |
| Re-insert the MAP
sensor back into the port on the top of the engine. Line up the hole in the sensor housing with the hole on the top of the engine. Spin in the 8mm bolt a few turns by hand in the clockwise direction to prevent it from becoming cross threaded. Tighten the bolt with the 8mm socket and a 1/4" drive ratchet in the clockwise direction until it is snug. |
|
 Push On Electrical Connector |
 MAP Sensor Replaced |
| Avoid over
tightening the bolt to prevent from cracking the plastic MAP sensor
assembly. Push the electrical connector straight on to the base of the MAP sensor until it clicks securely into place. Double check that the MAP sensor is secured to the engine and that the power plug is secure. If you have an OBD II Port Scan Tool, connect it and clear any DTC (diagnostic trouble codes), turn off the ignition and start the engine. Be sure to record the MAP sensor cleaning or replacement in your vehicle's service records. For more,
please check out all of my
2015-2018 Subaru Outback DIY Repair & Maintenance Guides. |
|
| If you found this guide to be helpful,
please consider making a small donation by clicking on the PayPal.com
"Donate" button located to the right of this paragraph. Thank you!
(Note: I am not a registered charity. Donations are not tax deductible.) |