
Nissan Altima
Third Brake Light Bulb Replacement Guide
Step by step instructions with pictures
for replacing the "high mount" third brake light bulb on a Nissan Altima sedan.

| This
guide was specifically written to assist owners of the 2002, 2003, 2004,
2005 & 2006 Nissan Altima
four door sedan in replacing a faulty "high mount" third brake light bulb
with a new one.
These instructions may also be useful for owners of other Nissan or Infiniti (made my Nissan Motors) vehicles such as the Maxima, Sentra, the Infiniti G sedan, and the Infiniti M sedan. The replacement bulb part number is 921. If you would like to have a brighter 3rd brake light, install a compatible 921 LED bulb. I am not a professional mechanic and I do not take any responsibility for any damage that occurs to your vehicle, person, home, property or pets. If you have any doubts, please consult an ASE certified auto mechanic. |
|
|
|
|
The first step to replace the "high mount" third brake light bulb in your Nissan Altima is to open the rear door and get in the back seat. Note: If all of your brake lights are "burned out" it might not be a problem with the actual bulbs themselves. If only the third brake light is out, then proceed with the next step. |
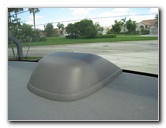 Get In The Back Seat |
To remove the third brake light housing, use a flat head screw driver or other similar device. Gently wedge the screwdriver in between the housing and the car's rear deck. Then gently push on the housing with your hand and lift with the screw driver. It should come off easily with just some minimal effort. |
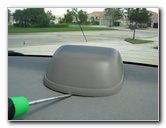 Gently Pry Up The Housing |
Under the third brake light housing you'll see the bulb's plug in connector and wires secured to the black rear part of the housing's underside. To unscrew the bulb and connector from the housing, rotate it about half a turn in the counter clockwise direction. It should come off easily without having to use any excessive force. |
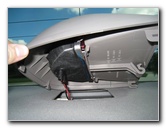 Twist Out The Bulb Connector |
Now that the plastic third brake light housing is out of the way, you can easily access the bulb. To remove the bulb from its socket, gently pull it straight out away from the connector. Some slight wiggling of the bulb might be necessary. |
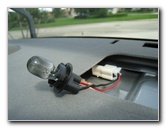 Pull Out The Old Bulb |
Pictured to the right is the old "high mount" third brake light bulb. As you can see, the inside of the glass is covered in a light black powder. This is a clear sign that the bulb has indeed reached the end of its useful life. Make sure you save the old bulb to take it with you to the auto parts store just in case you need to buy a different brand than I did in this guide. The OEM part is a Sylvania 921 bulb. |
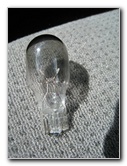 Burned Out Old Bulb |
I took the old bulb with me to Pep Boys and asked the guys at the counter which bulb number I needed to buy to replace it. Their computer system didn't seem
to have an entry for the "high mount" third brake light bulb of a 2002
Nissan Altima. They told me that any bulb of the same size would work
regardless of the voltage or wattage.
I chose a Sylvania 922 LL long liife bulb rated at 12.8 V (volts) and 12.5 W (watts). I left the store and hoped that I wouldn't have to return for another. |
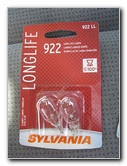 Sylvania 922 LL New Bulbs |
To install the new bulb, gently push it straight into the connector's socket. It shouldn't require much force so if it doesn't go in easily, try rotating the bulb to another position. Before you re-attach the bulb's connector to the housing, press the vehicle's brake pedal and test to see if the new light bulb illuminates. |
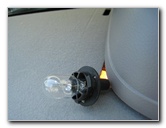 New Bulb Installed |
Now that you've verified that the new bulb works, go ahead and pop the plastic housing back into place. To do this, apply light pressure around the edges of the housing to snap the hook fasteners under the rear deck lid. The housing should lay completely flat on the rear deck. Test to see if the housing moves around at all when touched. |
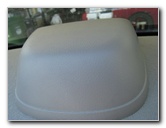 Housing Snapped Back In Place |
The last step is to have someone or something depress the brake pedal. Then verify that the light from the third brake light housing is easily visible and does not look obscured in any way. That's it. You're all done. I hope you found
this guide to be helpful.
|
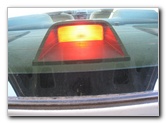 Third Brake Light Working Again |
|
If you've replaced the bulbs and your Nissan
Altima's brake lights are still not working, try cleaning the metal contacts
inside the bulb connectors with an alcohol soaked
Q-Tip. Be sure to
disconnect the 12V car battery first.
The problem might also be with the brake light switch. The brake light switch on a 2002 Nissan Altima is located at the very top of the brake pedal under the driver side dashboard. The switch is activated by the moving metal part of the brake pedal. This switch contains different terminals for the "high mount" third brake light and the other two primary rear brake lights. Two other things you can check if the brake lights still are not working is the corresponding fuses in the fuse box and the wires leading up to the brake light bulb sockets. For more of my related updates check out the
following links:
Nissan Altima Headlight Bulb Replacement Guide,
Nissan Altima Crankshaft Position & Camshaft Sensor Replacement Guide,
Nissan Altima Engine Oil Change Guide,
Car Interior Carpet Replacement,
K&N Air Filter Cleaning Guide,
Buffing Faded Headlights Guide,
Garmin Nuvi 260W Portable GPS Navigator Review and the
Nissan Altima Rear Brake Light Bulbs Replacement Guide. |
|
| If you found this guide to be helpful,
please consider making a small donation by clicking on the PayPal.com
"Donate" button located to the right of this paragraph. Thank you!
(Note: I am not a registered charity. Donations are not tax deductible.) |