
Mitsubishi
Mirage Spark Plugs Replacement Guide
How to check or change the 1.2L 3
cylinder engine's spark plugs in a 6th generation 2012 to 2016 Mitsubishi
Mirage.

 2015 Mirage 1.2L Motor |
 Left Side Intake Bolt |
 10mm Socket & Wrench |
| This
automotive maintenance tutorial was specifically written to assist
owners of the sixth generation (2012, 2013, 2014, 2015, & 2016)
Mitsubishi Mirage in checking or changing the engine spark plugs in
the 1.2 liter three cylinder 3A92 DOHC MIVEC 12V motor. Owners of other Mitsubishi vehicles such as the Lancer, Outlander, Galant, Montero, Eclipse, 3000GT, Endeavor, Raider, Diamante, Attrage, Carisma, Colt, Grandis, Magna, Pajero, Space Star and the revised 2017 Mirage may also find these DIY instructions to be helpful. The OEM iridium tipped spark plugs part number is as follows: NGK 93298-4PK LZFR5BI-11. A few other compatible replacement spark plugs with their part numbers include the following: Denso (5343) IKH16, Denso (4505) PKH16TT and Denso (4703) IKH16TT. The tools needed to complete this procedure include a 10mm socket, a 6" extension bar, a 3/8" drive ratchet, a 5/8" spark plug socket and a tube of dielectric grease. |
||
|
|
||
 Loosen Counterclockwise |
 10mm Bolt Removed |
 Middle Air Intake Bolt |
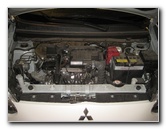
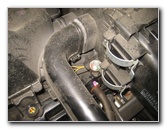
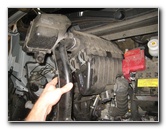
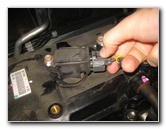
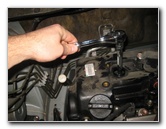
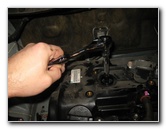
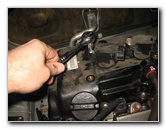
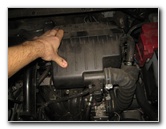
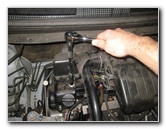
| The first two steps
are to open the hood and then locate the black plastic air intake assembly
on the top of the engine. The air intake housing is held in place by three bolts and a single plastic friction fastener inserted in to a rubber grommet. The left side bolt is just in front of the oil filler cap. The center bolt is in between the air intake tube and the engine air filter box. The right side bolt is towards the rear of the engine and near the windshield. |
||
 Loosen 10mm Bolt |
 Center Bolt Removed |
 Right Rear Intake Bolt |
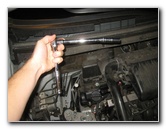
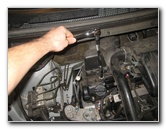
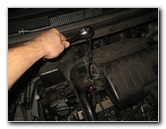
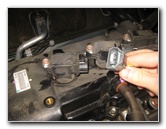
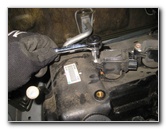
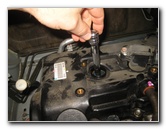
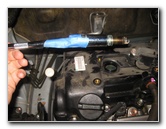
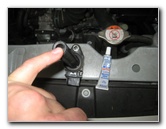
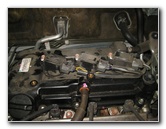
| Remove the three bolts by turning them counterclockwise with a 10mm socket and a ratcheting wrench. | ||
 Loosen Counterclockwise |
 10mm Bolt Removed |
 Three 10mm Bolts |
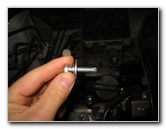
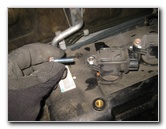
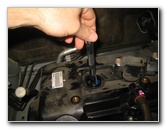
| Set the three bolts aside in a safe place. | ||
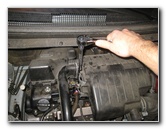
 Lift Up To Release Fastener |
 Pull Off Air Intake Assembly |
 Set Aside Air Intake |
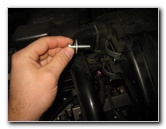
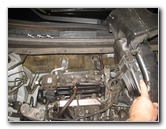
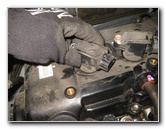
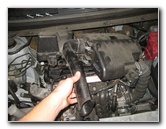
| Firmly lift up the
right side of the air intake assembly to release the plastic peg or "spike"
from the rubber grommet on the top of the engine. Lift the left side of the air intake and swing it over to the right side of the engine bay. Rest the air intake on top of the 12 volt car battery. |
||
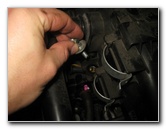
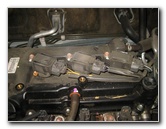 Three Spark Plug Coils |
 Press In Tab To Release |
 Slide Off Power Plug |
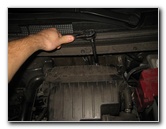
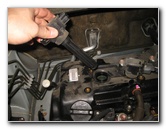
| If you have access
to compressed air or a wet/dry shop vacuum, thoroughly clean off the top of
the engine to help reduce the risk of having debris fall down in to the
cylinders. I'd also recommend only checking or changing one spark plug at a time to further reduce the chance of having something fall down in to the engine. Press in the tab on the electrical connector before sliding the power plug straight off the base of the ignition coil. |
||
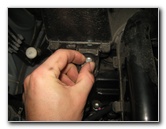
 Loosen 10mm Bolt |
 10mm Bolt Removed |
 Rotate Back & Forth |
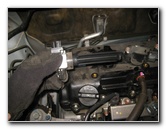
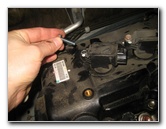
| Loosen the single
bolt that secures the ignition coil to the engine by turning it
counterclockwise with a 10mm socket and a ratcheting wrench. Set the 10mm bolt aside in a safe place. Rotate the ignition coil back and forth a few times to make sure that the rubber dust boot at the bottom of the coil is not stuck or "frozen" to the top of the old spark plug. |
||
 Lift Out Ignition Coil |
 Spark Plug In Well |
 5/8" Spark Plug Socket |
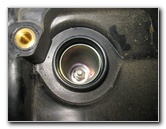
| Lift the ignition
coil housing straight out of the spark plug well and set it aside in a safe
place. Attach the 5/8" spark plug socket to a 6" extension bar and a 3/8" drive ratcheting wrench. I always use a bit of painter's tape to secure the spark plug socket to the extension bar to keep it from falling down in to the spark plug well. |
||
 Loosen Counterclockwise |
 Spin Out By Hand |
 Lift Out Old Spark Plug |
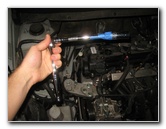
| Lower the socket in
to the well and attach it to the top of the old spark plug. Loosen the old spark plug by turning it counterclockwise. Try to avoid using excessive force to prevent from cracking the ceramic part of the old spark plug. If the spark plug won't turn, spray in some penetrating oil such as PB Blaster, Liquid Wrench or Kano Kroil and wait 15-30 minutes or more before trying again. If you don't have any penetrating oil, try spraying some WD-40 or just warm up the engine for a few minutes to expand the metal engine block. Once the spark plug is loose, detach the ratcheting wrench from the extension bar and spin it out the rest of the way by hand. Lift the old spark plug out of the well and detach it from the socket. |
||
|
|
||
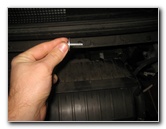
 Inspect Old Spark Plug |
 Lower In New Spark Plug |
 Tighten Clockwise |
|
Carefully inspect the old spark plugs. If the electrode end of the old spark plug looks ashy white, the plugs may have been exposed to high temperatures such as engine overheating or they might be the incorrect heat range for your driving conditions and/or environment. If the old spark plugs are dark grey or covered in black soot, the engine might be burning oil and should be checked by a professional mechanic. The OEM (original equipment manufacturer) spark plugs in this 2015 Mirage were the NGK 93298-4PK LZFR5BI-11. If you have a spark plug gap gauge, check the gap on the new spark plugs. They should already be pre-gapped to the correct setting from the factory. An optional step is to apply some anti-seize grease to the threads on the new spark. Most spark plug manufacturers recommend that you should not use anti-seize since it can lead to over tightening. But it your old spark plugs were very difficult to remove at 100,000 miles, you may want to consider using some. Just remember to use less torque when you tighten the plugs. Push the new spark plug in to the socket and carefully lower it down in to the well. Your spark plug socket should have a rubber insert or a strong magnet to securely hold the new spark plug in place. Spin in the new spark plug by hand in the clockwise direction until it makes contact with the cylinder block. Attach the 3/8" drive ratcheting wrench to the 6" extension bar and tighten the new spark plug to just past barely past the point when you feel the crush washer collapse. If you are re-installing the old spark plugs, just tighten them to just a very small fraction of a turn past hand tight. (Remember, if you used anti-seize lubricant, you'll have to be extra careful to avoid over tightening the new plug.) Try to avoid using excessive force to prevent from cracking the new plug or stripping the aluminum threads. Double check that the new spark plug is tight before moving on to the next step. |
||
 Apply Dielectric Grease |
 Lower In Ignition Coil |
 Spin In 10mm Bolt |
|
Apply a small amount of dielectric grease to the opening at the bottom of the rubber dust boot attached to the ignition coil. The dielectric grease will help keep out any dust or moisture. Lower the ignition coil in to the spark plug well and rotate it back and forth several times to help spread the dielectric grease.Spin in the 10mm bolt by hand a few turns to prevent it from becoming cross threaded. |
||
 Tighten Clockwise |
 Push On Power Plug |
 Spark Plugs Replaced |
|
Tighten the bolt with the 10mm socket and a ratcheting wrench until it is snug. Try to avoid over tightening the bolt to prevent from cracking the plastic ignition coil housing. |
||
 Lower Air Intake Housing |
 Re-Insert Friction Fastener |
 Push Down Air Intake |
| Carefully lower the
air intake and engine air filter box assembly back in to place. Line up the plastic peg on the right side and push it down in to the rubber grommet. |
||
 Spin In Left Side Bolt |
 Replace Middle Bolt |
 Replace Right Side Bolt |
| Spin in the three 10mm bolts by hand a few turns in the clockwise direction to prevent them from becoming cross threaded. | ||
 Tighten Bolts Clockwise |
 |
 Engine Air Intake Secured |
| Tighten the three
air intake housing bolts in the clockwise direction with the 10mm socket and
ratcheting wrench until they are snug. Start the engine and listen closely for any strange noises that might indicate a loose spark plug or a disconnected power plug. If you hear any odd sounds, immediately turn off the engine. Be sure to record the spark plug change in your car's service records. For more,
check out all of my
2012-2016 Mitsubishi Mirage DIY Repair & Maintenance Guides. |
||
| If you found this guide to be helpful,
please consider making a small donation by clicking on the PayPal.com
"Donate" button located to the right of this paragraph. Thank you!
(Note: I am not a registered charity. Donations are not tax deductible.) |