
Liftmaster
MyQ Control Panel Speaker Volume Reduction Guide
How to reduce the beeping volume on the
Liftmaster or Chamberlain MyQ garage door opener control panel.

| Disclaimer - Following these directions may void your warranty. Please continue at your own discretion. I assume no responsibility for damage to your garage door opener, control panel, persons, property or pets. | ||
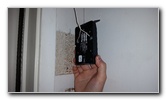
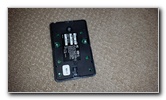
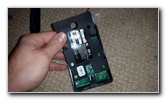
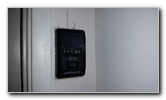 Liftmaster 8500 Control Panel |
 Flip Up Plastic Cover |
 Loosen Counterclockwise |
| I recently
installed the Liftmaster 828LM
internet gateway for our
Liftmaster 8500 jackshaft garage door opener to activate the
feature that allows us to open and close the garage door with the
MyQ Android or Apple IOS smartphone apps when connected to a WiFi or
4G cellular connection. We quickly realized that the beeping noise of the warning alarm from the Liftmaster 888LM control panel speaker when closing the garage door with the app was far too loud. The repeated beep sounds were almost as loud as a home alarm that might disturb neighbors, especially at night. I didn't want to completely disable the speaker, since the beeping sound is an important safety feature to alert people in or around the garage that the door will be closing soon. To complete this procedure to muffle the speaker and reduce the volume, you'll need a Phillips head screwdriver, some cotton or tissue paper and any tape such as painter's tape. |
||
|
|
||
This DIY tutorial was specifically written for owners of the Liftmaster 8500 jackshaft garage door opener equipped with the MyQ Door Control Panel (model number 888LM). Owners of other MyQ capable openers such as the 8550W, 8360W, 8557W, 8587W, 8355W, 8365W-267, 8160W, 8010, 8155W, 8164W, 8165W, 3240, Chamberlain B970, B550, B750, C450, C870 and C455 may also find these instructions to be helpful. |
||
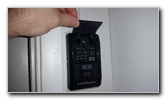
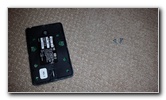
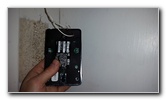
 Phillips Screw Removed |
 Slide Up Control Panel |
 Lift Off Lower Screw |
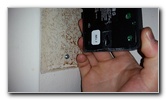
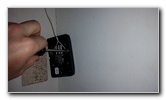
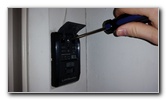
| The first step is
to lift up the plastic cover at the top of the control panel which hides the
"Learn" and "TTC" (Time To Close) buttons. Then remove the single Phillips head screwdriver at the top of the panel by turning it in the counterclockwise direction. Set the screw aside in a safe place. Gently slide the entire control panel up to release it from the lower mounting screw. |
||
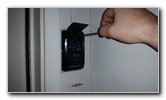
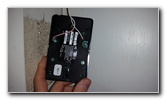
 Lower Slot & Screw |
 Back Side of Panel |
 Loosen Two Screws |
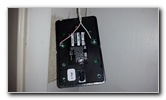
| Turn over the
control panel to access the two wires and screws on the back side. Loosen the two screws in the counterclockwise direction with the Phillips head screwdriver and disconnect the two control wires. |
||
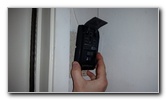
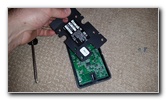
 Control Panel Removed |
 Remove Two Screws |
 Two Screws Removed |
| Set the control
panel face down on a soft surface. Fully remove the two small Phillips head screws. |
||
 Pull Off Plastic Cover |
 Rear Cover Removed |
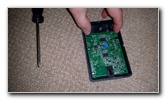 Pull Apart Plastic Sides |
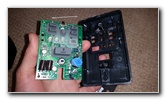
| Gently pull off the
top edge of the plastic cover to release it from the two retaining posts. Then slide the plastic cover up and out of the control panel. Carefully pull apart the two sides of the control panel case to release the circuit board from the housing. |
||
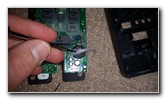
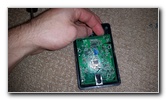 Lift Out Circuit Board |
 Turn Over Circuit Board |
 Round Black Speaker |
| Gently lift the
circuit board out of the plastic housing and turn it over to access the
speaker. The round black plastic speaker is located at the bottom right of the control panel. |
||
|
|
||
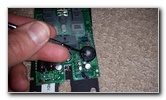
 Q-Tip Cotton & Tape |
 Small Cotton Pieces |
 Cotton In Speaker Hole |
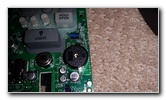
| Pull some small
pieces of cotton off the Q-Tip or tear apart a tissue. Use a small flathead screwdriver or the end of a paper clip to very gently push some of the cotton or tissue into the hole in the center of the speaker. Try to loosely pack in the cotton. I do not recommend fully disabling the speaker for safety reasons. Update - If your garage door opener will always open when using the MyQ smartphone app but will NOT close the garage door, you may have reduced the volume of the speaker by too much. I found that the MyQ app would consistently open the garage door but it was never able to close the garage door when the speaker was nearly silent. I suspect that the Liftmaster engineers included a microphone or some other way to detect if the warning alarm speaker inside the 888LM control panel was functioning properly. If the speaker is fully muted, the MyQ app will be unable to close the garage door and display a warning message such as that the "garage door opener is not responding", "please try again later" or "Close error - too many failed attempts". I had to re-open the control panel and remove some of the cotton to slightly increase the volume of the speaker. Now the beeping volume is at a reasonable level that can warn people in or near the garage but it can't be heard more than a few feet away from the garage door opening. The MyQ app was once again able to easily close the garage door whether I was using my home wireless connection or a 4G LTE cellular connection when away from home. If you are still unable to close your garage door with the MyQ app you may need to check the alignment of the photocells safety sensors or also try re-locating the internet gateway hub further away from the motor, power cycle the unit, open and close the door with a traditional remote control, restart your phone and remove and re-add the gateway or opener to the MyQ app. |
||
 Gently Insert Cotton |
 Cover With Painter's Tape |
 Replace Circuit Board |
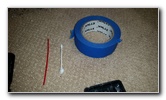
| Cover the front of
the speaker with some tape to secure the cotton or tissue paper in place. I recommend using painter's tape so that you can easily remove it in the future without leaving a mark on the speaker just in case you sell your home or you'd like to return the control panel if it becomes defective in the future. Turn over the circuit board and line it up with the plastic housing. Slide the notch at the bottom part of the circuit board into the lower part of the housing. |
||
 Slide In Plastic Cover |
 Replace Two Screws |
 Re-Attach Wires |
| Slide the plastic
cover back into place. Gently snap the two holes at the top of the plastic cover on to their retaining clips. Replace the two screws by turning them in the clockwise direction. Do not fully tighten the two screws. You'll still need to re-attach the two control wires. The wire with the red stripe should be attached to the screw on the left that is marked with the word "RED" above it. |
||
 Tighten Screws |
 Re-Attach Lower Screw |
 Tighten Upper Screw |
| Then attach the
white wire to the screw on the right marked with the word "White" above it. Line up the slot on the bottom of the rear cover of the control panel with the bottom screw on your garage wall. Insert the screw head into the slot and slide down the control panel to secure the lower screw into the slot. Replace the top screw by turning it in the clockwise direction with the Phillips head screwdriver. Allow the control panel at least a minute or two to re-sync with the garage door opener. You may see the learn and door open / close LED lights flashing rapidly. You can quickly and easily test the volume of the speaker by pressing the "OFF" button above the word "Timer". Then test opening and closing the garage door with the MyQ app on your smartphone. If the MyQ app is unable to close the garage door, you may need to remove some of the cotton and increase the speaker volume. For more, check out my list of
Home DIY Repair &
Maintenance Guides. |
||
| If you found this guide to be helpful,
please consider making a small donation by clicking on the PayPal.com
"Donate" button located to the right of this paragraph. Thank you!
(Note: I am not a registered charity. Donations are not tax deductible.) |