
Kia Rio
Serpentine Accessory Belt Replacement Guide
How to change the engine's serpentine
accessory belt on the Gamma 1.6L GDI I4 motor in a 3rd generation 2012-2016 Kia
Rio.

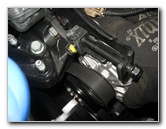
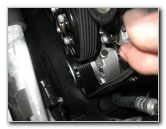
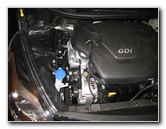 2014 Rio - Gamma GDI 1.6L |
 Alternator Bracket & Belt |
 12mm Tension Adjustment Bolt |
| This
automotive maintenance tutorial was specifically written to assist
owners of the third generation (2012, 2013, 2014, 2015 and also the
face lifted 2016 model year) Kia Rio in changing the engine's
serpentine accessory belt on the Gamma GDI 1.6 liter inline four
cylinder motor. Owners of other Kia and Hyundai vehicles such as the Optima, Forte, Cadenza, K900, Sorento, Sportage, Sedona, Soul, Elantra, Veloster, Sonata, Azera, Tucson, Santa Fe, Genesis, ix20, i20, ix35 and Equus may also find these DIY instructions to be helpful. The tools needed to complete this procedure include a 12mm socket, a 14mm socket and a 3/8" drive ratchet. A few compatible replacement serpentine accessory belts with their part numbers are as follows: Continental Elite 4060495, Kia 25212-2B020, Bando 6PK1255, Prestone 495K6, ACDelco 6K494 and Dayco 5060495. |
||
|
|
||
Please verify the correct replacement part number for your Kia Rio by consulting with the parts counter at your Kia or Hyundai dealership, by calling an auto parts store, or by using the Amazon Part Finder website. The correct serpentine accessory belt for your Rio may vary depending on if it is equipped with A/C (air conditioning), by the engine type, trim level and also the model year. |
||
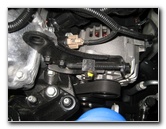
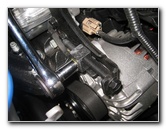
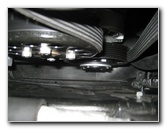
 Alternator - Lower 14mm Bolt |
 Loosen Lower 14mm Bolt |
 |
|
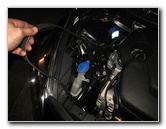
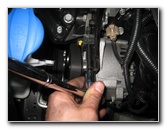
The first step is to gently pull off the plastic engine cover and set it then set it aside in a safe place. I'd recommend studying how the OEM belt is routed around each of the pulleys and also drawing yourself a routing diagram or snap a few pictures with your cell phone or a camera. In order to remove the old OEM serpentine accessory belt, you will need to loosen three bolts on the alternator located at the top of the engine. First loosen the 14mm bolt located at the bottom of the alternator. This is the alternator "pivot" bolt that will allow the alternator to be pivoted backwards and create slack in the belt after the other two bolts are loosened. |
||
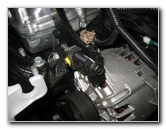
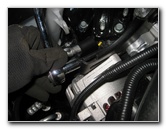
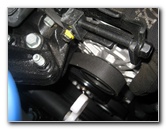
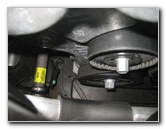
 Alternator Pivot Bolt Loosened |
 |
 12mm Bracket Bolt |
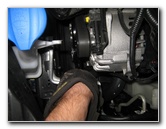
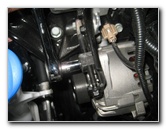
| Continue loosening
the alternator pivot bolt a few turns in the counterclockwise direction but
do not remove it entirely. You may only need to loosen it 3-4 turns. Then move to the top of the alternator and locate the bracket slider set bolt which is positioned with the bolt head on the left (passenger side) and the threads facing the right towards the engine. Loosen the 12mm bolt in the counterclockwise direction a few turns, but do not remove it. |
||
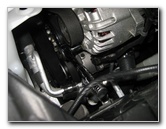
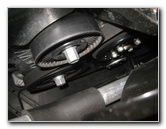
 Loosen Counterclockwise |
 Loosen 12mm Adjustment Bolt |
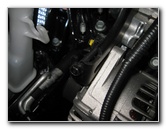 |
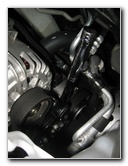
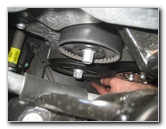
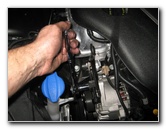
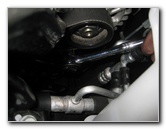
| Then you may loosen
the third bolt which is positioned with the bolt head facing the front of
the vehicle and the threads facing the rear of the car. This long bolt is the serpentine belt tension adjustment bolt. Continue loosening the tensioner bolt in the counterclockwise direction until there is some slack in the accessory belt. |
||
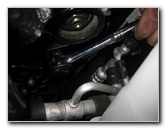
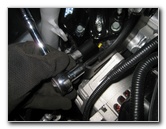 Continue Loosening Bolt |
 Slide Back Alternator Bracket |
 Creating Slack In Belt |
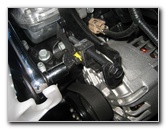
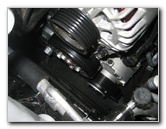
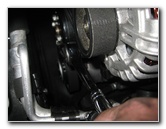
| Firmly push the top
of the alternator back towards the rear of the vehicle. You should feel and see the alternator pivot slightly backwards. |
||
 Serpentine Belt Loose |
 Pull Old Belt Off Alternator |
 Remove Belt From Other Pulleys |
| If you still don't
have enough slack in the old belt to slip it off the alternator pulley,
continue loosening the long tensioner bolt in the counterclockwise
direction. Carefully pull the old belt off the top of the alternator pulley. Make a mental note of the way the old OEM belt is routed around the various pulleys (crankshaft, water pump, A/C, power steering, alternator) before slipping it off the other pulleys. |
||
|
|
||
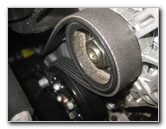
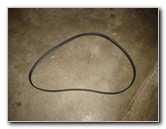 Old OEM Belt Removed |
 Ribbed & Smooth Pulleys |
 New Belt Over Crankshaft Pulley |
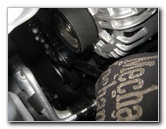
| If the old belt is
in relatively good condition, I'd recommend keeping it in your garage or
your trunk just in case you have a belt failure in the future. I recommend buying the Continental Elite 4060495 belt since it has excellent reviews on Amazon. Lower the new belt down on to the left side of the engine. The general rule to keep in mind is that the ribbed side of the belt goes around the ribbed pulleys and the smooth side of the belt goes against the smooth pulleys. Start by wrapping the inner ribbed side at the bottom of the belt over the large crankshaft pulley at the bottom of the engine. |
||
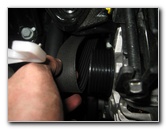
 Routing Belt - Pulleys |
 Smooth Side On Smooth Pulleys |
 Ribbed Side Over Ribbed Pulleys |
| Then continue routing the belt with the ribbed side over the ribbed pulleys and the smooth flat side of the belt around the smooth pulleys. | ||
 New Belt Routed |
 Top Of Belt Over Alternator |
 Tighten Tensioner Bolt |
| Double check that
the new accessory belt has been properly routed over the pulleys. Refer to
the routing diagram you created or the pictures you took earlier. Slip the top of the belt over the ribbed alternator pulley at the top of the engine. Begin tightening the belt tensioner bolt by turning it in the clockwise direction with the 12mm socket and ratcheting wrench. |
||
 Check Belt Tension |
 Tighten Bracket Slider Bolt |
 Tighten Clockwise |
| Repeatedly check
the belt tension as you tighten the long 12mm tensioner bolt. The correct amount of belt tension will be achieved when you can twist the section of belt in between the alternator and crankshaft pulleys to about 90 degrees but not past that point. If you can still rotate that longest span of belt to past 90 degrees (close to almost being entirely twisted) then the belt is still way too loose. If you can barely twist the belt at all from it's current flat position, the belt is too tight and should be loosened a bit. Once you think you have the correct belt tension, tighten the 12mm bolt on the alternator slider bracket in the clockwise direction until it is snug. |
||
 Tighten Alternator Pivot Bolt |
 Double Check All 3 Bolts |
 New Belt Installed |
| Then move to the
bottom of the alternator and tighten the 14mm pivot bolt by turning it
clockwise with the ratcheting wrench until it is snug. Double check that all three bolts are tight before moving on to the next steps. Start the engine and carefully listen for any noises that may indicate a problem. If you hear a loud SCREECH sound when you start the engine, immediately turn it OFF! The belt may have been tightened far too much and it is not spinning. The crankshaft pulley may have been rubbing the belt and causing that sound. If you hear an occasional "chirp, chirp, chirp" or "squeak, squeak" sound, the belt might be a little bit too loose. To adjust the belt, first loosen the lower 14mm alternator pivot bolt and then the 12mm left-to-right mounted bracket slider bolt. Then either turn the long front-to-back mounted tensioner bolt in the clockwise direction to tighten it, or in the counterclockwise direction to loosen the belt. Perform the belt twist or turn at the longest span between the alternator and crankshaft to see if it can be twisted about 90 degrees (no more or no less). For more,
check out my other
2012-2016 Kia Rio DIY Repair & Maintenance Guides. |
||
| If you found this guide to be helpful,
please consider making a small donation by clicking on the PayPal.com
"Donate" button located to the right of this paragraph. Thank you!
(Note: I am not a registered charity. Donations are not tax deductible.) |