
Home Water
Heater Sediment Flushing Guide
How to flush out sediment from a house's
water heater to prolong its life & ensure maximum energy efficiency.

| Please note, I am not a professional plumber. When working with a water heater there is always a chance of being scalded by hot water. If you have any doubts, do not proceed and consult with a professional. I take no responsibility for damage to your property, persons, or pets. | ||
 |
 |
 |
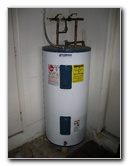
| It's
inevitable that sediment, sand, and other debris will slowly
accumulate at the bottom of a home's hot water heater. How quickly
this happens depends on whether or not your area has "hard water"
that is filled with minerals such as calcium, and magnesium. Common
signs of sediment build up include hearing popping, bubbling and
cracking sounds. To keep your water heater operating as energy efficient as possible and extend its useful life, it's vital that the sediment is regularly flushed out. The recommended flushing schedule for your area can vary between once every few months to just once every few years. Consult with your local water utility company or local plumbers for their opinion. The first step is to turn off the electricity for an electric water heater at the breaker box or turn off the gas supply. Then turn off the cold water inlet valve located at the top of the water heater. (For maximum safety, allow the water heater to cool off for several hours before continuing with the flush.) |
||
 |
 |
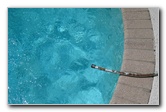 |
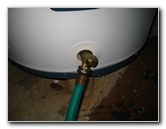
| I chose to
immediately run a garden hose to the pool so as to not "waste" the hot water
on the driveway. I'm sure the measly 80 gallons of hot water from the heater
made little to no difference in the temperature of the pool, but at least it
made me feel like the energy was going to good use.
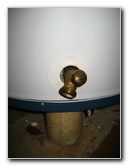
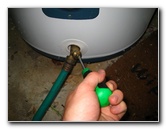
Normally, you'd connect a short high quality garden hose to the spigot at the bottom of the water heater and run it out to the driveway or somewhere safe where no one could get burned by the hot water. (If you don't allow the water to cool first before doing the flush, carefully monitor the condition of the hose during the flush for signs of melting or leaks and avoid getting the hot water on your lawn. Some species of grass could be damaged or killed by the hot water, especially in cooler climates.) The drain spigot on our Rheem brand water heater required a flathead screwdriver to open. Some water heaters are equipped with an easier to open round metal or plastic shut off valve similar to those commonly found at a home's garden hose spigot. Before opening the valve on the water heater's drain spigot, open a hot water faucet in the home to allow air to enter the water heater and cause it to drain more quickly. Once you've opened the valve, watch the flow of water coming out of the hose and take note of whether or not it looks cloudy. When the water looks clear or the flow slows down considerably, turn off the drain valve. Do not turn back on the electricity or re-light the pilot light until the water heater has been refilled with water. Turning on the water heater without the heating elements being submerged in water can cause them to burn out and require repair or water heater replacement. Open the cold water inlet valve and listen for the sound of water rushing into the water heater. You should also check that the air in the water heater is being purged out of the hot water faucet that was opened earlier in the home. When only water runs out of the hot water faucet in the home, turn it off. After the water heater is completely
re-filled, turn on the electricity or follow the manufacturer's instructions
for turning on the gas supply and re-lighting the pilot light. |
||
| For of my related
guides or reviews, click on the following links:
Culligan US-600A Under Sink Water Filter,
Laptop To HDTV Via HDMI CAT6 Extender,
Home Dryer Exhaust Vent Lint Cleaning Guide,
HVAC Air Handler Condensate Drain Pipe Flushing Guide,
Kitchen Sink Drain Pipe Leak Repair Guide,
Culligan Icemaker Water Filter Installation Guide,
Culligan IC-EZ-1 Drinking Water Filter Installation Guide,
Honda EU3000is Generator Maintenance Guide,
Sticky Door Lock Lubrication Guide,
Hunter Just Right Digital Thermostat Installation Guide,
Home A/C Run Capacitor Replacement Guide,
Home Refrigerator Water Leak Repair Guide,
Toilet Water Supply Valve Leak Repair Guide,
Kenmore Oven/Range 220V Power Supply Repair Guide,
Summit Kegerator Review,
Honda EU3000is Generator Review, &
Carpenter Bee Pest Control Guide. |
||
| If you found this guide to be helpful,
please consider making a small donation by clicking on the PayPal.com
"Donate" button located to the right of this paragraph. Thank you!
(Note: I am not a registered charity. Donations are not tax deductible.) |