
GM Pontiac
Grand Prix Tail Light Bulbs Replacement Guide
Pictures illustrated instructions for
replacing the brake, parking & reverse light bulbs on a 1997-2003 GM Pontiac
Grand Prix.

 |
 |
 |
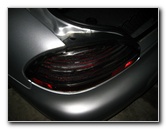
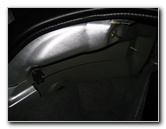
| This
automotive "how-to" guide was specifically written to assist owners of
the 2001 GM Pontiac Grand Prix GTP sedan in replacing the tail light
bulbs (parking/signal, brake & reverse). Owners of other sixth generation (1997, 1998, 1999, 2000, 2001, 2002 & 2003) General Motors Pontiac Grand Prix coupe or sedan vehicles in the SE, GT & GTP trim levels may also find these instructions to be useful. New light bulbs for the rear of the Pontiac Grand Prix have the following part numbers from Sylvania and other manufacturers: Rear Turn Signal / Parking Light Bulb # 3057, Stop/Brake Light Bulb # 3057, and Reverse (Back Up) Light Bulb # 3156. If you would like to have brighter tail lights, choose compatible 3057 LED or 3156 LED bulbs. The first step to replacing the bulbs in the rear light assembly is to pop open the trunk and locate the black plastic thumb screws in the corners of the trunk. You may have to remove the top bungee hook of your trunk's cargo net, if so equipped. |
||
|
|
||
 |
 |
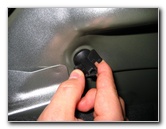 |
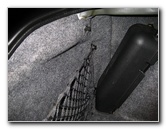
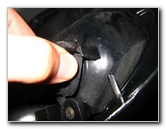
| Remove the two
visible black plastic thumb screws by turning them counter-clockwise until
they come loose.
Then gently pull the trunk's grey carpeting away from the rear of the trunk to reveal the third black plastic thumb screw located near the bottom of the trunk closest to the center. |
||
 |
 |
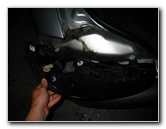 |
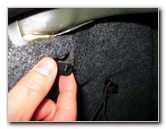
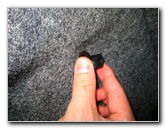
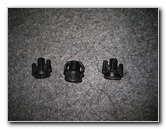
| Be sure to hold the
tail light housing with one hand while unscrewing the third thumb screw as
it may fall away causing damage to your car's paint or the assembly itself.
With all three black plastic thumb screws removed, gently pry and wiggle the rear tail light housing until it is free from the rear of the car. |
||
|
|
||
 |
 |
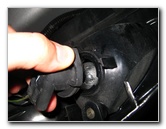 |
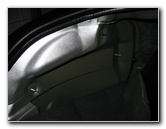
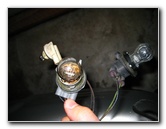
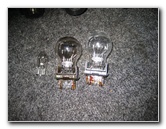
| To access the brake
or parking/signal light bulbs, press and hold the locking tab and turn the
light bulb socket a quarter turn counter-clockwise.
Then pull the socket straight out from the housing. To remove the reverse/back up light bulb socket, just turn it a quarter turn counter clockwise and pull it out. To remove the light bulbs from the sockets, just pull and wiggle them straight out of the socket. This should only require minimal effort. Again, the Sylvania part numbers for replacement bulbs are the following: Parking/Rear Signal # 3057, Brake/Tail Light Bulb # 3057, and Reverse/Back Up Light Bulb # 3156. If you plan on keeping your Grand Prix for a long time, I'd suggest replacing any burnt out light bulbs with the "Long Life" or "LL" light bulbs. |
||
 |
 |
 |
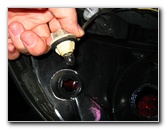
| To complete the
Pontiac Grand Prix tail light bulb replacement procedure, just reverse the
steps.
Push the new light bulb securely into the socket, insert the socket into the tail light assembly and turn it a quarter turn clockwise until the plastic tab locks into place. (For the reverse bulb, you only have to insert the socket into the assembly and turn it a quarter turn clockwise.) Then line up the three threaded screws on the tail light assembly with the holes on the rear of the car and gently insert them. Secure the tail light housing with the third thumb screw that you removed by turning it clockwise until finger tight and cover it with the trunk's carpeting. Finally, screw in the other two thumb screws (with the cargo net latching point in the correct place) and re-secure the trunk's cargo net bungee loop. To test the lights, turn on the lights at the driver's console and have someone step on the brake and put the transmission in reverse. |
||
For more of my related automotive guides or reviews, click on the following links: Tail Light & Headlight Condensation Guide, GM Pontiac Grand Prix Power Steering Whine Guide, Zaino Show Car Polish Review Guide, WeatherTech FloorLiner Review, Pontiac Grand Prix Front Brake Pads Replacement Guide, GM Brake Line Fluid Bleeding Guide, Pontiac Grand Prix Rear Brake Pads Replacement Guide, Pontiac Grand Prix GTP Supercharger Belt Replacement Guide, Pontiac Grand Prix Serpentine/Accessory Belt Replacement Guide, Pontiac Grand Prix Idler & Tensioner Pulleys Replacement Guide, Corroded Car Battery Terminal Replacement Guide, GM Pontiac Grand Prix Alternator Replacement Guide, Pontiac Grand Prix PCV Valve Replacement Guide, GM Pontiac Grand Prix TCS Off / ABS / SES Warning Lights Solution Guide, Pontiac Grand Prix Power Window Motor & Regulator Replacement Guide, GM Pontiac Grand Prix Wheel Bearing Hub Replacement Guide, Pontiac Grand Prix Engine Oil Change Guide, Buffing Old Faded Headlights Guide, K&N Air Filter Cleaning Guide, GM Pontiac Grand Prix Headlight Bulb Replacement Guide and the GM Pontiac Grand Prix Eaton M90 Supercharger Oil Change Guide.
For more, check out all of my
Pontiac Grand Prix DIY Repair & Maintenance Guides. |
||
| If you found this guide to be helpful,
please consider making a small donation by clicking on the PayPal.com
"Donate" button located to the right of this paragraph. Thank you!
(Note: I am not a registered charity. Donations are not tax deductible.) |