
Ford Flex MAP
Sensor Replacement Guide
How to change the manifold absolute
pressure sensor on the Duratec 3.5L V6 engine in a 2009 to 2019 Ford Flex.

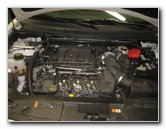 2019 Flex 3.5L V6 Engine |
 Left Side of Engine |
 Left Rear Corner |
| This automotive
maintenance tutorial was specifically written to assist owners of the first
generation (2009, 2010, 2011, 2012, 2013, 2014, 2015, 2016, 2017, 2018 &
2019) Ford Flex crossover SUV in checking or changing the MAP (manifold
absolute pressure) sensor on the Duratec 35 3.5L V6 engine. Owners of other Ford or Lincoln vehicle such as the Explorer, Fiesta, Focus, Fusion, C-Max, Mustang, Taurus, EcoSport, Escape, Edge, Expedition, Transit Connect, F-150, Ranger, MKZ, MKC, Navigator, MKX and Continental may also find these DIY instructions to be helpful. The procedure should be the same or very similar for the EcoBoost 3.5L V6 engine. A few of the symptoms of a failing or faulty MAP sensor include low fuel economy (reduced MPG), lack of power, failing an emissions test, a rough idle, hesitating, jerking and stalling. If you see a CEL (check engine light) or SES (service engine soon) light on the instrument cluster, you can use an OBD II scan tool to check the DTC (diagnostic trouble code). The fault codes that may indicate a broken MAP sensor include P0105, P0106, P0107 or P0108. The compatible replacement MAP sensor for a newer 2016 to 2019 Ford Flex is Motorcraft CX2526. If you have a previous model year 2009 to 2015 Ford Flex, the MAP sensor part number is Motorcraft CX2228. If you have a Flex equipped with the EcoBoost turbocharged engine, you will need the 3 bar Motorcraft CX2231 MAP sensor which can accommodate the wider range of atmospheric pressure that the turbo produces. The tools needed to complete this procedure include a 7mm socket and a 1/4" drive ratchet. |
||
|
|
||
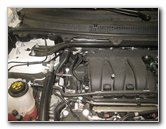
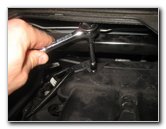
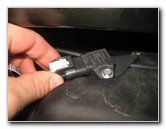
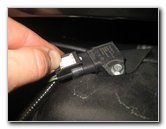
 MAP Sensor Location |
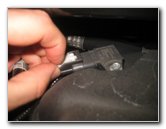 Slide Out Lock Tab |
 Disconnect Power Plug |
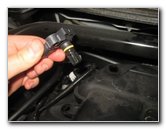
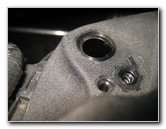
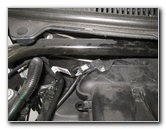
| On the newer Ford
Flex models with the naturally aspirated ("NA") Duratec 35 engines, the MAP
sensor is located on the rear left corner of the manifold.
It is just below the strut tower brace and near the front passenger suspension assembly. Clean off the area around the sensor to help prevent from having debris fall down into the manifold. Slide out the white plastic locking tab to unlock the electrical connector. Push in the release tab before sliding the power plug straight off the base of the old sensor. |
||
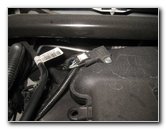
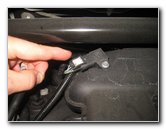
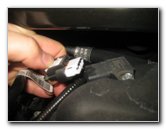
 Loosen Counterclockwise |
 |
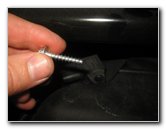 Single Screw Removed |
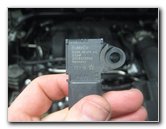
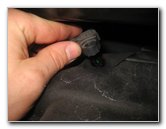
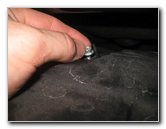
| On the newer
models, there is only one screw holding the MAP sensor to the intake
manifold. (Older Flex models have two screws on the MAP sensor.) Loosen the screw by turning it in the counterclockwise direction with a 7mm socket and a 1/4" drive ratchet. Set the screw aside in a safe place. |
||
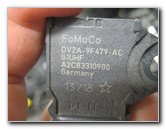
 Pull Out Old MAP Sensor |
 DV2A-9F479-AC |
 Inspect Old Sensor |
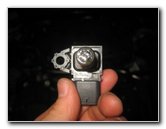
| Gently rotate the
old map sensor back and forth to loosen it. Then pull the old sensor straight out of the port. The OEM MAP sensor in this 2019 Ford Flex Limited AWD was marked as part number DV2A-9F479-AC which is also known as Motorcraft CX2526. The earlier 2009 to 2015 models are equipped with the Motorcraft CX2228 (or CX-2228) which is also known as FoMoCo part number AA52-9F479-A (AA529F479A). Flex models with the EcoBoost 3.5L V6 turbo engine require the three bar Motorcraft CX2231 (or CX-2231) which is FoMoCo part number AA5Z-9F479-B (AA5Z9F479B or AA5Z-9F479-AB). |
||
|
|
||
 FoMoCo Two Bar Sensor |
 Motorcraft CX2526 |
 MAP Sensor Port |
| If you would like to try cleaning the old MAP sensor, only use an electric parts cleaner such as CRC Electronic Cleaner spray. | ||
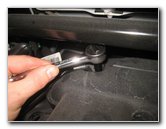
 Install New Sensor |
 Spin In Single Bolt |
 Tighten Clockwise |
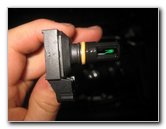
| Push the new sensor
into the port.
Line up the bolt hole in the sensor with the hole in the manifold. Spin in the screw a few turns by hand in the clockwise direction to help prevent it from becoming cross threaded. Tighten the screw in the clockwise direction with the 7mm socket and a 1/4" drive ratchet. (The earlier model years have two screws to secure the MAP sensor in place.) |
||
 Push In Power Plug |
 Slide In White Lock Tab |
 MAP Sensor Replaced |
| Slide the power
plug straight into the socket on the new sensor. You should feel or hear it "click" securely into place. Slide in the white plastic lock tab to secure the connector in place. Use your OBD2 scan tool to clear any trouble codes. Start the engine and take the SUV for a test drive to see if the MAP sensor related DTC code re-appears. Be sure to record the sensor change in your vehicle's service records. Please
check out all of my
Ford Flex DIY Repair & Maintenance Guides. |
||
| If you found this guide to be helpful,
please consider making a small donation by clicking on the PayPal.com
"Donate" button located to the right of this paragraph. Thank you!
(Note: I am not a registered charity. Donations are not tax deductible.) |