
Ford Escape
License Plate Light Bulbs Replacement Guide
How to replace the two license plate
light bulbs on a 2nd generation 2008-2012 Ford Escape with picture illustrated
steps.

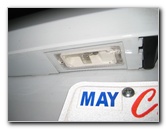 Escape License Plate Light |
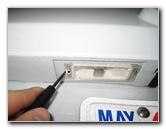 Press Release Tab |
 Pull Down Light Housing |
| This
automotive "how-to" guide was specifically written to assist owners
of the second generation (2008, 2009, 2010, 2011, & 2012) Ford
Escape SUV in replacing a burnt out license plate light bulb or
upgrading them both to brighter LED units. Owners of other Ford, Lincoln, Mercury or related Mazda SUV, crossover, or hatchback vehicles such as the Edge, Explorer, C-Max, Expedition, E-150, E-350 Wagon, Flex, Transit Connect, MKX, MKT, Mariner, Mountaineer, Navigator, and Mazda Tribute may also find these DIY instructions to be helpful. Replacement license plate light bulbs are part # 168 from manufacturers such as Sylvania, PIAA, GE and Eiko. If you would like to have brighter license plate lights, install some compatible 168 LED bulbs. The only tool needed to replace the bulbs is a small flathead screwdriver or a plastic pry bar tool. |
||
|
|
||
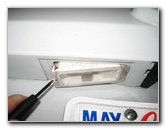
 Bulb Housing Removed |
 1/4 Turn Counter Clockwise |
 Pull Bulb Straight Out |
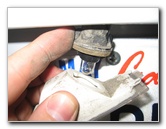
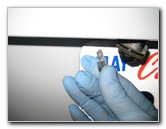
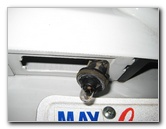
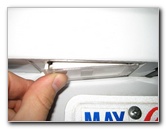
| Insert the blade of
the flathead screwdriver into the outer edge of the license plate light bulb
housing. Gently press the release tab in towards the center of the vehicle and pry down the housing. Rotate the black plastic light bulb socket 1/4 turn counter clockwise and remove it from the housing. |
||
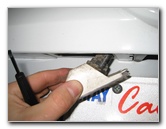
 License Bulb Socket |
 Push In New # 168 Bulb |
 New Bulb Installed |
|
|
||
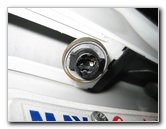
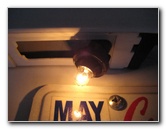
| Pull the old bulb
straight out of the socket and push in a new #
168 bulb. If necessary, you can also use any other miniature wedge base bulbs such as the number 158, W5W, 2825, 194 or a compatible LED unit. If you have trouble removing the old bulb, try putting on a latex glove to give your fingers some more grip. |
||
 Press Fob - Test Bulb |
 1/4 Turn Clockwise |
 Insert Wires First |
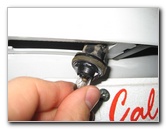
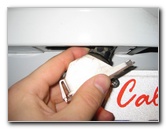
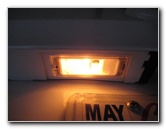
| Test the new
license plate light bulb by pressing the lock or unlock buttons on the key
fob or by turning on the headlights. Insert the power wires and bulb socket back in to the underside of the tailgate door first and then pop the other side in to place. |
||
 Snap Housing In Liftgate |
 Bulb Housing Replaced |
 New License Bulb Working |
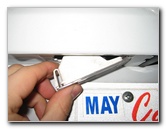
| Test the new bulb
again once the housing has been re-installed. For more, please check out my
other
Ford Escape Repair & Maintenance Guides. |
||
| If you found this guide to be helpful,
please consider making a small donation by clicking on the PayPal.com
"Donate" button located to the right of this paragraph. Thank you!
(Note: I am not a registered charity. Donations are not tax deductible.) |