
Acura MDX Rear Wiper Arm
Replacement Guide
How to change the rear window wiper arm
and blade assembly on a 1st generation 2001 to 2006 Acura MDX SUV.

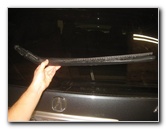
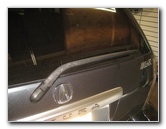 2006 MDX Rear Wiper Arm |
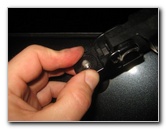
 Plastic Cover On Base |
 Gently Pull Off Base Cap |
| This
automotive maintenance tutorial was specifically created to assist
owners of the first generation (2001, 2002, 2003, 2004, 2005 & 2006)
Acura MDX in changing the entire rear window wiper arm and rubber
wiper blade assembly. Owners of other Acura or Honda vehicles such as the RDX, ILX, TLX, RLX, TL, CL, RSX, RL, TSX, ZDX, NSX, Integra, Pilot, Accord, Civic, Fit, Clarity, CR-V, CR-Z, HR-V, Odyssey, Element and Ridgeline may also find these DIY instructions to be helpful. The OEM part number for the complete rear window wiper arm and wiper blade assembly is Acura 76740-S3V-A04. The tools needed to remove the old wiper arm include a 10mm socket and a 1/4" drive ratchet. You may also need some penetrating oil spray and a rubber mallet to loosen the old wiper arm from a rusted mounting bolt. |
||
|
|
||
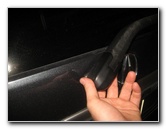
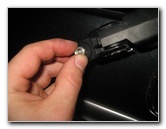
 Base Cap Removed |
 Metal 10mm Nut |
 Loosen Counterclockwise |
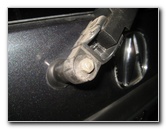
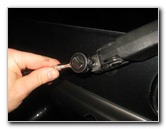
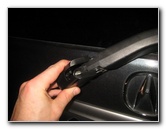
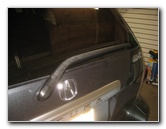
| The first step is
to gently pull the black plastic cover off the base of the wiper arm just to
the left of the Acura logo on the tailgate door. Set the base cap aside in a safe place. Loosen the single nut on the base of the wiper arm by turning it counterclockwise with a 10mm socket and a 1/4" drive ratchet. |
||
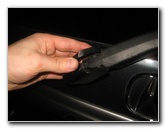
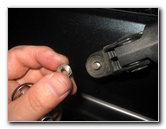 10mm Nut Removed |
 Spray PB Blaster Oil |
 Gently Tap Bolt End |
| Try to carefully
pull the wiper arm off its mounting bolt on the tailgate. It will most likely be stuck to the mounting bolt by some corrosion (rust) from years of being exposed to rain and snow. Spray some penetrating oil such as PB Blaster, Liquid Wrench, Kano Kroil or WD-40 on to the exposed bolt end. Hold a paper towel under the base of the wiper arm to protect the paint and glass from the spray. Allow the penetrating oil to work its way into the threads for at least five to ten minutes. You may also choose to gently tap on the bolt with a rubber mallet to help loosen the wiper arm from the corroded threads. |
||
|
|
||
 Pull Wiper Arm Off Stud |
 Old Wiper Arm Removed |
 Line Up New Wiper Arm |
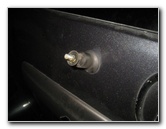
| Once again,
carefully pull the wiper arm away from the tailgate. If necessary, you could also gently move the wiper arm up (towards the top of the window) and slightly down (towards the license plate) to loosen it from the threads. If you have a wire brush, gently clean off any rust or debris from the splines on the mount or the threads on the bolt end. |
||
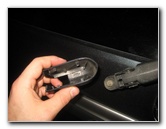
 Push Wiper Arm On Bolt |
 Spin On 10mm Nut |
 Tighten Clockwise |
| Line up the new
wiper arm assembly with the rubber wiper blade orientated parallel to the
bottom edge of the back window. Carefully push the base of the new wiper arm over the threaded bolt and on to the splines. If the wiper blade holder does not look parallel (lined up with) the bottom of the window, pull it off and try to push it on again. The wiper arm should not be touching the painted metal tailgate panel or rest more than about an inch above the bottom edge of the glass. Spin on the 10mm nut a few turns by hand in the clockwise direction to prevent it from becoming cross threaded. Tighten the 10mm nut with the socket and 1/4" drive ratchet until it is snug. Avoid over tightening the nut to prevent from stripping the threads or damaging the base of the metal wiper arm. |
||
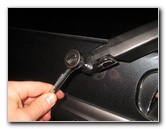
 Line Up Plastic Cover |
 Pop Base Cap In Place |
 Wiper Arm Replaced |
| Line up the plastic
cover over the base of the wiper arm. Gently snap the base cap back into place. For the best wiper performance, thoroughly clean off the back window and apply a glass treatment product that will repel water such as Rain-X. If you would like to just replace the insert, here is the Acura MDX Rear Wiper Blade Rubber Refill Installation Guide. For more,
please check out all of my
2001-2006 Acura MDX DIY Repair & Maintenance Guides. |
||
| If you found this guide to be helpful,
please consider making a small donation by clicking on the PayPal.com
"Donate" button located to the right of this paragraph. Thank you!
(Note: I am not a registered charity. Donations are not tax deductible.) |