
Kia Sportage
Rear Turn Signal & Reverse Light Bulbs Replacement Guide
How to change a burnt out rear turn
signal or reverse light bulb in a 4th generation 2017 to 2022 Kia Sportage SUV.

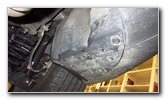
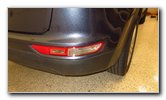 2018 Sportage Rear Bumper |
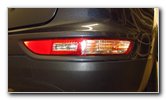 Rear Turn Signal & Reverse |
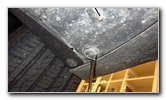
 Look Under Bumper Cover |
| This automotive
maintenance tutorial was specifically written to assist owners of the fourth
generation (2017, 2018, 2019 and maybe also the updated 2020, 2021 and
2022) Kia Sportage SUV in changing a burnt out rear turn signal or reverse
(or "back-up") light bulb located in the separate housing attached to the
lower part of the back bumper cover. Owners of other Kia, Hyundai and Genesis vehicles such as the Niro, Optima, Soul, Forte, Rio, Stinger, Cadenza, K900, Sorento, Telluride, Sedona, Kona, Santa Fe, Tucson, Elantra, Sonata, Accent, Rondo, Carens, Veloster, Ioniq, Nexo, Palisade, G70, G80 and G90 may also find these DIY instructions to be helpful. The compatible replacement bayonet style light bulb part numbers are as follows: Rear Turn Signal # 1156A or 1156NA and Reverse Light # P21W. If you would like to have brighter tail lights, install some 1156A LED bulbs for the rear turn signals and P21W LED bulbs for the reverse lights. The only tool needed to access the sockets and replace the bulbs is a small flathead screwdriver or a plastic pry bar tool. The first two steps are to move to the side of the SUV with the burnt out bulb and then look under the bumper cover. |
||
|
|
||
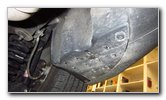
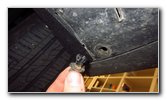
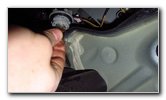
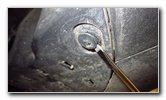 Pry Out Center of Fastener |
 Remove Pop Rivet |
 Pry Up Middle Button |
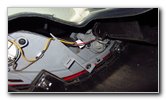
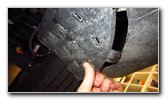
| Locate the two
round black plastic pop rivet fasteners on the curved access cover. Pry out the smaller round button in the center of the pop rivet with the flathead screwdriver or a plastic pry bar tool. Then pry out the base of the fastener to remove it. |
||
 Pull Out 2nd Pop Rivet |
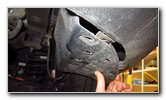 Open Plastic Access Cover |
 Outer Edge - Turn Signal |
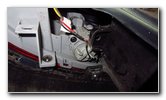
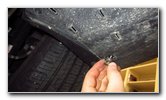
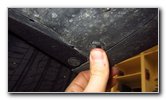
| The repeat the
process to remove the second pop rivet. Set the two fasteners aside in a safe place. Carefully pull open the access cover. |
||
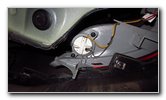
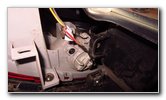
 Inner Edge - Reverse Light |
 Grey Socket - Reverse |
 White Socket - Rear Turn |
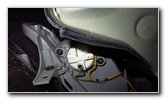
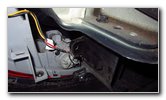
| The white plastic
socket closer to the outer edge of the housing contains the rear turn signal
light bulb. The grey plastic socket located near the inner edge of the housing closer to the center of the SUV contains the reverse light bulb. |
||
 1/4 Turn Counterclockwise |
 Bulb Socket Removed |
 Push Down & 1/4 Turn CC |
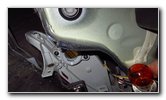
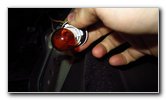
| Grasp the white
bulb socket and rotate it 1/4 turn in the counterclockwise direction before
pulling it straight out of the housing. To remove the bayonet style rear turn signal light bulb from the socket, push it down into the socket and twist it 1/4 turn in the counterclockwise direction before pulling it straight out. The original OEM rear turn signal bulb was marked as part number KHA12V27W 1156. |
||
 Install New Light Bulb |
 1/4 Turn Clockwise - Lock |
 Turn Signal Replaced |
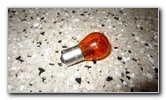
| Install a new amber
colored number 1156A or
1156NA light bulb into the socket
by pushing it down and twisting it 1/4 turn in the clockwise direction to
secure it into place. If you would like to have brighter rear turn signal light bulbs that will also last a lot longer, install some compatible replacement 1156A LED bulbs. Re-insert the bulb socket into the housing and rotate it 1/4 turn in the clockwise direction to secure it into place. |
||
|
|
||
 1/4 Turn Counterclockwise |
 Old Reverse Light Bulb |
 Push In & 1/4 Turn Cl. |
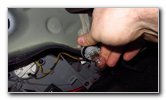
| Remove the grey
plastic reverse bulb socket by rotating it 1/4 turn in the counterclockwise
direction before pulling it straight out of the housing. Push the old bulb down into the socket and twist it 1/4 turn in the counterclockwise direction before pulling it straight out. The original OEM reverse light bulb was marked as part number KHA12V21W P21W E11. Push a new number P21W light bulb down into the socket and rotate it 1/4 turn in the clockwise direction to secure it into place. If you would like to have brighter reverse lights for extra safety, install some compatible P21W LED bulbs. |
||
 Replace Bulb Socket |
 Two Plastic Pop Rivets |
 Re-Insert Plastic Tabs |
| Re-insert the bulb
socket into the opening in the assembly and rotate it 1/4 turn in the
clockwise direction to secure it into place. Swing the access cover closed and re-insert the plastic tabs into the bottom part of the rear bumper cover. |
||
 Push In Plastic Pop Rivets |
 Push In Center To Secure |
 Replace 2nd Pop Rivet |
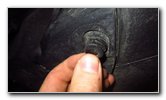
| Make sure the
smaller pin in the center of the pop rivets are raised up out of the
fastener in the "released" position. Push the two pop rivets into place to secure the access cover. |
||
 Access Cover Secured |
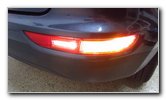 Test New Light Bulbs |
 Turn Signal & Reverse |
| Push in the smaller
round center pins to lock the fasteners in place. To test the new light bulbs, have an assistant step on the brake pedal, activate the hazard signals and place the transmission in reverse. Be sure to record the bulb change in your vehicle's service records. Please check out all of my
2017-2022 Kia Sportage DIY Repair & Maintenance Guides. |
||
| If you found this guide to be helpful,
please consider making a small donation by clicking on the PayPal.com
"Donate" button located to the right of this paragraph. Thank you!
(Note: I am not a registered charity. Donations are not tax deductible.) |