
Honda Civic
PCV Valve Replacement Guide
How to check or change the positive
crankcase ventilation valve in a 10th generation 2016 to 2019 Honda Civic.

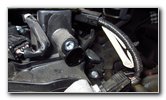
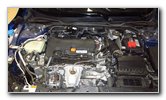 2016 Civic 2.0L I4 Engine |
 Right (Driver) Side |
 PCV Valve Location |
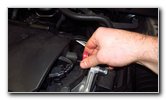
| This automotive
maintenance tutorial was specifically written to assist owners of the tenth
generation 2016, 2017, 2018 and 2019 Honda Civic in checking, cleaning or changing
the PCV (positive crankcase ventilation) valve in the Earth Dreams K20C2 2.0
liter inline four cylinder engine. (The procedure might be similar for the
turbocharged 1.5L I4 engine.) A few symptoms of a clogged, stuck or faulty PCV valve include increased fuel consumption (lower fuel economy / less MPG), hesitation, stalling, backfiring, oil leaks, surging, a rough idle, difficulty starting and possibly also a CEL / SES (check engine light or service engine soon) warning on the gauge cluster's LCD display screen. Owners of other Honda or Acura vehicles such as the Accord, Insight, Clarity, Fit, HR-V, CR-V, Pilot, Passport, Odyssey, Ridgeline, ILX, MDX, RDX, NSX, RLX and TLX may also find these DIY instructions to be helpful. The OEM (original equipment manufacture) PCV valve in this 2016 Civic was part number Honda 17130-5A2-A01. A compatible replacement aftermarket valve is part number Standard Motor Products V567. The only tool needed to remove and replace the valve is a 10mm socket with a 1/4" drive ratchet or a 10mm wrench. The first two steps are to open the hood and then move to the right (driver) side of the engine bay. The PCV valve is situated at the right rear corner of the engine near the cowl and windshield. It is close to the right most ignition coil electrical connector and just below the right rear corner of the black plastic engine cover. The exposed part of the old valve is red plastic. |
||
|
|
||
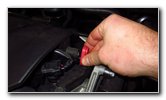
 Loosen Counterclockwise |
 Spin Out Silver Metal Bolt |
 Silver Bolt Removed |
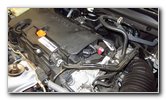
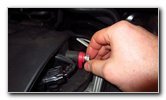
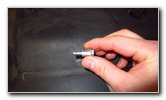
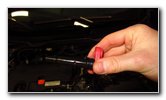
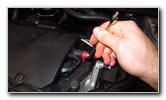
| Loosen the single
silver metal bolt by turning it in the counterclockwise direction with a
10mm socket and a 1/4" drive ratchet or a 10mm wrench. Once the bolt is loose, spin it out the rest of the way by hand to help prevent it from falling down into the engine bay and becoming lost. Set the bolt aside in a safe place. |
||
 Pull Out Old PCV Valve |
 Inspect Old Valve |
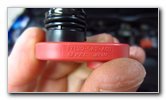 Part # 17130-5A2-A01 |
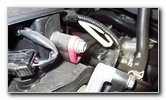
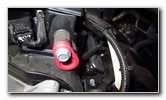
| Carefully pull the
old valve straight out of the engine.
You may need to rotate the old valve back and forth a few times to loosen it. The valve might feel stuck in place due to a build-up of sludge, oil, grease or carbon deposits. The OEM valve in this 2016 Civic was part number Honda 17130-5A2-A01. Inspect the old valve for any damage or excessive build-up of sludge. To test the old valve, vigorously shake it back and forth. If you hear a "healthy" sounding rattling sound similar to a spray paint can, the valve is probably still in working condition. Check the black rubber o-ring washer (also known as a "gasket" or "grommet") on the old valve for damage. If the rubber o-ring is broken, damaged or missing and you think the old valve is still good, just replace the gasket. The part number for the rubber o-ring washer on the OEM PCV valve is Honda 91308-RCA-A01. If your car has been driven at least 30,000 miles with lots of city stop-and-go driving, it would be good preventative maintenance to replace it. If you drive your Civic mostly on the highway, it could be possible to avoid replacing the valve until about 60,000 to 80,000 miles. Since a new valve is relatively inexpensive, I would recommend replacing it after driving 30K to 60K miles even just for the possibility of increased fuel economy (higher MPG). |
||
 Valve Port (Opening) |
 Install New PCV Valve |
 Line Up Bolt Holes |
| If you would like
to try cleaning the old valve before buying a new one, you can spray it with
some MAF cleaner, throttle body cleaner, engine degreaser or
carburetor cleaner (also known as
"carb cleaner") to dissolve the grease, oil and sludge. Be sure to dry off the excess cleaning spray from the valve before re-installing it. To install the new (or cleaned) valve, slide it straight into the port on the right rear edge of the engine. Line up the bolt hole in the new valve with the corresponding bolt hole in the engine. |
||
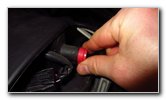
 Spin In Bolt By Hand |
 Tighten Clockwise Direction |
 New Valve Installed |
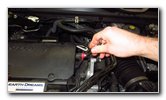
| Spin in the bolt a
few turns by hand in the clockwise direction to make sure it doesn't become
cross threaded. Tighten the bolt in the clockwise direction with the 10mm wrench or a 10mm socket with a 1/4" drive ratchet until it is snug. Try to avoid over tightening the bolt to prevent from cracking the plastic valve housing. Double check that the bolt is secure. Be sure to write down the valve change in your vehicle's service records. Please
check out all of my
2016-2019 Honda Civic DIY Repair & Maintenance Guides. |
||
| If you found this guide to be helpful,
please consider making a small donation by clicking on the PayPal.com
"Donate" button located to the right of this paragraph. Thank you!
(Note: I am not a registered charity. Donations are not tax deductible.) |