
Dodge Grand
Caravan 3.6L V6 Engine Oil Change Guide
How to change the motor oil and replace
the filter in a 2011-2014 Dodge Grand Caravan with the Pentastar 3.6L V6 engine.

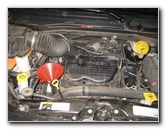
 2013 Grand Caravan 3.6L |
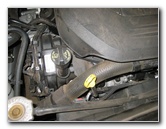 Oil Filler Cap & Dipstick |
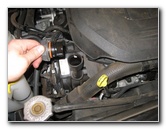 Twist Off Oil Filler Cap |
| This
automotive maintenance tutorial was specifically written to assist
owners of the revised or "refreshed" 5th generation 2011, 2012, 2013 & 2014 Dodge Grand Caravan in changing
the motor oil and replacing the cartridge style oil filter in the
Pentastar 3.6 liter V6 engine. Owners of other Chrysler Group vehicles equipped with the Pentastar 3.6L V6 such as the 200, 300, Dodge Avenger, Challenger, Charger, Durango, Town & Country, Journey, Jeep Grand Cherokee, Wrangler, Volkswagen Routan, Fiat Freemont, Lancia Voyager, Thema, Ram Cargo Van and RAM 1500 truck may also find these DIY instructions to be helpful. The items needed to complete this procedure include a floor jack, two jack stands, a 13mm socket with a 3/8" drive ratcheting wrench, a used oil catch container, a 24mm socket with a 1/2" drive ratcheting wrench, an automotive funnel, a new oil filter and 6 quarts (or 5.6L) of new SAE 5W-20 oil. |
||
|
|
||
A few compatible replacement cartridge style oil filters for the 2011, 2012 & 2013 model years with their part numbers are as follows: Purolator L36135, Fram CH10955, Wix 57526, Bosch 3335, Hastings LF656, Pennzoil PZ-180, Mahle OX 768D, Pentius PCB10955, ACDelco PF100G, Beck Arnley 041-0865, Ecogard X6135 and Valvoline # VO-110. The 2014 and possibly also the 2015 model years of the Dodge Grand Caravan with the updated Pentastar 3.6L V6 engine require different oil filters. The compatible filter part numbers are as follows: Fram CH11665, Mopar # 68191349AA (or "MO-349"), Wix # WL10010, Ecogard X10040 and Pentius PCBT4024.
If you have a newer 2014 or 2015 Grand Caravan, please buy one of the compatible filters listed above. |
||
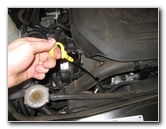 Pull Up Dipstick |
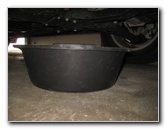
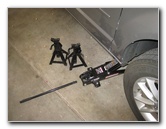
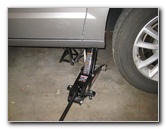 Raise Front Passenger Side |
 Black Metal Oil Pan |
| The first several
steps are to warm up the engine for a few minutes, park the minivan on a
level surface, and turn off the engine. Warming up the engine to near operating temperature will help suspend any contaminants within the old oil and also allow it to drain out more quickly.
Then twist off the oil filler cap in the counterclockwise direction and pull up the yellow handled engine oil level dipstick a few inches. Removing the filler cap and lifting up the dipstick will prevent a vacuum from forming and allow the old oil to drain out more quickly. Raise the front passenger side of the minivan with the floor jack and securely support it with two jack stands. |
||
 Oil Drain Bolt On Rear |
 Used Oil Catch Basin |
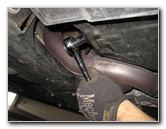 Remove Oil Drain Bolt |
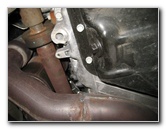
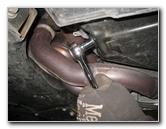
| Update - The
service manual recommends that you loosen or remove the oil filter cap
before draining the oil to allow the old oil from the oil filter cavity to
drain down to the sump. If you don't remove the oil filter cap before
draining the old oil, all of the old oil will not be removed from the
engine. Slide under the front passenger side of the engine bay with the 13mm socket, 3/8" drive ratcheting wrench and the used oil catch basin. The black metal oil drain bolt is located near the back edge of the black metal oil pan and the bolt head faces towards the rear of the vehicle.
Loosen the oil drain bolt by turning it counterclockwise with the 13mm socket and ratcheting wrench. |
||
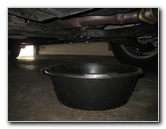
 Drain Out Old Oil |
 Replace Oil Drain Bolt |
 Round Plastic Filter Cap |
| Allow the old oil
to drain out for at least a few minutes or until the flow slows to an
occasional drip. If the drain bolt is equipped with a washer, inspect it and replace it with a new washer if necessary. Re-insert the drain bolt and spin it in a few turns in the clockwise direction by hand to prevent it from becoming cross threaded. Tighten the drain bolt by turning it clockwise with the 13mm socket and ratcheting wrench to just past hand tight or about 20 ft-lbs of torque. Do not over tighten the drain bolt to avoid damaging the aluminum threads which could lead to an oil leak. Double check that the oil drain bolt is tight before moving on to the next steps. |
||
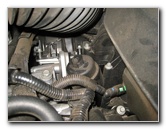
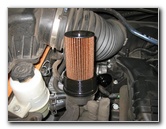
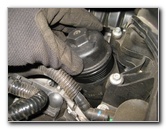
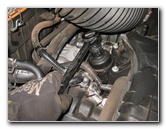
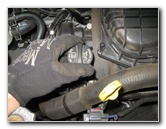
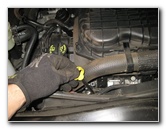
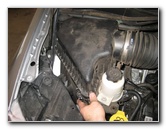
 Release Air Box Cover |
 Loosen Filter Cap With 24mm |
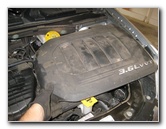 Lift Off Engine Cover |
| Lower the minivan
from the jack stands using the floor jack. Move to the engine bay and locate the round black plastic oil filter housing just below the rubber air intake hose on the left (passenger) side of the engine. To gain better access to the oil filter cap, release the three metal latches on the top half of the air box and lift it out of the way. You may also choose to pull off the plastic engine cover. Attach the 24mm socket to a 1/2" drive ratcheting wrench and loosen the oil filter cap by turning it in the counterclockwise direction. |
||
|
|
||
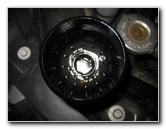
 Spin Out Old Filter |
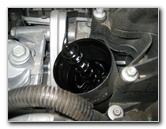 Remove Filter From Cap |
 Pry Off Old O-Ring Gasket |
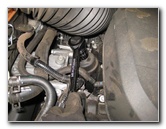
| Spin off the oil
filter cap and lift it out of the housing. Pull the old cartridge style oil filter out of the cap and discard it. Pry off the old rubber o-ring gasket from the oil filter cap and discard it. Install the new rubber o-ring on to the top of the threads on the oil filter cap. |
||
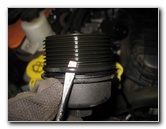
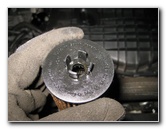 Tabs On Oil Filter |
 Socket In Filter Cap |
 Install New Cartridge Filter |
| Dip your pinky
finger in to some new SAE 5W-20 oil and lightly lubricate the rubber o-ring
on the filter cap.
Lubricating the o-ring will help it form a better seal and make the cap easier to remove during the next oil change. Push a new cartridge oil filter in to the cap until it clicks securely in to place. Lower the filter and cap down in to the housing and spin it in by hand a few turns in the clockwise direction to prevent it from becoming cross threaded. |
||
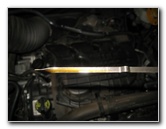
 Tighten Filter Housing |
 Lower Vehicle From Stands |
 Insert Automotive Funnel |
| Tighten the oil
filter cap to just past hand tight by turning it clockwise with the 24mm
socket and 1/2" drive ratcheting wrench. Do not over tighten the oil filter to prevent from cracking the plastic housing. |
||
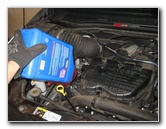 Pour In SAE 5W-20 Oil |
 Twist On Oil Filler Cap |
 Check Dipstick Oil Level |
| Insert the
automotive funnel in to the oil filler hole and only pour in about 5 to 5
and 1/2 quarts of new SAE 5W-20 oil.
The engine's total capacity for an oil change with filter replacement is 6 U.S. quarts (or 5.6 liters). It is far better to have slightly less oil than necessary in an engine than too much. Temporarily replace the oil filler cap and push down the dipstick. Run the engine for a few minutes, turn it off, and allow the oil to drain back down to the oil pan for at least 5 to 10 minutes. |
||
 Re-Insert Oil Dipstick |
 Replace Air Box Cover |
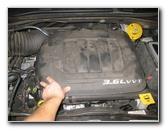 Push On Engine Cover |
| Check the oil level
on the dipstick and slowly pour in more oil while repeatedly checking the
level until it reaches at or just below the top of the crosshatched area. You may not need to pour in all 6 quarts of the engine's total capacity depending on how long you allowed the old oil to drain out. Twist on the oil filler cap in the clockwise direction to just past hand tight and replace the oil level dipstick. Replace the top half of the air filter box and secure the three metal latches. Be sure to record the oil change in your service records. It's also a good idea to check your driveway or garage during the next few days for drops of oil that may indicate a leak from the drain bolt or filter housing. To reset the "change oil" notification, follow these steps: 1. Turn the ignition switch to the "On/Run" position but do not start the engine. 2. Fully press down the gas pedal slowly three times within ten seconds. 3. Turn the ignition switch to the "Off" position. If your minivan (such as the Town & Country) has the Keyless "Enter-N-Go" system with the push button Start feature, follow these steps: 1. Press the "Start/Stop" button without pressing the brake pedal and do not start the engine. 2. Fully press down the gas pedal three times in 10 seconds. 3. With the brake pedal released, push the "Start/Stop" button once to turn off the vehicle. For more, check out my other
Dodge Grand Caravan DIY Maintenance Guides. |
||
| If you found this guide to be helpful,
please consider making a small donation by clicking on the PayPal.com
"Donate" button located to the right of this paragraph. Thank you!
(Note: I am not a registered charity. Donations are not tax deductible.) |